[Guide] T6.1 Fitting new wing badges

Pauly

Senior Member
VCDS User
Admin
Moderator
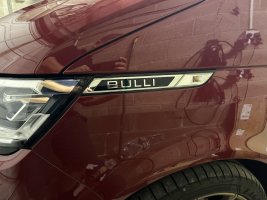
Since getting my new van and having the @BognorMotors gloss front end i couldnt help but feel the wing badges looked a little out of place

ROXO8818.JPG

These were the only bit of matt plastic around the front of the van so thought they needed to get gone so got myself a set of gloss black/chrome bulli badges

Now i like a little 'how to' thread so heres a quick run through
1 old.JPG

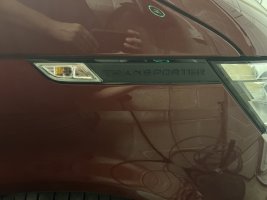
To remove the side repeaters you have to slide/press the light unit forwards towards the front of the van which allows the rear plastic 'hook' to unclip from the wing and the unit will come out
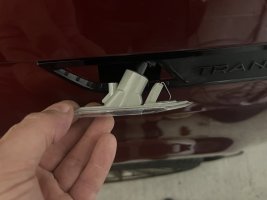
2 light removed.JPG

The electrical connector is locked in by the little grey tab on the plug
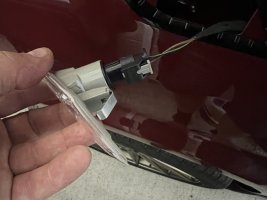
3 plug.JPG

Sliding it out will allow the plug to be removed
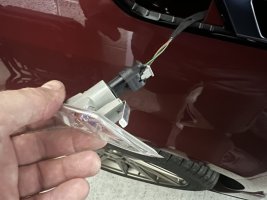
4 plug open.JPG

Now you can remove the old badges, they break very easily so if you want to retain them then you need to go all around and free up the edges before trying to pull it off and pay extra attention to the thin plastic area around the indicator, this needs to be freed up before trying to remove the badge or you will end up with this
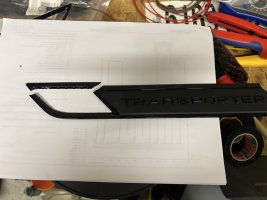
6 broken old.JPG

the adhesive pad will be left behind and this needs to be picked/pulled/rubbed away until you get some shiny paint on show
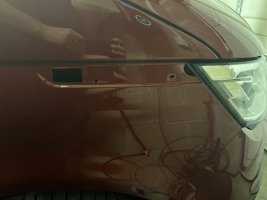
5 old removed.JPG

the badges have two locating pins on the rear so are very easy to fit
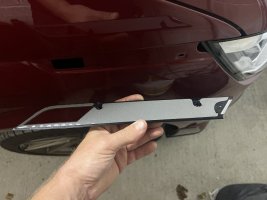
7 new.JPG

just line the pins up with the holes and on they go
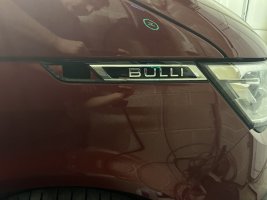
8 new fitted.JPG

i do like how the chrome in the LED headlight flows through into the badge
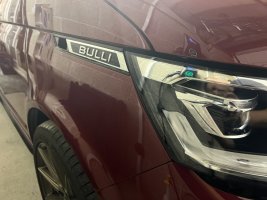
9 new left.JPG

and the other side

10 new right.JPG
 
There are a few different wing badges available so heres the part numbers

Chrome/gloss bulli badges as fitted above
7LA 853 675 Q DPJ
7LA 853 675 R DPJ

Chrome/gloss caravelle badges
7LA 853 675 J DPJ
7LA 853 675 K DPJ

Chrome/gloss california badges
7LA 853 675 L DPJ
7LA 853 675 M DPJ

Original satin black/black transporter badges
7LA 853 675 G BUS
7LA 853 675 H BUS
 
Oh, I like those, wonder if there will be someone selling them at Busfest.
 
Since getting my new van and having the @BognorMotors gloss front end i couldnt help but feel the wing badges looked a little out of place

View attachment 171390

These were the only bit of matt plastic around the front of the van so thought they needed to get gone so got myself a set of gloss black/chrome bulli badges

Now i like a little 'how to' thread so heres a quick run through

View attachment 171391

To remove the side repeaters you have to slide/press the light unit forwards towards the front of the van which allows the rear plastic 'hook' to unclip from the wing and the unit will come out

View attachment 171392

The electrical connector is locked in by the little grey tab on the plug

View attachment 171393

Sliding it out will allow the plug to be removed

View attachment 171394

Now you can remove the old badges, they break very easily so if you want to retain them then you need to go all around and free up the edges before trying to pull it off and pay extra attention to the thin plastic area around the indicator, this needs to be freed up before trying to remove the badge or you will end up with this

View attachment 171396

the adhesive pad will be left behind and this needs to be picked/pulled/rubbed away until you get some shiny paint on show

View attachment 171395

the badges have two locating pins on the rear so are very easy to fit

View attachment 171397

just line the pins up with the holes and on they go

View attachment 171398

i do like how the chrome in the LED headlight flows through into the badge

View attachment 171399

and the other side

View attachment 171400
Hi,
Can you fit these to a T6?
 
Brilliant post and guide, including how to be careful else snapping the badge. I was thinking of just painting the raised lettering in silver. I have a pen which I could use but suspect I will end up making a balls up ans needing to just buy a chrome one anyway
 
Nice tutorial :)
I came across it while looking for blank wing badges for my 2018 T6 nearly finished campervan, to have a custom inscription on it, instead of the standard “bulli/transporter/multivan/etc” label. Does anybody know if and where such a thing can be found?

I really like those but what is bulli??? (Excuse my ignorance!)
“Bulli” is a contraction of the German “Bus und Lieferwagen”, like a pet name. (In German, many terms are being contracted like this.)
Bus (“u” pronounced as in “full”) would mean a van for transportation of people, and Lieferwagen stands for a van for making deliveries (Liefern=to deliver). The contraction would be BuLi, but as its pronounciation was snappier, the second “L” was added (like “fully” instead of “fooly”). According to an article on the Belgian website camperland.be, VW wanted to register the trademark ”Bully” (with a “y”) for the T1, shortly after its presentation in 1949, but it appeared already taken. Nevertheless, “Bulli“ became widely used as the unofficial, popular name. In 2007 VW finally obtained the rights to the “Bulli” trademark. Now, the name “Bulli” could also officially be applied to all models in the series. Personally, I am glad that the originally devised name did not make it - I mean, I would not like to ride with a bully…
 
Nice tutorial :)
I came across it while looking for blank wing badges for my 2018 T6 nearly finished campervan, to have a custom inscription on it, instead of the standard “bulli/transporter/multivan/etc” label. Does anybody know if and where such a thing can be found?


“Bulli” is a contraction of the German “Bus und Lieferwagen”, like a pet name. (In German, many terms are being contracted like this.)
Bus (“u” pronounced as in “full”) would mean a van for transportation of people, and Lieferwagen stands for a van for making deliveries (Liefern=to deliver). The contraction would be BuLi, but as its pronounciation was snappier, the second “L” was added (like “fully” instead of “fooly”). According to an article on the Belgian website camperland.be, VW wanted to register the trademark ”Bully” (with a “y”) for the T1, shortly after its presentation in 1949, but it appeared already taken. Nevertheless, “Bulli“ became widely used as the unofficial, popular name. In 2007 VW finally obtained the rights to the “Bulli” trademark. Now, the name “Bulli” could also officially be applied to all models in the series. Personally, I am glad that the originally devised name did not make it - I mean, I would not like to ride with a bully…
New member to the page and German living in the UK, so I just simply want to say that the above explanation of Bulli is a thousand percent accurate :) Thank you
 
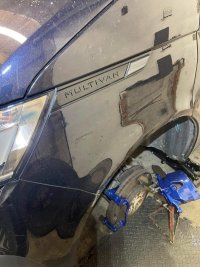
And don’t forget Multivan - they don’t come in gloss black these have been painted by some dude in Germany who won’t ship to the UK.

IMG_1785.jpeg
 
There are a few different wing badges available so heres the part numbers

Chrome/gloss bulli badges as fitted above
7LA 853 675 Q DPJ
7LA 853 675 R DPJ

Chrome/gloss caravelle badges
7LA 853 675 J DPJ
7LA 853 675 K DPJ

Chrome/gloss california badges
7LA 853 675 L DPJ
7LA 853 675 M DPJ

Original satin black/black transporter badges
7LA 853 675 G BUS
7LA 853 675 H BUS
Great info and thanks for the part numbers, gunna take mine off to get them spayed (just in case they break)

Can I ask where you got all the gloss black wing mirror surrounds ?
 
Since getting my new van and having the @BognorMotors gloss front end i couldnt help but feel the wing badges looked a little out of place

View attachment 171390

These were the only bit of matt plastic around the front of the van so thought they needed to get gone so got myself a set of gloss black/chrome bulli badges

Now i like a little 'how to' thread so heres a quick run through

View attachment 171391

To remove the side repeaters you have to slide/press the light unit forwards towards the front of the van which allows the rear plastic 'hook' to unclip from the wing and the unit will come out

View attachment 171392

The electrical connector is locked in by the little grey tab on the plug

View attachment 171393

Sliding it out will allow the plug to be removed

View attachment 171394

Now you can remove the old badges, they break very easily so if you want to retain them then you need to go all around and free up the edges before trying to pull it off and pay extra attention to the thin plastic area around the indicator, this needs to be freed up before trying to remove the badge or you will end up with this

View attachment 171396

the adhesive pad will be left behind and this needs to be picked/pulled/rubbed away until you get some shiny paint on show

View attachment 171395

the badges have two locating pins on the rear so are very easy to fit

View attachment 171397

just line the pins up with the holes and on they go

View attachment 171398

i do like how the chrome in the LED headlight flows through into the badge

View attachment 171399

and the other side

View attachment 171400
Great article thank you. Best way to remove the self adhesive gunk? My van has been resprayed and I am nervous about the quality of the paint!
 
Does anyone know where I could get replacement side repeaters for my t6.1 with custom words “Buzz”??
 
Back
Top