Highline overhead cubby-hole tray - 3D printed

Status
Not open for further replies.

Jono

Senior Member
T6 Pro
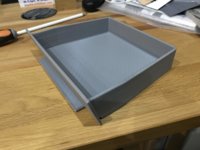
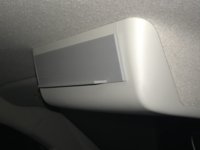
Right then, nailed it, after two prototypes. Here's my 3d printed cubby hole tray.

MK1 jammed half way in so i had to taper the sides and the tray top part.
MK2 fit well but the front face of the tray was at a slightly different angle to the hole and looked bad.
MK3 is cock on. It slides in well, the tapered groove on the bottom of the tray fits really well over the lip of the cubby hole and pulls the front in (due to the taper) and the front face is parallel with the face of the hole. It doesn't slide rattle or squeak in the slightest either which is also paramount for my sanity.

It's been a really good project to get me up to speed with the CAD system, the slicer software and the 3d printer. Today's first print of MK3 was printed on a coarse setting, almost twice as fast and still has a pretty good finish.

It's now filled with coffee vouchers from McD's a few business cards and other assorted bits and pieces. Job done.
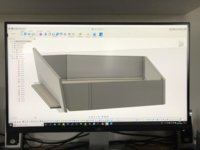
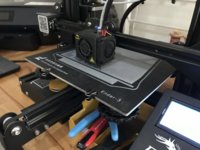
IMG_9834.jpg IMG_9835.jpg IMG_9848.jpg IMG_9847.jpg
 
Right then, nailed it, after two prototypes. Here's my 3d printed cubby hole tray.

MK1 jammed half way in so i had to taper the sides and the tray top part.
MK2 fit well but the front face of the tray was at a slightly different angle to the hole and looked bad.
MK3 is cock on. It slides in well, the tapered groove on the bottom of the tray fits really well over the lip of the cubby hole and pulls the front in (due to the taper) and the front face is parallel with the face of the hole. It doesn't slide rattle or squeak in the slightest either which is also paramount for my sanity.

It's been a really good project to get me up to speed with the CAD system, the slicer software and the 3d printer. Today's first print of MK3 was printed on a coarse setting, almost twice as fast and still has a pretty good finish.

It's now filled with coffee vouchers from McD's a few business cards and other assorted bits and pieces. Job done.
View attachment 54134 View attachment 54135 View attachment 54136 View attachment 54137
Very neat and tidy solution
 
Right then, nailed it, after two prototypes. Here's my 3d printed cubby hole tray.

MK1 jammed half way in so i had to taper the sides and the tray top part.
MK2 fit well but the front face of the tray was at a slightly different angle to the hole and looked bad.
MK3 is cock on. It slides in well, the tapered groove on the bottom of the tray fits really well over the lip of the cubby hole and pulls the front in (due to the taper) and the front face is parallel with the face of the hole. It doesn't slide rattle or squeak in the slightest either which is also paramount for my sanity.

It's been a really good project to get me up to speed with the CAD system, the slicer software and the 3d printer. Today's first print of MK3 was printed on a coarse setting, almost twice as fast and still has a pretty good finish.

It's now filled with coffee vouchers from McD's a few business cards and other assorted bits and pieces. Job done.
View attachment 54134 View attachment 54135 View attachment 54136 View attachment 54137
That’s brilliant, well done Sir!
 
So More importantly How much are you going to charge for 1??????
Ha! Thats an interesting question and I wondered if anyone would actually want one. Depending on the postage I think I could do them for about £12 each delivered. I could have a go at trying to find a slightly better colour match too.
 
Ok, cool, let's do it! I'll need to buy some black filament, probably for more than £12!, but there will be some left for me to print a few more or some other stuff. It's not about the money anyway as you can probably imagine? If you're serious i'll get some in and do one.
 
Ha! Thats an interesting question and I wondered if anyone would actually want one. Depending on the postage I think I could do them for about £12 each delivered. I could have a go at trying to find a slightly better colour match too.


I'll have one of those fella too please

Magic
 
Ill have a Black one and a grey one please !
See what looks best and possibly cover one ! Put the unused one back on here
 
I would like one in grey too.

If you are interested in designing other projects have you thought about a sun visor for the infotainment system. When the sun is shining in a particular direction it can be impossible to see the screen, a pain if the screen is also the satnav.

I made one myself so can upload a photo of mine but a 3d printed one would be far better
 
I love storage solutions for these vans.....because let's face it, sometimes you can have TOO much storage for some stuff and not enough for other stuff! I'd like to meet the person who designed the bog standard dash......if mine hadn't been a cancelled order, I'd have been all over the comfort dash like a tramp on chips! Being a caveman with sausage fingers, I'm okay with a sliding mitre saw, plywood and stretchy carpet.....but there comes a time when you neeeed to adopt a more 21st century approach ala @Jono! Come on guys......3d print me a comfort dash, eh! :thumbsup:
 
I would like one in grey too.

If you are interested in designing other projects have you thought about a sun visor for the infotainment system. When the sun is shining in a particular direction it can be impossible to see the screen, a pain if the screen is also the satnav.

I made one myself so can upload a photo of mine but a 3d printed one would be far better

I'll get the trays out of the way and have a think about the visor. May need some clues as you suggested...
 
Status
Not open for further replies.

Similar threads

Back
Top