LWB Shuttle roof lining removal

Merryman

Retired
VIP Member
T6 Guru
Hi,
I'm trying to remove the preformed roof lining in my 9 seat 2015 LWB Shuttle. So far have the B post pillar trims removed, all the lights are out. Rear bracket between the last posts presumably called the C posts. These post panels also removed. Still seems pretty solid up there, is it glued to the roof or are there some fixings I haven't found yet. Don't want to force it as soon as I put a crease in, then will be a sad day for the roof lining and me.
So, has anyone removed one of these and how?
Thanks in anticipation.
 
Have had a real good look now. Bought a set of electricians rods from Screwfix. Using the rods can go back of the van to the front quite easy, but has also shown how many fixing points there are. The bad news is that the lining is glued in place. Stuck to the heating duct and the reinforcing roof beams. So, everything back in and will put the solar panel on, access for the solar electrics through one of the light units. Then fit a window roof/vent. Lying on the Van King Mattress, gives about 25" of head space between the lining and the mattress. Meaning not a lot air for 2 adults sleeping without some sort of ventilation. Presumably why pop up roofs are so popular. After that the next job will be to sew the black out curtains up, reckon on velcro the side edges so nice and tight. Wire in the fog lights, and usb socket to the central dash panel, if I can find an easy live. Hide the camera wiring, and the sat nav wiring with another live feed. Time to find an Auto Electrician. Anyone know of one in the mid Norfolk area?
 
The roof lining is not bonded in place - the vents etc are part of the lining. It does have clips through the middle and I think I just stuck my arm up there and pulled it.
 
Well, with JB's , encouragement went for it. In the end 3 plastic clips holding the roof in place, each clip dead centre of the cross beams, plus the one where the bulkhead would be. Insert your hands into the vent holes, either side, and just keep pulling. At one point my whole weight 109KG was just hanging on. It should be a 2 man job, however folding the seats down gives you enough clearance. So drilled through the roof for the solar panel. Just sealed the cover in, when it poured down. So cracked on with insulation between the crossbeams. Now running the electrics down the N/S B post, under the carpet, with the double seat removed, and the electrician comes tomorrow. If anyone is looking for a Sparky in Norwich I'll pass his par's on.
 
At 109KG I should be 6'5, then I wouldn't have got inside in the first place.The zero carbs is bringing it down. But haven't been 11 stone 12, since I was 12. Which is what the recommended weight ratio is.
Nothing to do with the head lining of course, just chatting.
 
Now you’ve seen behind the roof panel did you notice if there were any electrics or air control/divertet valves up there behind the lining? My Shuttle only blows air out of the side demister vents, but I don’t know where to look to find what control piece is not working to divert the airflow.
 
Now you’ve seen behind the roof panel did you notice if there were any electrics or air control/divertet valves up there behind the lining? My Shuttle only blows air out of the side demister vents, but I don’t know where to look to find what control piece is not working to divert the airflow.
The heater box has two outlets which have motorised flaps built into it. One of those goes to the side panel and the other up to the roof. At the roof, built in to the roof lining, right at the back is a motorised diverter valve which flips between two channels built into the head lining. If you are getting nothing up top at all then I would look at the heater unit itself.
 
At 109KG I should be 6'5, then I wouldn't have got inside in the first place.The zero carbs is bringing it down. But haven't been 11 stone 12, since I was 12. Which is what the recommended weight ratio is.
Nothing to do with the head lining of course, just chatting.
Good luck getting it down, I share your challenge....
 
The heater box has two outlets which have motorised flaps built into it. One of those goes to the side panel and the other up to the roof. At the roof, built in to the roof lining, right at the back is a motorised diverter valve which flips between two channels built into the head lining. If you are getting nothing up top at all then I would look at the heater unit itself.
I get airflow up top on both rows or air vents but only out through the side vents which direct at the windows. The larger vents which can swivel and close off have no airflow at all. I’ve opened up the heater box at the back and can see the two motorised arms operate so that bit is ok, it must be the diverter valve in the headlining but I didn’t know where it was until you mentioned it. Do you know how to get to it, can you reach it by popping the d pillar trim off or is it a headliner down job?
 
Never thought about air flow. Have never been in the back and tested the airflow so am pretty useless as to Broadside's quest. I do know the electrics above the front mirror don't work, so haven't pursued the airflow, having too much other stuff.

If you are taking the roof panel down, here is how I would go about it again. Best with 2 people.
With right size star socket 25 I think, and small electricians screw driver, pop off the covers over the grab handles and unscrew. Remove all pillar post trims. You will break a few clips, so best order a pack of at least 10 maybe for 20. Panel removal kit is better than screwdrivers.
Unclip the foam heater piping in the rear offside post.
Then remove the light units, with a broad plastic slim tool. This where your mate is handy, holding the unit while you unclip the electrics.
Time for the courageous bit, two hands in the vents you and with your buddy and really pull that roof down.
Electrics run down both roof sides, and there is a lot of it.
 
I get airflow up top on both rows or air vents but only out through the side vents which direct at the windows. The larger vents which can swivel and close off have no airflow at all. I’ve opened up the heater box at the back and can see the two motorised arms operate so that bit is ok, it must be the diverter valve in the headlining but I didn’t know where it was until you mentioned it. Do you know how to get to it, can you reach it by popping the d pillar trim off or is it a headliner down job?
The valve motor is screwed into the top of the headlining in the back RH corner so you will need to pull it down. Whether you can flex it enough to do the job without removing the whole thing I don't know.
 
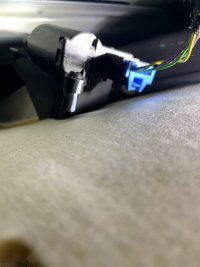
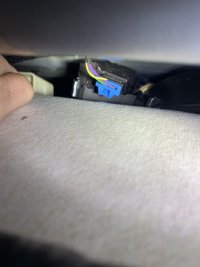
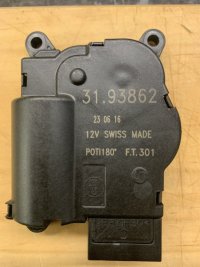
This seems to be the valve motor, difficult to get a decent photo of it. I think you would need to drop the headliner or at least part of it to swap out. Can’t see a part number on it but it has the following printed on it.


31 93862
230616 (presumably the date of manufacture)
12v Swiss made
POT1180 ft301

Does anyone know where or how to get a replacement part? I can occasionally feel it operate when the buttons on the control panel are pushed but it doesn’t operate much which is probably why the air doesn’t redirect properly.

4A8FBA29-6273-4C90-B2FF-0E79C483324A.jpeg

F67DF1C0-1723-4E46-A99C-1E582EB47AD9.jpeg
 
I'm going to hazard a guess and say that is likely to be a VW only part given it's limited use. There is a Facebook group just for Shuttles so it may be worth posting a wanted on there - seems a lot of people rip their heaters out - might get a 2nd hand one.
 
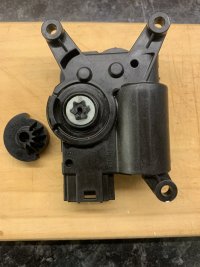
I managed to get the part out, the gear has sheared off the motor. The motor still operates but not very much (about 20 degrees rather than the 180 degrees needed) so I think it must be damaged.

There is a spring loaded flap in the headliner that can be operated by finger tips, pulling on it diverts the air out through the main vents but when you let go it springs back. I’m tempted to wedge it in position somehow but will see if I can find a replacement motor first.

1DD2585A-23B9-4729-806B-93357894606F.jpeg

DDF88816-D47C-4CA3-92F3-FD87EA04B740.jpeg
 
Last edited:
Back
Top