I am posting this on here as I am hoping it may help others. I am no expert in this at all quite the opposite. I only got into this about 12 months ago as my neighbour converted a T5 and it looked amazing. I was hooked ! I sold my Ranger Rover and decided to embark on this project. I learned a lot of lessons along the way (good and bad) and made some mistakes naturally and I am still a newbie and still learning from all the amazing support and suppliers from here on this forum. Hope you enjoy
1. After selling my ranger rover I thought (wrongly) finding a van would be easy, did I want to go down the path of buying a fully converted or did I want to go on a path of building one to my spec. Now when I say build I mean outsource to the relevant people. Last thing I was going to do was do this myself as it would not work out how I had visioned it in my mind. So I landed on with the wife we wanted to select how we wanted and styles so that directed me to locating a bog standard panel van. We initially set our sights on the Indium Grey van however we could not located them anyway. In fact locating any van with relevant quality, mileage and spec was so tough. In the end I had put my name down at various dealers to notify me when one come in. This started way back last September. In October I received a call from a VW dealer asking if was still looking, they had just had one come through as a demo van the only catch was it was Pure Grey. I said I would come and have a look. I loved the colour instantly, good spec T6.1 Highline and only 7K on the clock. Done deal! A week later as you can see it was sitting on my driveway the day I drove it home.
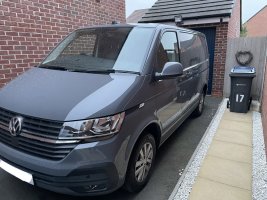
In my mind the first things I wanted to address modify was the outer look, feel and structure then work my way inside. Again could be totally wrong approach its just my approach to doing so. Having took advice from on this forum and lengthly and extremely helpful chat with Steve I decided to go to Steve @CRS Performance for some new coil overs to be fitted and alloy wheels. I landed on the Velare alloy wheels and Steve provided a fantastic Service for coil overs, lowering, Alloys and tyres. The nice touch I had collecting this was the slightly larger wheels on the back which personally I really like.
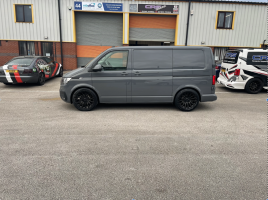
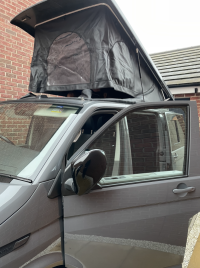
Next up was the big one the Pop Top I may have been over thinking this but I read so much on all the different pop tops and pro's and con's and again I could be wrong but I decided to go for the Skyline Auroa pop top and have it match the paint work. I also had the bi fold bed and another reason I moved for it was they had an offer on bi-fold bed and scenic roof so I took this to Cosmic Campers and again were super helpful and supportive. Whilst I was there I decided to move forward with them also doing the insulation work, Rear windows & Carpeting and lights just in the top part and stalk light in the pop top - I was really caught about letting them do this but now looking back it was the right move rather than ripping things off come conversion. After a weeks work this is the day I had picked dit up - apologies for crap photo.
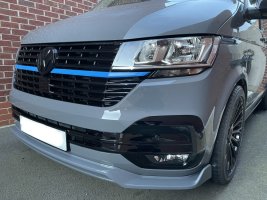
The next thing for me was getting the gloss black bumpers and grills and dog bones at the bottom - I could really see it starting to take shape now and transitioning. I loved the blue strip and wanted to add blue as a theme through my van so the grill stripe kicked that off.
Again not a necessaity however I wanted the callipers painting blue to match the stripe and thought if I don't do it now when will I do it, so a local guy come to my home to do it o the drive and he was amazing, matched the blue and coated them in candy coat to give them a glittery finish. A small detail but really pleased with this.
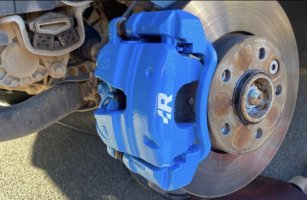
Calliper look with Alloy in front
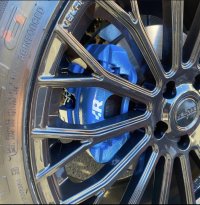
At this point I was happy with the outer look and feel and I wanted a few additional mods such as headlights and barn door lights but these were not available so I pre-ordered and started work on the inside (well I didn't my convertor did) At this post for timeline this was March of this year. First job was the big electrical fix and linking in the other electric in the roof I had previously done. Does look much but I wouldn't have a clue with all this !! Also the Altro floor had been fitted again I had pike out the blue fleck to carry on the theme with the van which I must admit looks great now its all come together.
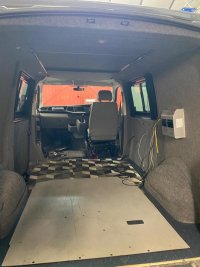
More shots of the electric work
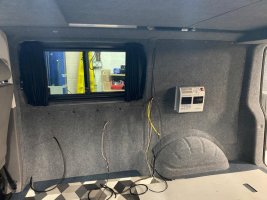
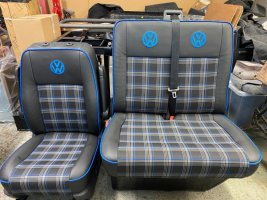
This was a big decision moment with the wife that had conflicting views, do we get the seats upholstered or not. I wanted them as I felt we would of regretted it if we didn't but my wife said it was expensive and felt no reason to do so. I said I agree with you and it was to expensive and decided to move on and just not tell her (face the pain later on! lol) Again I wanted to pick out the blue and now it was the best decision I made I am so glad I had these and the RIB Bed covered the same. Again its the details but appreciate its not everyone's cup of tea. Another big moment for us was the whole bed situation Rock N Roll or RIB and again its preference and cost, we went to may shows and sat, lay etc on them to see what worked for us. We landed on the RIB 113 (I think) which also added some additional cost challenges on the internal conversion - below is the photo I was sent after front seats come back
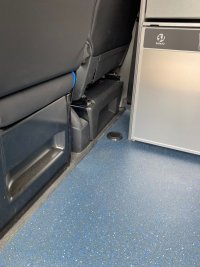
We also had the Planar heated fitted with Modem (this is a pain in the back side the modem is temperamental and was a bit of back and forth but now its working) the technology could be so much better with this but hey ho its working now. We had to have the vent fitted in this space due to space, the oven being fitted and the leisure battery under the driver seat.
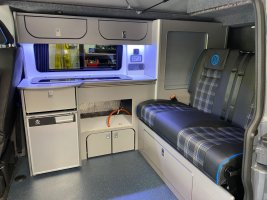
The interior kit out first fit with RIB bed in. The oven I missing on this shot as it hadn't arrived yet. We had a right game with boards and colours for the furtniture due to stock and availability but we got there in the end.
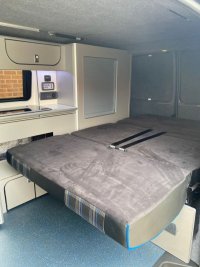
Some with the RIB bed out for you
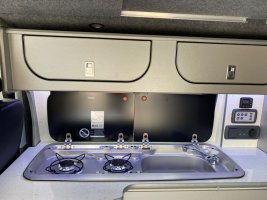
The kitchen area
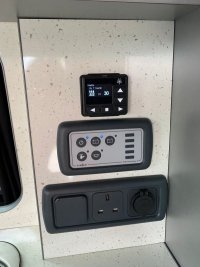
The control panel to the heater & Van and I now have a internet plummet into the van also for iPad TV and kids iPads. That works so well
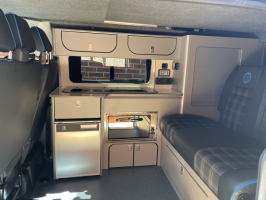
A full shot of the kitchen area now including the oven now although this arrived damaged and needs to be swapped out when a new one lands (god knows when that will be). Another addition was the iPad cracked on the rear of the seats and you can see the wifi panel on the Side of the cupboard now
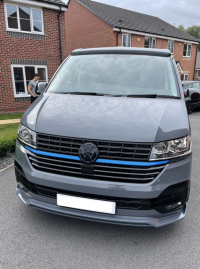
Last job now for me was have a full valet by the best In the business (next door neighbour) and a full ceramic coat applied all over. The finish was amazing and really transformed the van. The front shot
The Side shot
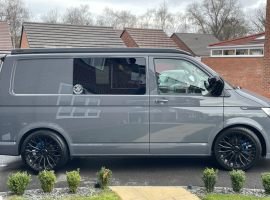
The side shot with Door
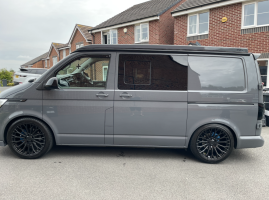
Last couple of mods for me was applying a couple of stickers and I changed the lights on the side (indicators) and the rear barn doors - the upper break light and main breaking lights. All are smoke to go with the van look and are sequential Which makes a huge difference.
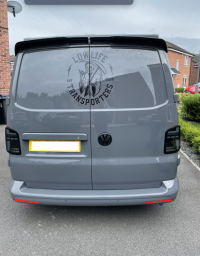
Only thing for me now is changing the headlights when they come into stock to be smoke and sequential and last thing will be using it !!!!
Its been a long journey however overall I am chuffed with the outcome - hopefully see some of you guys round !
Thanks for taking the time to gander at the post! Thanks to all the support, advice and guidance & suppliers that helped me get here - Ian
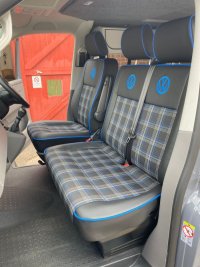
1. After selling my ranger rover I thought (wrongly) finding a van would be easy, did I want to go down the path of buying a fully converted or did I want to go on a path of building one to my spec. Now when I say build I mean outsource to the relevant people. Last thing I was going to do was do this myself as it would not work out how I had visioned it in my mind. So I landed on with the wife we wanted to select how we wanted and styles so that directed me to locating a bog standard panel van. We initially set our sights on the Indium Grey van however we could not located them anyway. In fact locating any van with relevant quality, mileage and spec was so tough. In the end I had put my name down at various dealers to notify me when one come in. This started way back last September. In October I received a call from a VW dealer asking if was still looking, they had just had one come through as a demo van the only catch was it was Pure Grey. I said I would come and have a look. I loved the colour instantly, good spec T6.1 Highline and only 7K on the clock. Done deal! A week later as you can see it was sitting on my driveway the day I drove it home.

In my mind the first things I wanted to address modify was the outer look, feel and structure then work my way inside. Again could be totally wrong approach its just my approach to doing so. Having took advice from on this forum and lengthly and extremely helpful chat with Steve I decided to go to Steve @CRS Performance for some new coil overs to be fitted and alloy wheels. I landed on the Velare alloy wheels and Steve provided a fantastic Service for coil overs, lowering, Alloys and tyres. The nice touch I had collecting this was the slightly larger wheels on the back which personally I really like.

Next up was the big one the Pop Top I may have been over thinking this but I read so much on all the different pop tops and pro's and con's and again I could be wrong but I decided to go for the Skyline Auroa pop top and have it match the paint work. I also had the bi fold bed and another reason I moved for it was they had an offer on bi-fold bed and scenic roof so I took this to Cosmic Campers and again were super helpful and supportive. Whilst I was there I decided to move forward with them also doing the insulation work, Rear windows & Carpeting and lights just in the top part and stalk light in the pop top - I was really caught about letting them do this but now looking back it was the right move rather than ripping things off come conversion. After a weeks work this is the day I had picked dit up - apologies for crap photo.

The next thing for me was getting the gloss black bumpers and grills and dog bones at the bottom - I could really see it starting to take shape now and transitioning. I loved the blue strip and wanted to add blue as a theme through my van so the grill stripe kicked that off.

Again not a necessaity however I wanted the callipers painting blue to match the stripe and thought if I don't do it now when will I do it, so a local guy come to my home to do it o the drive and he was amazing, matched the blue and coated them in candy coat to give them a glittery finish. A small detail but really pleased with this.

Calliper look with Alloy in front

At this point I was happy with the outer look and feel and I wanted a few additional mods such as headlights and barn door lights but these were not available so I pre-ordered and started work on the inside (well I didn't my convertor did) At this post for timeline this was March of this year. First job was the big electrical fix and linking in the other electric in the roof I had previously done. Does look much but I wouldn't have a clue with all this !! Also the Altro floor had been fitted again I had pike out the blue fleck to carry on the theme with the van which I must admit looks great now its all come together.

More shots of the electric work

This was a big decision moment with the wife that had conflicting views, do we get the seats upholstered or not. I wanted them as I felt we would of regretted it if we didn't but my wife said it was expensive and felt no reason to do so. I said I agree with you and it was to expensive and decided to move on and just not tell her (face the pain later on! lol) Again I wanted to pick out the blue and now it was the best decision I made I am so glad I had these and the RIB Bed covered the same. Again its the details but appreciate its not everyone's cup of tea. Another big moment for us was the whole bed situation Rock N Roll or RIB and again its preference and cost, we went to may shows and sat, lay etc on them to see what worked for us. We landed on the RIB 113 (I think) which also added some additional cost challenges on the internal conversion - below is the photo I was sent after front seats come back

We also had the Planar heated fitted with Modem (this is a pain in the back side the modem is temperamental and was a bit of back and forth but now its working) the technology could be so much better with this but hey ho its working now. We had to have the vent fitted in this space due to space, the oven being fitted and the leisure battery under the driver seat.

The interior kit out first fit with RIB bed in. The oven I missing on this shot as it hadn't arrived yet. We had a right game with boards and colours for the furtniture due to stock and availability but we got there in the end.

Some with the RIB bed out for you

The kitchen area

The control panel to the heater & Van and I now have a internet plummet into the van also for iPad TV and kids iPads. That works so well

A full shot of the kitchen area now including the oven now although this arrived damaged and needs to be swapped out when a new one lands (god knows when that will be). Another addition was the iPad cracked on the rear of the seats and you can see the wifi panel on the Side of the cupboard now

Last job now for me was have a full valet by the best In the business (next door neighbour) and a full ceramic coat applied all over. The finish was amazing and really transformed the van. The front shot

The Side shot

The side shot with Door

Last couple of mods for me was applying a couple of stickers and I changed the lights on the side (indicators) and the rear barn doors - the upper break light and main breaking lights. All are smoke to go with the van look and are sequential Which makes a huge difference.

Only thing for me now is changing the headlights when they come into stock to be smoke and sequential and last thing will be using it !!!!
Its been a long journey however overall I am chuffed with the outcome - hopefully see some of you guys round !
Thanks for taking the time to gander at the post! Thanks to all the support, advice and guidance & suppliers that helped me get here - Ian

Last edited:
