Our T6 build journey...complete beginners!

Rapt0rUK

Senior Member
VIP Member
T6 Pro
I've had so much incredible help from the people on this forum so attempting to give something back and plan to provide a write up of our journey so far in case it helps someone out or i can help with anything we've learnt along the way - plus it keeps all our hurdles in one place and stops me hijacking other threads!!

What I should say upfront is that we are complete beginners with this stuff. I'm fairly handy with basic DIY around the house but know very little about cars and this is our first van so we will be learning absolutely everything along the way.

There's so much info on this forum and hours of content on YouTube so I'm hoping I can short cut some of the searching for newbies like us and outline the key decisions we made along the way and why.

So here's our van, bought from VW Marshals in Scunthorpe back in Nov last year, 2018, T32, LWB, 204ps DSG with 6,000 on the clock.

20191116_131314.jpg
 
Last edited:
Removing ply lining

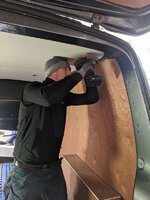
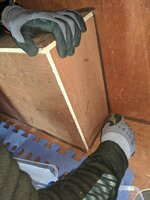
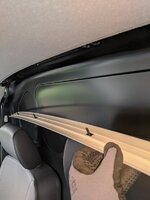
First things first was removing the existing ply lining, pretty straight forward, unfortunately lots of screws through the van floor and quite a few in the tail gate, we treated these with red oxide then Hammerite.

IMG_20191227_122648.jpgIMG_20191227_123157.jpg

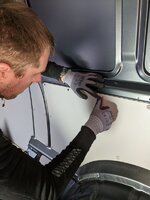
Behind the ply were the factory fitted hardboard panels, much easier to take the clips out with the correct tools, we bought this fairly cheap trim removal tool set, well worth it, we've used it an awful lot along the way (https://www.amazon.co.uk/gp/product/B07B7F5T8D/ref=ppx_yo_dt_b_asin_title_o00_s00?ie=UTF8&psc=1)

IMG_20191227_132621.jpg

Then it was on to sound deadening, insulation and bulkhead removal
 
Last edited:
Sound Deadening & Insulation

So there's so much stuff out there on this topic and loads of conflicting opinions... I watched and read it all.

For those that really want to deep dive into the science Greg Virgo covers in detail here:
but ultimately he recommends a Kingspan type material which others argued to steer well clear of because it apparently holds moisture.

In the end weighing everything up, I concluded the Kingspan style stuff is more suitable for a larger/Sprinter type van where you intend to install a bullet proof vapour barrier. For our T6 we instead followed the guidance from the guys at Combe Valley Campers, they've done a great series of how to videos.


We took their advice and went with silent coat sound deadening, then a layer of dodo thermo liner and finally dodo thermo fleece in the larger voids.

Most suggest that when it comes to the silent coat you only need c.60% coverage on any given panel as all it's really doing is cutting out the opportunity for resonance/vibration so by adding mass to the panel you reduce vibration. In reality, rightly or wrongly (and maybe a waste of money) we stuck the stuff everywhere we could fit it...

Silent coat went on first, pretty easy to work with, it was Dec so pretty cold, heat it up a bit when it comes to shaping it round the wheel arches etc.

This little roller was useful to make sure it was well bonded.


20191229_161450.jpg

This was the first time we had to think about the layout of the van and where we going to have windows etc. As it happens we changed our minds afterwards and ended having a window at the back which you can see we did cover here!

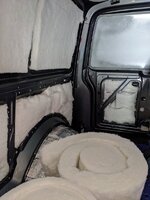
Then the thermo liner went on everywhere we could get it, quite easy to install. Top tip when you're trying to get it into the harder to reach corner though. Peel the backing off, then stick it back on again loosely before trying to push down into a void. This made it much easier to peel the backing away again when it was in a tight space.

We actually had enough of the thermo liner to do 2 layers so we are very well insulate.

I should also say that we taped all the seams on every layer (both sound deadening and thermo liner) with foil tape from here:


And finally the thermo fleece. As per the Combe Valley video, we got some of the thick stuff and the thin stuff which was handy for certain areas.

We bought some high temp spray glue from here to stick into places where needed but for the most part it just stays in place.


20200104_122541.jpg

IMG_20200104_133700.jpg

All the insulation products came from here:

 
Last edited:
Bulkhead Removal

So this is something that on the surface looks pretty straight forward but in fact requires a bit more work than you'd think...

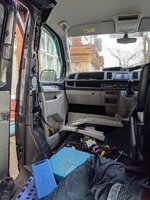
The bulkhead is in 3 parts, top and bottom and then a metal trim that's spot welded in various points to the van. The top and bottom (main sections) are easy to remove, just a case of removing the obvious bolts and a bit of trim from the headliner in the cab and it comes away.

IMG_20191228_135201.jpg IMG_20191228_134439.jpg

The metal trim on the other hand is quite a bit trickier and requires removal of quite a bit of the plastic trim.

The best guides we found to follow were Kirvans

and Dubious Engineering

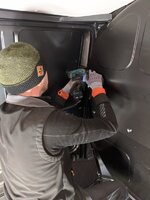
The guys at Kiravans get stuck in with a grinder whereas the Dub-Eng uses a more brute force approach with hammer and chisel, in the end we did a bit of both. I'd never used a grinder before so was pretty nervy at first but if you take your time and go slow, it's actually fairly straight forward, the biggest worry was cutting/grinding too far and going into the body work of the van rather than the welds but in the end we did a pretty good job.

We followed the Kiravans video to remove all the plastic trim, seat belts etc. put a plastic dust sheet up (taped to the roof) and made the cuts in the welds as suggested, ground everything down smooth as we could then treated with red oxide (No Nonsense Red Oxide Metal Primer & Undercoat 250ml) and Hammerite (Hammerite Hammered Metal Paint Black 750ml).

We also bought this grinder from Screwfix Erbauer EAG900-115 900W 4½, fairly cheap, good reviews and more than powerful enough to do the job. And here are the grinding (Metal Grinding Disc 4½) and cutting discs we got for it (Inox / Metal Cutting Discs 4½)

We also got gloves, ear protection (I have tinitus from too many nights in clubs as a youngster!) and goggles for the sparks...

IMG_20200202_120623.jpg

Taking the B-pillar trim off wasn't the easiest and in places it does require a bit of force which is worrying as you think you might snap something but it's sturdy stuff and was all good in the end. Getting it back and lined up as neatly as it was before is a pain but keep at it and it all does click back into place eventually.

Once the bulkhead was out it made a huge difference to driving the van, not only did it feel much bigger but it was really noisy.

The road noise from the back of the van is very noticeable with the ply floor up, no bulkhead and no sound deadening on the floor. When driving we could hear a hissing sound coming from somewhere near the sliding door which we later learnt was where the fuel pump is located and nothing to worry about.
 
  • Like
Reactions: CAB
Floor Insulation and Ply Floor

So the van came with a ply floor but it was a bit of a mess in places, when we took it out to treat the holes in the floor underneath for the sake of having a better finish we just decided to replace it.

Again following the advice from the Combe Valley Campers series, we bought the replacement kit from here (Home | customshop-designs) which arrived promptly and was as expected.

Comes in 3 pieces, needed a bit of trimming here and there (mostly just in front of the wheel arches) with a jigsaw as it didn't sit perfectly but it was 95% there.

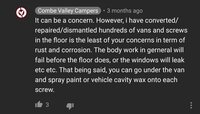
Again there's conflicting views about whether you should screw into the metal of the van floor. Clearly can't be a good thing to have holes in the floor but the question is how big a risk is it... I and others asked the Combe Valley Campers guys about this because they appeared to do just that in their video here...


Their view:

Screenshot_20200528-183626_YouTube.jpg

It's a fair point but we took a view of, if we can avoid it we will, especially as we'd just spent time treating all the holes from the last screwed down ply floor...

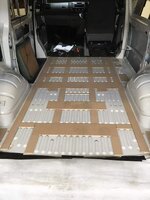
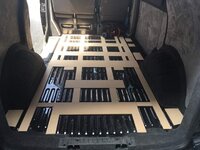
So we glued MDF batons in between all the ridges on the floor using a guide sent to us by our roof fitter (which we'll come on to later)

Images courtesy of Stewart at Viper Tech Conversions in Manchester (great guy!)

FB_IMG_1579990541494.jpgFB_IMG_1579990512857.jpg

We were keen to limit the noise in the back as much as possible, as mentioned before it was pretty noisy having taken the bulkhead out. We had sound deadening left over so we cut strips of this and stuck it inbetween the thinner ridges and any spots not covered with an MDF baton.

Next up, we had loads of the dodo thermo mat left (and still do!) so we then stuck a layer of that down on top of the batons similar to this video from Coombe Valley


In their video they use a product that is essentially a combination of sound deadening plus foam insulation layer which we were replicating only with 2 separate products.

Just a note on the insulation, we got it all from here: Sound Deadening Shop - Car Van & 4x4 Automotive Sound Proofing

I gave them a call to ask how much I'd need to cover a T6 LWB and truth be told, they did sell me too much... I've used it elsewhere in the van (door cards) but still got thermo fleece and thermo liner left over and that's with doing the floor which wasn't actually in my original plan. They sold me 1 X slimline fleece, 2 X standard fleece and 2 X 10m thermo liners....not cheap at all but it is really good quality stuff.

So next, the ply went back on top and was screwed down into the batons below... The tricky thing here is knowing where the batons are!

We had to draw out a cryptic grid system by strategically sticking tape down in various places to use as reference points and taking measurements off those...

We countersunk all the drill holes and screwed down into the MDF. Now truth be told, some of the screws didn't take all that well and sods law the batons underneath don't perfectly line up with the joins in the Custom Shop Design ply floor which means there were now screws on the edges of the boards where you'd want them to make sure the joins are nice and level...

So at this point to make sure there was no bounce in the floor we had to make the call to drill a few holes for longer screws that would indeed go through into the metal floor... There's only a handful but based on Coombe Valley's comments on it, we thought sod it and went for it.

Floor was solid as a rock afterwards. There were still slight gaps between the boards so we filled them with wood filler, as we did all the countersunk screw heads and then sanded down for a perfectly smooth finish... Reason being we later fitted Karndean which needs a perfect subfloor.
 
Flooring Update

We saw Karndean fitted in one of the vans at the Motorhome show at the NEC and loved the finished so decided to go for it.

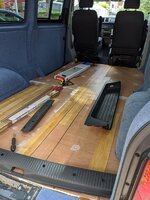
It was a 2 day process in the end, we bought a ply kit from Custom Shop Designs. As mentioned in the last post, it needed a bit of trimming here and there and by the time it was fixed down there were a few gaps to fill and sand (on the joins). Also filled all the countersunk screw heads to make sure it was perfectly flat/smooth. The adhesive went straight down onto the ply.

(Bought the adhesive from here, F-Ball Styccobond F48 Flooring Adhesive 5lt/High Temperature Grade Vinyl Adhesiv | eBay)

Once the floor was good here's how we did it:

1. Found the centre line of van, took a couple of measurements across the 2 rear wheel arches, the boot catch any other points that were in the middle then put a laser level down and drew a centre line.

2. Laid the first row on the centre line and taped it down using masking tape so it couldn't move. The planks but up to each other, no tongue and groove or click system hence taping the first row to have something firm to but up against. Then worked out from the centre line to the far side (kitchen side), cutting as you go and using a scribe tool to help get round the tricky shapes. A few trial and error bits but it's pretty easy stuff to cut/trim and I knew i had excess boards so any i wasn't totally happy with, i used the botched one as a rough template and then made the changes.

3. Once fully laid over to the far side, i removed the tape from the near side of the centre row and worked back to the other side until basically you have fully laid it. When you spread the adhesive you only get 30 mins (that's the case with F-Ball F48 high temp one) so you need to make sure that you're not having to do any cutting etc whilst the glue is down.

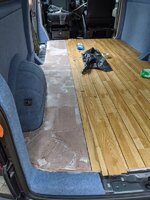
4. Felt criminal to be lifting it up once down but we then started at the far side (kitchen side) and lifted 4 rows at a time. We were careful to stack the lifted planks (and strips) in order to make sure we knew exactly where each one had to go.

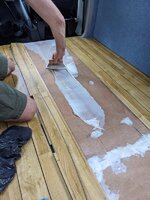
5. Spread the glue (you have to use a special A2 trowel which spreads it to the correct depth (A2 Adhesive Spreader 18cm: Amazon.co.uk: DIY & Tools) spread as close to the edge as we could then right up to the edge of the 5th row.

6. You get 30 mins so butting up tight to the 5th row still on the floor we put the 4 rows back down, then once they are down you have something firm to work against to come back the other way towards the sliding door 4 rows at a time.

The last 4 rows are pretty tricky as you don't have much space to work in as we tried to stay of the floor we'd laid as much as possible but that's essentially it.

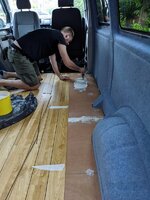
One issue we did face, as you spread the glue up to the line of the row that is just sat in place, some of the glue bled underneath that row meaning when we lifted it up to spread glue under that area it had glue on the back of it so we had use wipes to clean them off and make sure they were nice and clear to get a good flat finish. It's best to do 3-4 rows but finish on a black strip each time so that next time you're starting with a plank rather than a strip as they are fiddly to glue up to - basically as you spread the glue up to the strip when the trowel touches it, the strip moves because its so light...

Here's a few pics we took along the way...

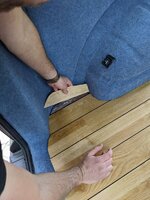
IMG_20200523_110617.jpg20200523_155101.jpgIMG_20200524_113204.jpgIMG_20200524_121459.jpgIMG_20200524_141339_MP (1).jpgIMG_20200524_143018 (1).jpg20200524_191235.jpg20200524_191227.jpg
 
Should just add we also bought the deeper step (VW Side Door Step (Correct Height for Ply Lined Floors)) and full width threshold (VW T5/T6 Tailgate Threshold Trim (Genuine Part)) from Kiravans.

The threshold was pretty easy to fit, the step on the other hand a bit of a b*gger and to be honest still not 100%... I need some new clips as the old ones are no longer gripping having been ripped out a good few times.

I had to modify the step slightly with a multi-tool as it was quite a tight fit in some places so there was a bit of trial and error. Taking the step in and out so many times meant the clips are now knackered... It's in but there's a bit of bounce in it as the bottom clips holding the footstep area down aren't gripping.
 
Electrics

I've got a separate thread on the electrics as that is a big topic on it's own, we went for a Lithium system and you can read about it here:

 
I was reading this and towards the end thought "I've seen that van". Recognised it from Renogy thread. Nice build! I've got a few updates to my battery install so will update in a couple of days with some photos! I do have a load of photos so far. I've pretty much got as far as you but I do have a kitchen built up ready to put in.
 
Flooring Update

We saw Karndean fitted in one of the vans at the Motorhome show at the NEC and loved the finished so decided to go for it.

It was a 2 day process in the end, we bought a ply kit from Custom Shop Designs. As mentioned in the last post, it needed a bit of trimming here and there and by the time it was fixed down there were a few gaps to fill and sand (on the joins). Also filled all the countersunk screw heads to make sure it was perfectly flat/smooth. The adhesive went straight down onto the ply.

(Bought the adhesive from here, F-Ball Styccobond F48 Flooring Adhesive 5lt/High Temperature Grade Vinyl Adhesiv | eBay)

Once the floor was good here's how we did it:

1. Found the centre line of van, took a couple of measurements across the 2 rear wheel arches, the boot catch any other points that were in the middle then put a laser level down and drew a centre line.

2. Laid the first row on the centre line and taped it down using masking tape so it couldn't move. The planks but up to each other, no tongue and groove or click system hence taping the first row to have something firm to but up against. Then worked out from the centre line to the far side (kitchen side), cutting as you go and using a scribe tool to help get round the tricky shapes. A few trial and error bits but it's pretty easy stuff to cut/trim and I knew i had excess boards so any i wasn't totally happy with, i used the botched one as a rough template and then made the changes.

3. Once fully laid over to the far side, i removed the tape from the near side of the centre row and worked back to the other side until basically you have fully laid it. When you spread the adhesive you only get 30 mins (that's the case with F-Ball F48 high temp one) so you need to make sure that you're not having to do any cutting etc whilst the glue is down.

4. Felt criminal to be lifting it up once down but we then started at the far side (kitchen side) and lifted 4 rows at a time. We were careful to stack the lifted planks (and strips) in order to make sure we knew exactly where each one had to go.

5. Spread the glue (you have to use a special A2 trowel which spreads it to the correct depth (A2 Adhesive Spreader 18cm: Amazon.co.uk: DIY & Tools) spread as close to the edge as we could then right up to the edge of the 5th row.

6. You get 30 mins so butting up tight to the 5th row still on the floor we put the 4 rows back down, then once they are down you have something firm to work against to come back the other way towards the sliding door 4 rows at a time.

The last 4 rows are pretty tricky as you don't have much space to work in as we tried to stay of the floor we'd laid as much as possible but that's essentially it.

One issue we did face, as you spread the glue up to the line of the row that is just sat in place, some of the glue bled underneath that row meaning when we lifted it up to spread glue under that area it had glue on the back of it so we had use wipes to clean them off and make sure they were nice and clear to get a good flat finish. It's best to do 3-4 rows but finish on a black strip each time so that next time you're starting with a plank rather than a strip as they are fiddly to glue up to - basically as you spread the glue up to the strip when the trowel touches it, the strip moves because its so light...

Here's a few pics we took along the way...

View attachment 74714View attachment 74715View attachment 74716View attachment 74717View attachment 74718View attachment 74719View attachment 74721View attachment 74722

Was there any issue fitting this under the B pillar trims?
I've got 9mm ply floor from Custom Shop Designs. This floor is 3mm thick, is that right?

Do you mind me asking how much that floor cost?
 
Was there any issue fitting this under the B pillar trims?
I've got 9mm ply floor from Custom Shop Designs. This floor is 3mm thick, is that right?

Do you mind me asking how much that floor cost?
Hi, no it was fine, my floor was 12mm ply (from Custom Shop Designs) so with MDF batons, the 12mm floor and the Karndean + adhesive it was a close fit (very snug literally just fit under so perfect really). With a 9mm ply floor you should more than fine.

Flooring was £128 plus another £25 for the design strip, found a random guy selling some of the strip cheap on ebay.

Flooring came from here, cheapest I could find after an extensive search!

Great thanks!
It looks really good by the way!
 
Should just add we also bought the deeper step (VW Side Door Step (Correct Height for Ply Lined Floors)) and full width threshold (VW T5/T6 Tailgate Threshold Trim (Genuine Part)) from Kiravans.

The threshold was pretty easy to fit, the step on the other hand a bit of a b*gger and to be honest still not 100%... I need some new clips as the old ones are no longer gripping having been ripped out a good few times.

I had to modify the step slightly with a multi-tool as it was quite a tight fit in some places so there was a bit of trial and error. Taking the step in and out so many times meant the clips are now knackered... It's in but there's a bit of bounce in it as the bottom clips holding the footstep area down aren't gripping.

Hi, the flooring looks amazing. What Karndean flooring was it as the colour looks perfect for my van too.
 
Back
Top