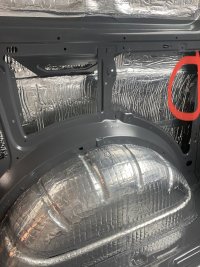
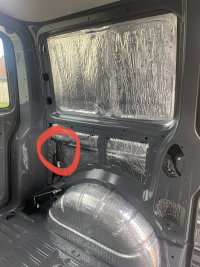
Rear Earth location

dubLU

Member
VIP Member
T6 Pro
I was expecting to see an earth lug sited behind the rear light cluster when removed. I thought I had read there is one there somewhere in the vicinity. I was horrified by it's absence .Can someone explain where it is and how I'd get to it given the rear of my van is carpeted, I'm assuming it is accessed from inside the van.
In case this ends up with me having to create a new earth lug any suggestions for a North West based mechanic / fitter who can do this at short notice would be great. Like wise if any local member can do this I'm happy to pay for your time and tools and drive anywhere in the North West. I have a trip booked Friday hence the panic mode.

Thanks.
Are the carpeted panels removable (did they use hidden clips). If so the is one above the offside rear wheel arch.
 
I have a wardrobe fitted on the side where the EHU is. I'll check the other side, , Am I looking for a threaded stud or a threaded hole?

Thanks.
 
I have a wardrobe fitted on the side where the EHU is. I'll check the other side, , Am I looking for a threaded stud or a threaded hole?

Thanks.
There us a stud with a nut on on the offside, I think there is nearside as well (but not sure).
 
  • Like
Reactions: mmi
I managed to unclip a small panel above the wheel arch on the near side, there is no earth lug above the wheel arch I can see or feel but the D pillar one is there, so at least I can use that as a temporary one if all else fails.
My cu is on the off side rear though,, there is a run of wardrobes with very little wiggle room along that side, it has been lined with one piece ply so apart from cutting a portal and then trying to work in a very confined space it's not looking good. for that one.
 
To confirm there’s earth points on both rear quarters for future reference.

07B7E408-8BF1-4FBC-AD96-6E3B8D1160BC.jpeg

5B593163-5870-4194-8A0A-EE49CB29E2C4.jpeg
 
Hi
Thanks to this thread I have found the earth stud as above, quick question though, there’s already a cable attached. Can I add another earth cable to the same stud or do I need to find an additional stud elsewhere?
 
I am trying to find stuff out on my own but struggling as someone new to this conversion malarkey! So I need to earth my batteries to this rear stud. Firstly, my kit has no 35mm2 earth wire in it. Do I just use the same battery cable (black maybe)? Also, the stud looks M6, but I think the smallest lug in my kit is suitable for M8 screw. Is this lug ok to use or should I purchase some smaller eyelet ones?
Again, sorry for the newbie questions!
 
Is there an earth point anywhere under the window behind the drivers seat? I’m adding a second leisure battery in that location and want to earth it somewhere there for ease. The first leisure battery is earthed under the seat but am I right in thinking if running parallel I need the earth from the secondary battery?
 
Is there an earth point anywhere under the window behind the drivers seat? I’m adding a second leisure battery in that location and want to earth it somewhere there for ease. The first leisure battery is earthed under the seat but am I right in thinking if running parallel I need the earth from the secondary battery?
There is a chassis ground point underneath each seat if the helps.

If you have VIP Membership then you have access to wiring diagrams and this one shows all the factory chassis ground points (assuming you are a T6)

 
There is a chassis ground point underneath each seat if the helps.

If you have VIP Membership then you have access to wiring diagrams and this one shows all the factory chassis ground points (assuming you are a T6)

yeah but that’s already being used by the first battery. So I need to take that off and have the neg on the 2nd feed battery from parallel diagrams I’ve been looking at. That underwear point will be too far away hence looking for something closer to my battery location behind the drivers rear window/under the kombi seat
 
yeah but that’s already being used by the first battery. So I need to take that off and have the neg on the 2nd feed battery from parallel diagrams I’ve been looking at. That underwear point will be too far away hence looking for something closer to my battery location behind the drivers rear window/under the kombi seat
Maybe what I need to do is re-do all the leisure wiring as most of it was done by the previous owner and I’m just modifying it. I guess to start again makes better sense and then I’ll know how it’s been done for the future.
 
yeah but that’s already being used by the first battery. So I need to take that off and have the neg on the 2nd feed battery from parallel diagrams I’ve been looking at. That underwear point will be too far away hence looking for something closer to my battery location behind the drivers rear window/under the kombi seat
If you are aiming to use 2 batteries in a bank (assuming they are lead acid) be aware that's only really going to work if they are identical models/capacity/age and really they should form together.

If not generally what happens is the "worst" battery pulls down and damages the health of the "better" battery.

A better way of increasing usable capacity is to switch to LiFePo.
 
Back
Top