You are using an out of date browser. It may not display this or other websites correctly.
You should upgrade or use an alternative browser.
You should upgrade or use an alternative browser.
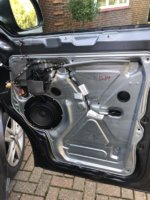
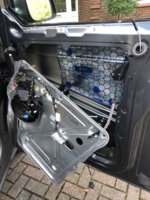
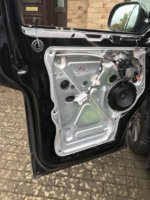
removal: metal internal door skin / door assembly?
- Thread starter LambethBoy
- Start date
Loosten bolts 11 right?
Join the VIP club for more great help & Info:
VIP Membership | VW T6 Forum - The Dedicated VW Transporter T6 Forum
***********************************************************************
Removing and installing assembly carrier:
Window regulator, door lock and loudspeaker are secured to the assembly carrier.
The door lock can be removed only together with the assembly carrier.
Assembly carrier can only be removed when door window is unbolted at window regulator clamping bolts. To do this, lower door window to the height of the assembly holes in assembly carrier and loosen clamping bolts.
If door window cannot be lowered with electric window regulators, first determine the precise cause of the fault.
If an electrical fault exists, rectify it first.
If the electrical fault is due to the window regulator motor, it can be unbolted from the assembly carrier. The door window can be pushed into the necessary working positions by hand.
– Remove front door trim →General body repairs, interior; Rep. gr.70.
– Remove lock cylinder → Chapter.

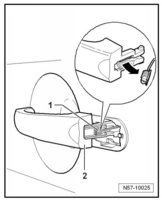
– Loosen clip -1- from door handle -2- → Chapter.
– Lever out sealing plugs -5-.
– Unscrew earth cable connection -6- from beneath window slot seal.
– Lower door window until clamping bolts -11- for door window become accessible.
 Note
Note
If work is not possible due to a malfunction caused by electric window regulator, the window regulator motor can be unbolted. The door window can then be pushed into the necessary working position by hand.
– Loosen clamping bolts for door window -11- (do not unscrew completely).
– Press apart clamping jaws.
– Slide door window upwards, and secure it (e.g. with adhesive tape).
– Lever out boot -3-.
– Disconnect connectors -8- and -10-.
– Remove bolts -1-.
– Remove bolts -7- (Qty. 8).
– Pull subframe at top off door, lift it slightly, and swing it out of door towards hinge side together with door lock and locking rod -4-.
– Turn over assembly carrier, and disconnect connector from door lock.
– Pull off clips of electrical wiring on back of subframe.
– Lever out rubber grommet -13-.
– Pull line -12- out of opening -13- and out of rubber grommet -9-.

************************************************************************************
Installing
Install in reverse order, but note the following:
– Insert assembly carrier in door.
– Start bolts -arrows-.
l Observe bolting sequence on subframe.
– Tighten bolt -1- first, then tighten bolt -2- to specified torque.
– Then, tighten remaining bolts -arrows- in diagonal sequence (no particular order given) to specified torque.
l Then check function with door open.
Join the VIP club for more great help & Info:
VIP Membership | VW T6 Forum - The Dedicated VW Transporter T6 Forum
***********************************************************************
Removing and installing assembly carrier:
Window regulator, door lock and loudspeaker are secured to the assembly carrier.
The door lock can be removed only together with the assembly carrier.
Assembly carrier can only be removed when door window is unbolted at window regulator clamping bolts. To do this, lower door window to the height of the assembly holes in assembly carrier and loosen clamping bolts.
If door window cannot be lowered with electric window regulators, first determine the precise cause of the fault.
If an electrical fault exists, rectify it first.
If the electrical fault is due to the window regulator motor, it can be unbolted from the assembly carrier. The door window can be pushed into the necessary working positions by hand.
– Remove front door trim →General body repairs, interior; Rep. gr.70.
– Remove lock cylinder → Chapter.

– Loosen clip -1- from door handle -2- → Chapter.

– Lever out sealing plugs -5-.
– Unscrew earth cable connection -6- from beneath window slot seal.
– Lower door window until clamping bolts -11- for door window become accessible.

If work is not possible due to a malfunction caused by electric window regulator, the window regulator motor can be unbolted. The door window can then be pushed into the necessary working position by hand.
– Loosen clamping bolts for door window -11- (do not unscrew completely).
– Press apart clamping jaws.
– Slide door window upwards, and secure it (e.g. with adhesive tape).
– Lever out boot -3-.
– Disconnect connectors -8- and -10-.
– Remove bolts -1-.
– Remove bolts -7- (Qty. 8).
– Pull subframe at top off door, lift it slightly, and swing it out of door towards hinge side together with door lock and locking rod -4-.
– Turn over assembly carrier, and disconnect connector from door lock.
– Pull off clips of electrical wiring on back of subframe.
– Lever out rubber grommet -13-.
– Pull line -12- out of opening -13- and out of rubber grommet -9-.

************************************************************************************
Installing
Install in reverse order, but note the following:
– Insert assembly carrier in door.
– Start bolts -arrows-.
l Observe bolting sequence on subframe.
– Tighten bolt -1- first, then tighten bolt -2- to specified torque.
– Then, tighten remaining bolts -arrows- in diagonal sequence (no particular order given) to specified torque.
l Then check function with door open.
Thanks all done and working.
There’s also two little pop rivets that you have to be careful of that are connected to the lock assembly. Mine came apart (too much jiggling!) but easy fix with a couple of small bolts.
There’s also two little pop rivets that you have to be careful of that are connected to the lock assembly. Mine came apart (too much jiggling!) but easy fix with a couple of small bolts.
Thanks all done and working.
There’s also two little pop rivets that you have to be careful of that are connected to the lock assembly. Mine came apart (too much jiggling!) but easy fix with a couple of small bolts.
@LambethBoy ... I'm in the same situation as you. I've removed the inner panel. Lots of jiggling and the large pop rivets pulled out of the plastic bracket bit. I can't see what that does. All re-assembled without the rivets. All seems to work OK, lock/unlock, both handles etc.. The plastic arm seems loose in the lock assembly anyway.... Not sure if I really need to strip it down again to install a couple of bolts.
I just drilled out the rivets and put a couple of small nut/bolts in, just in case.@LambethBoy ... I'm in the same situation as you. I've removed the inner panel. Lots of jiggling and the large pop rivets pulled out of the plastic bracket bit. I can't see what that does. All re-assembled without the rivets. All seems to work OK, lock/unlock, both handles etc.. The plastic arm seems loose in the lock assembly anyway.... Not sure if I really need to strip it down again to install a couple of bolts.
I just drilled out the rivets and put a couple of small nut/bolts in, just in case.
Coolio, thanks for the reply. I've just looked at the door handle resource that @Dellmassive has posted;
https://www.t6forum.com/threads/t6-door-lock-carrier-and-handle-set.13747/
The bracket seems to be item 14 on page 69. I just can't see what it does, and the fact that it such a lot of work to remove the internal lock mechanism with the inner panel too, and with a medium strength pull, the pop rivets pull out of the plastic bracket. Odd design really ?....
Go through the speaker hole...
Or look in the download section for the guide to remove the size carrier. 2xhodden bolts....
I just took the speaker out and went in that way.
Audio Upgrade Stage-1 . . . . Blam Relax 200rs Speakers From Skipton.
.
T6 door lock carrier and handle set
.
Or look in the download section for the guide to remove the size carrier. 2xhodden bolts....
I just took the speaker out and went in that way.
Audio Upgrade Stage-1 . . . . Blam Relax 200rs Speakers From Skipton.
.
T6 door lock carrier and handle set
.
Last edited:
cheers dude,
i left it for another day and just lathered the silver panel and door card in sound deadening and some dodo matting. music sounds better, but will at some point get to the doors themselves... i presume i have to drill off the speakers... meaning i might as well upgrade them!?!?!
i left it for another day and just lathered the silver panel and door card in sound deadening and some dodo matting. music sounds better, but will at some point get to the doors themselves... i presume i have to drill off the speakers... meaning i might as well upgrade them!?!?!
i presume i have to drill off the speakers... meaning i might as well upgrade them!?!?!
That's what I done, or you can rivet them back, or use metal self drill screws.
cheers dude,
i left it for another day and just lathered the silver panel and door card in sound deadening and some dodo matting. music sounds better, but will at some point get to the doors themselves... i presume i have to drill off the speakers... meaning i might as well upgrade them!?!?!
Trust me
Its so worth while taking that out to get to the door inner skin !
I didn't take mine fully out but could lift bottom clear enough to coat the door skin 90% double thickness behind speaker.
Amazing difference,
Hi Guys,
I'm struggling here as well. I manage to get the missus to hold the skin out far enough on the drivers side to get my hand in to stick the silent coat down, but a right faff.
The 2 rivets you said pop out are they the ones highlighted below ? As that seems to be where my door is hung up/still connected to something.
I wouldn't mind getting the passenger side full off to make it an easier/better job.
Cheers
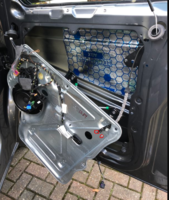

Yes those are the two rivets. I drilled mine out.
I think that’s where I got my door skin to, then removed some of the electrics to allow the panel to drop further.
I think that’s where I got my door skin to, then removed some of the electrics to allow the panel to drop further.
Awesome cheers.
What are the 2 rivets holding the skin on to? Is it the lock mechanism or something else?
I managed to get 2mm silent coat on the drivers door, and then put some more dodo matt in there, the low section is fine, but the top section I think is catching the window as it goes up.
So think I need to get it all back off and clear some runs for the mechanism.
Yeah it’s all part of the door mechanism but does not affect it in any way, all part of assembly at factory for easy install.Awesome cheers.
What are the 2 rivets holding the skin on to? Is it the lock mechanism or something else?
I managed to get 2mm silent coat on the drivers door, and then put some more dodo matt in there, the low section is fine, but the top section I think is catching the window as it goes up.
So think I need to get it all back off and clear some runs for the mechanism.
I put(glued) a 15mm M8 bolt through from the plastic bracket when I reassembled and just put a nut over the top of it (on top of skin) to stop anything rattling around.
I put the 2mm deadening and 7mm dodo and had no issues. how thick is your dodo mat?
hello, this is interesting for me - im not trying to change speakers or owt.... but trying to understand why when it rains i have water in my step... i have found the reason - water comes through the bottom of this alu panel - the seal doesnt seem to do much good..
@Dellmassive or @Loz do we have part numbers? im trying to get my vw garage to cover this for me as i dont see it a wear part?! if not ill just sika it in place but i'd prefer a seal as if needed it can be removed..
@Dellmassive or @Loz do we have part numbers? im trying to get my vw garage to cover this for me as i dont see it a wear part?! if not ill just sika it in place but i'd prefer a seal as if needed it can be removed..
Similar threads
- Replies
- 2
- Views
- 216
- Replies
- 1
- Views
- 441
- Replies
- 1
- Views
- 373

