T6.1 Lock button for sleeping / leaving dogs inside / windows open How-To Guide

T6Jay

Senior Member
VIP Member
T6 Guru
I need a button in the rear of the van to lock the doors, without arming the alarm, as many seem to have fitted on the T6.

Credit to @Willoughby for figuring this out on the T6 here;

The T6.1 works in a similar way, only one wire needs splicing into. Connecting it directly to 0V will unlock, and connecting it to 0V via a resistor will lock.

The resistor value however is different to that on the T6. I believe 180ohm is the correct value.

I still need to run the wire around the van and fit the button, but this will be different for everyone, so the most useful part is done like so;

1. Pull down the tray under the dash, no screws, just clips (no need to remove the dash front trim as I did)

2021-08-21 13.05.22.jpg

2. Find the loom from the drivers door, it's in a zipped up sleeve, unzip it to find the connectors inside. The large black one with purple clips is the one we need.

2021-08-21 13.51.40.jpg

3. Push the purple 'T' shaped latch, to release the connector pins, then with a very fine pin release tool (or paperclip?) release and remove pin 8, the wire is brown/yellow

2021-08-21 14.23.51.jpg2021-08-21 14.26.33.jpg

4. Very carefully solder a small wire (I used some 0.5sqmm) onto the end of the pin, if it's not a small neat joint it wont go back in the connector. Put the pin back in the connector until it clicks. Push the purple clip back to it's original position to secure all the pins. I made this wire just about 30cm long, then I can use a spade connector later on to run a cable to the pushbutton.

2021-08-21 14.36.15.jpg2021-08-21 14.44.17.jpg

5. Run your signal wire around to wherever you need the pushbutton, together with a 0V wire if there's not already one there.

6. Connect the signal wire to a LOCK pushbutton via a 180ohm*resistor, connect the other side of the pushbutton to 0V

7. If you need an unlock button too, a LOCK button should connect the signal wire directly to 0V (no resistor)

*anything from 100ohm to 320ohm worked for me
 
I need a button in the rear of the van to lock the doors, without arming the alarm, as many seem to have fitted on the T6.

Credit to @Willoughby for figuring this out on the T6 here;

The T6.1 works in a similar way, only one wire needs splicing into. Connecting it directly to 0V will unlock, and connecting it to 0V via a resistor will lock.

The resistor value however is different to that on the T6. I believe 180ohm is the correct value.

I still need to run the wire around the van and fit the button, but this will be different for everyone, so the most useful part is done like so;

1. Pull down the tray under the dash, no screws, just clips (no need to remove the dash front trim as I did)
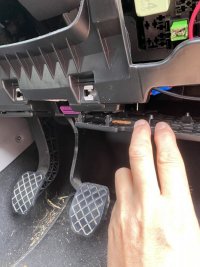
View attachment 127910

2. Find the loom from the drivers door, it's in a zipped up sleeve, unzip it to find the connectors inside. The large black one with purple clips is the one we need.
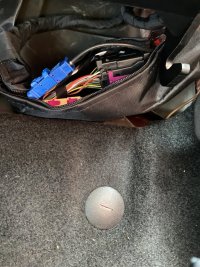
View attachment 127911

3. Push the purple 'T' shaped latch, to release the connector pins, then with a very fine pin release tool (or paperclip?) release and remove pin 8, the wire is brown/yellow
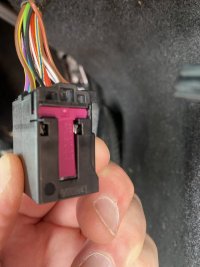
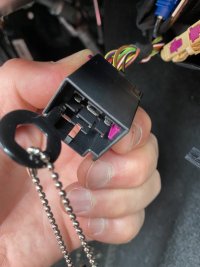
View attachment 127913View attachment 127919

4. Very carefully solder a small wire (I used some 0.5sqmm) onto the end of the pin, if it's not a small neat joint it wont go back in the connector. Put the pin back in the connector until it clicks. Push the purple clip back to it's original position to secure all the pins. I made this wire just about 30cm long, then I can use a spade connector later on to run a cable to the pushbutton.
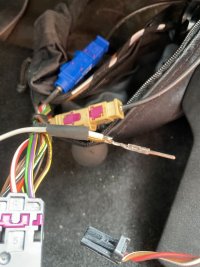
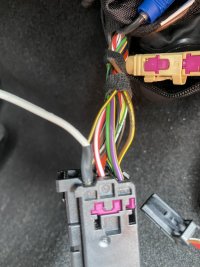
View attachment 127920View attachment 127921

5. Run your signal wire around to wherever you need the pushbutton, together with a 0V wire if there's not already one there.

6. Connect the signal wire to a LOCK pushbutton via a 180ohm*resistor, connect the other side of the pushbutton to 0V

7. If you need an unlock button too, a LOCK button should connect the signal wire directly to 0V (no resistor)

*anything from 100ohm
Just wanted to say a quick thanks for whoever was responsible for posting this thread/solution @T6Jay & @Willoughby . It worked a treat on my 21 plate T6.1. 180 ohm resistor coupled with a momentary on-off-on 20mm panel switch sorted the job perfectly. Followed the guide to the letter and the outcome worked without a hitch. So, many thanks, your efforts are appreciated.
 
Just wanted to say a quick thanks for whoever was responsible for posting this thread/solution @T6Jay & @Willoughby . It worked a treat on my 21 plate T6.1. 180 ohm resistor coupled with a momentary on-off-on 20mm panel switch sorted the job perfectly. Followed the guide to the letter and the outcome worked without a hitch. So, many thanks, your efforts are appreciated.
No worries! I finally finished mine with a momentary pushbutton and 200ohm resistor. Now we can lock the van from bed, my life is complete :)
 
it doesnt need to be double pole but it does need to be double throw so it switches in two directions
the amazon link will work fine but you will only use 3 of the contacts on one half of the switch
 
Yep, that would probably do it. But echo Pauly's comments on amount of contacts. Also, make sure that the switch is momentary in both directions from the central position. Some are momentary in one direction but then lock in the other. I also used a round switch though, easier to drill a round hole of the correct size.
 
Yep, that would probably do it. But echo Pauly's comments on amount of contacts. Also, make sure that the switch is momentary in both directions from the central position. Some are momentary in one direction but then lock in the other. I also used a round switch though, easier to drill a round hole of the correct size.
Thanks both - yip, that’s why I was thinking round may be easier.
 
I use these guys a lot for indicators and switches in projects, they have a big range of vehicle type switches and others and I've always been happy with the quality - you want a solid reliable switch if it's going to be locking and unlocking the van.

 
I use these guys a lot for indicators and switches in projects, they have a big range of vehicle type switches and others and I've always been happy with the quality - you want a solid reliable switch if it's going to be locking and unlocking the van.

Excellent, thank you
 
Just stumbled on this thread and so glad I did! The above works a treat and now I can lock or unlock my T6.1 from rear cabin without using the keys. Huge thanks to T6Jay!
Great stuff - which switch did you use for yours?
 
Great stuff - which switch did you use for yours?
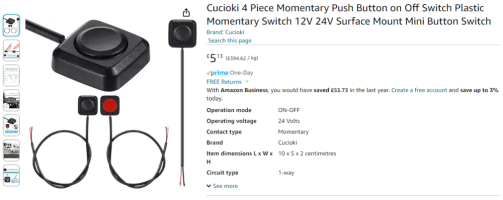
These little units off amazon: I only picked them up for a test run, but they work perfectly and are the size of your finger nail. Just popped them by the gear shifter so anyone can reach them. Also the good lady can lock the van if I jump out and pay for fuel etc..

1710876931983.png
 
I need a button in the rear of the van to lock the doors, without arming the alarm, as many seem to have fitted on the T6.

Credit to @Willoughby for figuring this out on the T6 here;

The T6.1 works in a similar way, only one wire needs splicing into. Connecting it directly to 0V will unlock, and connecting it to 0V via a resistor will lock.

The resistor value however is different to that on the T6. I believe 180ohm is the correct value.

I still need to run the wire around the van and fit the button, but this will be different for everyone, so the most useful part is done like so;

1. Pull down the tray under the dash, no screws, just clips (no need to remove the dash front trim as I did)

View attachment 127910

2. Find the loom from the drivers door, it's in a zipped up sleeve, unzip it to find the connectors inside. The large black one with purple clips is the one we need.

View attachment 127911

3. Push the purple 'T' shaped latch, to release the connector pins, then with a very fine pin release tool (or paperclip?) release and remove pin 8, the wire is brown/yellow

View attachment 127913View attachment 127919

4. Very carefully solder a small wire (I used some 0.5sqmm) onto the end of the pin, if it's not a small neat joint it wont go back in the connector. Put the pin back in the connector until it clicks. Push the purple clip back to it's original position to secure all the pins. I made this wire just about 30cm long, then I can use a spade connector later on to run a cable to the pushbutton.

View attachment 127920View attachment 127921

5. Run your signal wire around to wherever you need the pushbutton, together with a 0V wire if there's not already one there.

6. Connect the signal wire to a LOCK pushbutton via a 180ohm*resistor, connect the other side of the pushbutton to 0V

7. If you need an unlock button too, a LOCK button should connect the signal wire directly to 0V (no resistor)

*anything from 100ohm to 320ohm worked for me
Stealing this idea at some point thanks!
 
I need a button in the rear of the van to lock the doors, without arming the alarm, as many seem to have fitted on the T6.

Credit to @Willoughby for figuring this out on the T6 here;

The T6.1 works in a similar way, only one wire needs splicing into. Connecting it directly to 0V will unlock, and connecting it to 0V via a resistor will lock.

The resistor value however is different to that on the T6. I believe 180ohm is the correct value.

I still need to run the wire around the van and fit the button, but this will be different for everyone, so the most useful part is done like so;

1. Pull down the tray under the dash, no screws, just clips (no need to remove the dash front trim as I did)

View attachment 127910

2. Find the loom from the drivers door, it's in a zipped up sleeve, unzip it to find the connectors inside. The large black one with purple clips is the one we need.

View attachment 127911

3. Push the purple 'T' shaped latch, to release the connector pins, then with a very fine pin release tool (or paperclip?) release and remove pin 8, the wire is brown/yellow

View attachment 127913View attachment 127919

4. Very carefully solder a small wire (I used some 0.5sqmm) onto the end of the pin, if it's not a small neat joint it wont go back in the connector. Put the pin back in the connector until it clicks. Push the purple clip back to it's original position to secure all the pins. I made this wire just about 30cm long, then I can use a spade connector later on to run a cable to the pushbutton.

View attachment 127920View attachment 127921

5. Run your signal wire around to wherever you need the pushbutton, together with a 0V wire if there's not already one there.

6. Connect the signal wire to a LOCK pushbutton via a 180ohm*resistor, connect the other side of the pushbutton to 0V

7. If you need an unlock button too, a LOCK button should connect the signal wire directly to 0V (no resistor)

*anything from 100ohm to 320ohm worked for me
What size cable was used for this and have you a link for the switch you used please?
 
What size cable was used for this and have you a link for the switch you used please?
I used 0.5sqmm at the point where you splice into existing wiring (as mentioned in the guide), but you could use smaller. The important thing is that it's suitable for auto use (vibration, chafing etc).
And the button I used was: 12V 5 Pin 16mm LED Light Metal Push Button Momentary Switch Waterproof
Again you can use any button you like with a NO (normally open) contact, or if you need both lock/unlock, 2 buttons or a single spring to centre 3 position switch with 2xNO
 
Back
Top