Floor Tie-Down Lashing Points

MishMash

New Member
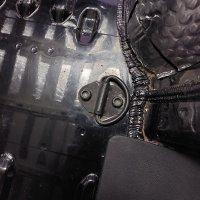
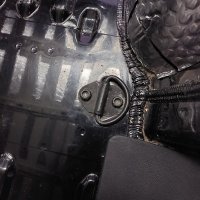
So what are you guys doing about the 6 lashing points in the floor? The previous floor had circles cut out but I don't fancy doing that as I'd rather have them covered.
I'm assuming the bolts go straight through to the outside?

I was wondering if anyone had come across a kind of cup maybe with the internal cut out? So the 6 holes can be in the ply, they I put this 'cup' over the top, then I cover the whole thing as one with the vinyl? That way they're not visible but also no holes underneath/ risk of rust damage etc.

Any advice and ideas please guys?
20230128_171456.jpg

20230128_171456.jpg
 
The bolts do go through to the outside. On mine, two holes are reused for the Reimo Variotech plate, and I took the others out and sealed the holes with mastic.

On the one behind the drivers seat, I removed the nut as well to make clearance for my water tank. The nuts are held in place with a pop rivet.
 
If you dont want to keep the D rings, remove them, you then have various options for the threaded holes.
1 - fill the holes with adhesive, clean and smooth off, this prevents any moisture coming back up through.
2 - fill with a non setting anti corrosion compund and then cover hole with moisture proof tape.
3 - cover bolt thread with adhesive/mastic and then thread into the hole to seal.

Dont forget that the bolts are just threaded through from the factory as standard anyway.

we use methods 1 and 3.

Cheers,
Ian
Hey Iain I was going to fill the holes with a metal putty that activates when you mold it in your hand, are there any reasons why I should not use this?
 
Hey Iain I was going to fill the holes with a metal putty that activates when you mold it in your hand, are there any reasons why I should not use this?
I wouldnt think so as long as it seals and adheres to the vehicle
 
I wouldnt think so as long as it seals and adheres to the vehicle
I'm so freaking out I'm going to make a mistake somewhere and damage her from the base coat, I think i'll have to drive a few more marks into her before I mellow out, but thanks for putting my fears at bay.
 
I wouldn’t use anything that sets hard because it will be a PITA if you ever want to remove it.

I’d use a mastic - either an appropriate silicon or PU adhesive, on any not being used for fixing down other stuff.
 

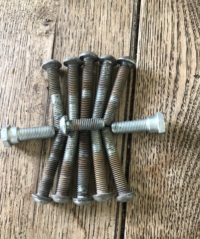
I'd use M10 x 16mm of these with some loctite, plugged and sealed flush to the floor but they'll come out if needs be.
a much better idea thank you I will source some of these, keeping them accessible sounds like much better idea. The original screws for the tie downs had rust on mostly the top half, is there any way I should treat the new screws or the holes before I set them in. Thes rest of the van is crazy clean so no rust on the floor or walls at all. Could you actually do a bit of both, seal the bottom of the hole that leads to the external of the van with a flexible sealant and then use shorter screws inside the holes still allowing for later protected use inside the van if needed. Its such a tiny tiny small detail of the over all van but seems a more complex process of what to do with it than I expected. Thanks for all the feedback folks, Id be randomly doing things without your advice.

Screenshot 2023-05-20 at 13.12.31.png
 
Last edited:
a much better idea thank you I will source some of these, keeping them accessible sounds like much better idea. The original screws for the tie downs had rust on mostly the top half, is there any way I should treat the new screws or the holes before I set them in. Thes rest of the van is crazy clean so no rust on the floor or walls at all. Could you actually do a bit of both, seal the bottom of the hole that leads to the external of the van with a flexible sealant and then use shorter screws inside the holes still allowing for later protected use inside the van if needed. Its such a tiny tiny small detail of the over all van but seems a more complex process of what to do with it than I expected. Thanks for all the feedback folks, Id be randomly doing things without your advice.

View attachment 199554
you can use the old bolts and get rubber washers if you are really worried (this is the same principle as the roor rack bolts on tour roof). They only have bolts (no washer) in teh holes from the factory. Even if you use sikaflex and want to use holed in future, just drill the sika out and run a thread tap through. No dramas.
 
you can use the old bolts and get rubber washers if you are really worried (this is the same principle as the roor rack bolts on tour roof). They only have bolts (no washer) in teh holes from the factory. Even if you use sikaflex and want to use holed in future, just drill the sika out and run a thread tap through. No dramas.
Eclipse Custom thanks for the advice, so I can actually just pop the original ones back in with the additional washer for sealing. There's two of them which have the metal washer, which is now spinning of its own accord so I can't get the bolt back down into it. I may just fill those two trouble holes with a sealant and pop the original bolts back in place on the others. Should I worry about the existing rust on the old bolts, or will that just normally happen over time anyway even if I put fresh ones in.
 
Youve lost me with tehmetal washer, do you mean the spacer? is the captive nut in teh floor spinning? The bolts will always rust, you could take them out and cover with an anti corrosion oil. The only reason to worry about corrosion on th bolts is they can be a pig to get out later on if they corrode too much on the thread. If worried replce them with stainless bolts, but again this is really overthinking it.
 
a much better idea thank you I will source some of these, keeping them accessible sounds like much better idea. The original screws for the tie downs had rust on mostly the top half, is there any way I should treat the new screws or the holes before I set them in. Thes rest of the van is crazy clean so no rust on the floor or walls at all. Could you actually do a bit of both, seal the bottom of the hole that leads to the external of the van with a flexible sealant and then use shorter screws inside the holes still allowing for later protected use inside the van if needed. Its such a tiny tiny small detail of the over all van but seems a more complex process of what to do with it than I expected. Thanks for all the feedback folks, Id be randomly doing things without your advice.

View attachment 199554
Do you know what Tx bit you used please? Struggling to find one big enough.
 
They are spline bit size not torx. I’ll probably get in trouble with the tool police, but an allen key will fit in an emergency. (Spline bits are 12 point and allen key 6)
 
Do you know what Tx bit you used please? Struggling to find one big enough.
Pretty sure it's M10.
If you take a look at this thread, there's a discussion on spline tool sets. There are sets for under £20 which will fulfil all of you splined needs.
 
Last edited:
Back
Top