[Guide] Retrofitting an internal Tailgate release switch

andys

Ex member
VIP Member
T6 Legend
To make up for my idiocy on the H4 thread, I thought I'd post how I added an internal tailgate release in case it's any help to anyone else.

My tailgate has a fibreboard covering, don't know whether it was standard or whether the converters removed another panel and replaced it with this. Anyway, with that off you will see a little blue plug (unplugged in pic below). This is the two wires that need to be touched together to activate the release.File 04-06-2017, 16 07 21.jpeg
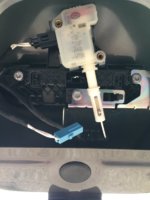
I cut into each of these wires and soldered additional wires. The connections were then heatshrunk and plugged the connection back in.File 04-06-2017, 16 08 49.jpeg
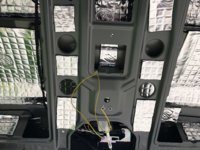
While I was at it, I put some Silentcoat on the inside of the hatch (took 7 sheets) as I noticed it had no insulation of any type. I also covered the back of the fibreboard with a layer of closed cell foam. I then got a boot release switch that I'd got off ebay (generic Ford switch, was about £6) and measured and cut a hole so that it would fit through the fibreboard into the top of the spaces on the inside of the hatch above. This isn't quite central but I needed the depth for the backside of the switch.File 04-06-2017, 16 08 16.jpeg
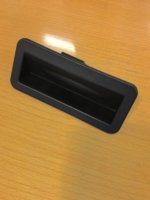
Connected up the switch and put the panel back and voila, I have an internal tailgate release. File 04-06-2017, 16 12 44.jpeg
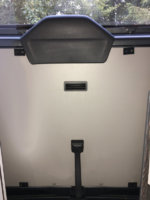
It can't be knocked open by a load (not that there would be anything resting on mine anyway) as the actual microswitch is an upward press behind a membrane inside the handle.
I'm probably going to cover the fibreboard with vinyl or something and I'm going to fix hooks to it so that I can bungee traction mats and levelling ramps to it, which will fit neatly in the spaces between the tailgate and the furniture. Anyway, hope this helps, not a tricky job at all.
 
On mine the tailgate locks when the van moves. This is a different functionality than "full" lock/unlock - which I haven't used.

Tailgate unlocks when either driver or passenger door is opened (LHD). Haven’t tried if the sliding doors have the same effect though (the bulkhead). Putting gear on N or P, or pulling handbrake or opening a window does not unlock the tailgate. So pretty much foolproof :thumbsup:. I haven't tried if central locking unlock button would release it.

So my thought was that this will take mostly care of accidentally opening tailgate by moving load hitting the switch etc.
Thus went for a big (32mm) momentary switch which allows me to open the tailgate with just straight single finger push. I have the power latch which might ease this a bit.
upload_2019-1-1_15-41-3.png


Possibly the culprit is BCM (09) byte 01 bit 3 - which is ticked on mine (from the factory). Unfortunately I have never ticked off to verify…
Byte 01 Bit 3 Central Locking/Rear Lid: Speed depending locking over 5 km/h (Zentralverriegelung/Heckklappe: Geschwindigkeits basierte Verriegelung (ab 5 km/h))
as documented in post VCDS codes list
09byte01.jpg
 
Last edited:
To make up for my idiocy on the H4 thread, I thought I'd post how I added an internal tailgate release in case it's any help to anyone else.

My tailgate has a fibreboard covering, don't know whether it was standard or whether the converters removed another panel and replaced it with this. Anyway, with that off you will see a little blue plug (unplugged in pic below). This is the two wires that need to be touched together to activate the release.View attachment 9308

I cut into each of these wires and soldered additional wires. The connections were then heatshrunk and plugged the connection back in.View attachment 9309

While I was at it, I put some Silentcoat on the inside of the hatch (took 7 sheets) as I noticed it had no insulation of any type. I also covered the back of the fibreboard with a layer of closed cell foam. I then got a boot release switch that I'd got off ebay (generic Ford switch, was about £6) and measured and cut a hole so that it would fit through the fibreboard into the top of the spaces on the inside of the hatch above. This isn't quite central but I needed the depth for the backside of the switch.View attachment 9311

Connected up the switch and put the panel back and voila, I have an internal tailgate release. View attachment 9312

It can't be knocked open by a load (not that there would be anything resting on mine anyway) as the actual microswitch is an upward press behind a membrane inside the handle.
I'm probably going to cover the fibreboard with vinyl or something and I'm going to fix hooks to it so that I can bungee traction mats and levelling ramps to it, which will fit neatly in the spaces between the tailgate and the furniture. Anyway, hope this helps, not a tricky job at all.
Hi Andy. Thanks for the guide, I have received my momentary switch but wondered if there was any specific type of wire I need to use to make the connection? Cheers
 
Its switching a negative and doesnt carry any voltage or current so pretty much anything will do, personally i use 2 pieces of 0.5mm cable
 
I am fitting an OEM tailgate interior switch to my T6...
Pauly has supplied me with a 3 wire short loom to connect the new switch into the existing loom...
Can someone advise me on where to connect into? I have looked and the 3 wires going to the exterior release handle have numbers 21 and 33 on them... the other doesn’t have a number marked in it?
 
E233 is your new switch. E234 is the switch in the outside handle
Connect pin 1 to ground or pin 2 on the exterior release
connect pin 4 to pin 1 on the exterior release
pin 2 is for the illumination, you might need to run a wire to the inside of the van to connect this

Capture.PNG
 
I tapped the illumination off my number plate light which was easier to get to.

Also had to bridge out the resistor inside the OEM switch between the switched pins (not the resistor for the LED!)
 
More about... hopefully just not to confuse more...
 
I tapped the illumination off my number plate light which was easier to get to.

Also had to bridge out the resistor inside the OEM switch between the switched pins (not the resistor for the LED!)
How do you mean mate?
I’ve tried tapping into the oem switch(blue connector) today but it didn’t work? Do you know which is which out of the 3 pins in the OEM interior switch?
 
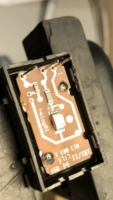
The thing is, the factory external handle is a standard switch so should measure 0 ohms when closed, but the interior switch from VW has a resistor between the two pins, so when closed, the switch was the value of the resistor.

I’ve attached pictures. You can see that when the switch is pulled, it joins the two outer pins, and mine didn’t work with the switch as it came from VW.

I heated up and removed the surface mount resistor and then bridged the position on the board. Now, when you pull (close) the switch, it’s straight through at 0 ohms.

E901AE6C-EBE1-476F-AFF4-606A33EF440D.png

8D85ACD7-61D5-4578-BE32-FA73B8CC2A66.png
 
Positive to the middle pin will provide illumination, but the pin 1 will provide the earth through the loom for the switch (provided it’s connected correctly)
 
Last edited:
It’s the 2 pins on the outer handle switch (blue plug that goes to the switch) that you need and not on the actuator.
 
Last edited:
The blue plug is the switch plug rather than the actuator. These are what you need to tap into. The actuator is the white thing with the black plug which you leave alone. :thumbsup:
 
Last edited:
just re-read your post and the word ‘that’ isn’t clear. It’s the plug that goes to the switch you need to tap into, not the actuator plug. :cool:

The switch joins the pins in the blue plug (that go to the switch) together and opens the boot.
 
Last edited:
Back
Top