You are using an out of date browser. It may not display this or other websites correctly.
You should upgrade or use an alternative browser.
You should upgrade or use an alternative browser.
H4 To H7 Upgrade
- Thread starter Howler
- Start date
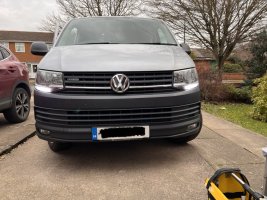
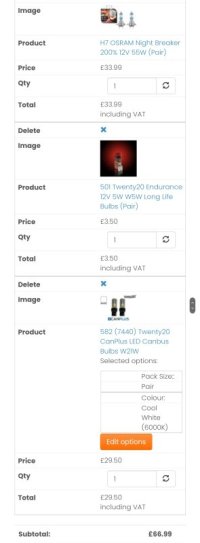
True! Already spent nearly that on the Twenty20 DRL LEDs when postage was included.You have yourself a bona-fide bargain there my friend.
It's a deal, it's a steal, it's the sale of the f*****g century.
Cost you more in bulbs
Lenses are in great nick, lugs and fixings all look present and correct, DRL bulb holders aren't burnt or melted, no condensation - so far so good. Haven't plugged em in yet - that's a job for the daylight at the weekend. The dice is still sliding across the table, but it's looking good for a win.Well on Wednesday I found a pair of H7s on FB marketplace for £40. They’re from a 2017 Shuttle. I had them couriered by UPS. They arrive tomorrow. What will the future hold? Did I get a massive bargain, or will I regret buying them without seeing them? Find out in tomorrow’s instalment of ‘Rolling the Facebook Marketplace Dice of Chance’.
I’ve got the 582 7440. Good bulbs, but a bugger to get in.
Took me 20 odd minutes to get the feckers in, and that was with the H7 units out and sat on a benchI’ve got the 582 7440. Good bulbs, but a bugger to get in.
Took me just over two hours for the whole thing. Couple of things to report for others attempting this:
1. The bumper does not need to be removed. This post from @Tigchamp was a great help to me - wife not well and unable to hold one end of the bumper. Mine is a Startline single-piece bumper, but there’s loads of flex. Thanks TigChamp.
3. Once I had finished and packed everything away, I noticed that the headlights sit shy of the bumper in the middle (they toe in slightly) by 5mm or so. Not noticeable to anyone other than me, but that made me realise that the headlight mounting screw guide underneath (and fixed to) the lights had an adjustable depth setting. If I ever get bored bored bored I might take the whole thing apart and correct this, but for anyone doing it afresh, check this before you bolt everything together - the right time to do it would be when you just put one screw in the lights and test the wiring etc by switching on the ignition.
Don’t mean to sound negative - I’m delighted with the end result, and if I die before I reach 298 years old then all is good.
Thanks everyone on this thread.
EDIT: ***SEE WARNING BELOW ABOUT AVOIDING THIS ROUTE***


1. The bumper does not need to be removed. This post from @Tigchamp was a great help to me - wife not well and unable to hold one end of the bumper. Mine is a Startline single-piece bumper, but there’s loads of flex. Thanks TigChamp.
2. Those ‘better’ CanPlus LEDs from Twenty20 - They look awesome. they are *much* longer than the older version and nearly twice as long as the halogen bulb. There was no way these were going in using the traditional method. I had the headlights on the dining room table with a small torch so I could see clearly why they fouled. The only option was to remove the plastic extension piece from the bulb holder (just unclips) then fit them without the extension. Either they can deal with either polarity or I luckily guessed correctly in both cases. Assuming they don’t fail, I calculated it will take me 250 years to reach the end of their life so now they’re in, I feel good about them. There are no CANBuS errors with ignition on. Haven’t driven it yet.Just a little update to this thread, there is no need to remove the whole bumper. Just do one side at a time. I had to replace a broken headlight and just removed the trim clips on the top and the Torx screws and trim clip on one side of the inner arch and bottom of one side, then simply pulled that side of the bumper away. This gave me plenty of room to undo the two bolts on the front of the headlight. It is flexible enough to remain attached on the other side. After replacing the headlight I simply pushed the bumper back in place and reinstalled al the fixings. If you wanted too you could then do the same for the other headlight. Obviously doing it this way there is no problems trying to get the whole bumper back in place and you can do it by yourself without a helper.
3. Once I had finished and packed everything away, I noticed that the headlights sit shy of the bumper in the middle (they toe in slightly) by 5mm or so. Not noticeable to anyone other than me, but that made me realise that the headlight mounting screw guide underneath (and fixed to) the lights had an adjustable depth setting. If I ever get bored bored bored I might take the whole thing apart and correct this, but for anyone doing it afresh, check this before you bolt everything together - the right time to do it would be when you just put one screw in the lights and test the wiring etc by switching on the ignition.
Don’t mean to sound negative - I’m delighted with the end result, and if I die before I reach 298 years old then all is good.
Thanks everyone on this thread.
EDIT: ***SEE WARNING BELOW ABOUT AVOIDING THIS ROUTE***


Last edited:
Looking great with those LED Drls
Will give you a wave when our paths cross. My folks live in Easingwold, can’t be far from you.Looking great with those LED Drls
Yes, more than a fair chance !
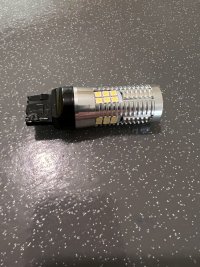
WARNING: Do not do what I did. Those ‘better’ Twenty20 CANBuS bulbs have near-on destroyed the DRL holder. I got a dash warning and found one was actually out. On inspection, the contact has melted INTO the body plastic of the bulb?!??! The holder is now just holding on for dear life. I replaced with normal bulbs until I figure out what’s going on. I cannot recommend these bulbs for this application. Steer clear.


WARNING: Do not do what I did. Those ‘better’ Twenty20 CANBuS bulbs have near-on destroyed the DRL holder. I got a dash warning and found one was actually out. On inspection, the contact has melted INTO the body plastic of the bulb?!??! The holder is now just holding on for dear life. I replaced with normal bulbs until I figure out what’s going on. I cannot recommend these bulbs for this application. Steer clear.
View attachment 187266View attachment 187267
So although website states they are compatible with T6 they are simply too long??
Worrying as I've already ordered them.
Too long and they melted after about 2 hours of use. I'll be sending mine back.So although website states they are compatible with T6 they are simply too long??
Worrying as I've already ordered them.
Nightmare. I'm going to phone or email now. Hopefully not dispatchedToo long and they melted after about 2 hours of use. I'll be sending mine back.
Oh bugger. That means I’m going to have to take the bumper off again to check mine. 
I’m glad you had the warning light though, as it could’ve been worse. Probably something for those who coded the warning lights out to think about.
I’m glad you had the warning light though, as it could’ve been worse. Probably something for those who coded the warning lights out to think about.
Last edited:
Agree. I did manage to get mine out without removing the bumper. Or the air box. Having had the unit on the dining room table, I could visualise what what happening inside to get them out.Oh bugger. That means I’m going to have to take the bumper off again to check mine.
I’m glad you had the warning light though, as it could’ve been worse. Probably something for those who coded the warning lights out to think about.
Similar threads
- Replies
- 11
- Views
- 3K
- Locked
- Replies
- 0
- Views
- 780
- Replies
- 48
- Views
- 17K


