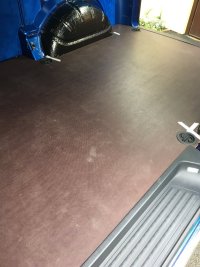
Lashing Points Fitting

DM812

New Member
I’m converting a panel van and will be putting down new lashing points.

I had the 2 bolt points before removing and now have the Kombi 1 bolt point and rings to install (plan is to fill the unused bolts of the two).

The question is, is the 1 bolt cup shape the same underneath as the 2 bolt cups? When I test the new points it doesn’t to sit flat (not sure if this will change once the floors in?), picture below..
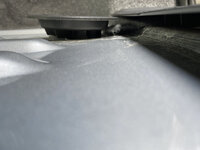
D4B50F39-A14E-4850-A2A8-CD9EE0589F32.jpeg
 
The spacer under the bolt is what is designed to clamp to the metal floor and the plastic trim just needs to be pulled tight to the floor lining. You can adjust with washers if you want to change the spacer height.
 
You can get the plastic tie down eyes with the 2 hole configuration @DM812 and will fit the floor correctly.
I am getting some for my T6.1 panel van to hold the plywood floor down as I can’t bring myself to drilling holes in the floor.
 
You can get the plastic tie down eyes with the 2 hole configuration @DM812 and will fit the floor correctly.
I am getting some for my T6.1 panel van to hold the plywood floor down as I can’t bring myself to drilling holes in the floor.
You can get the plastic tie down eyes with the 2 hole configuration @DM812 and will fit the floor correctly.
I am getting some for my T6.1 panel van to hold the plywood floor down as I can’t bring my
 
Sorry, no idea what happened there!

@Randolph , I'm going to do the same with 18mm ply flooring in the back of my Kombi. Will the bolts still tighten up with the added 18mm?
 
Sorry, no idea what happened there!

@Randolph , I'm going to do the same with 18mm ply flooring in the back of my Kombi. Will the bolts still tighten up with the added 18mm?
Hi @Scruffy
Yes they will be long enough to use with 18mm. When I made the hole in the plywood for the plastic discs, I let it rest on the flange and measured the distance from the steel floor to the top of the bolt hole in the plastic disc minus the thickness of the plastic disc then turned some alloy spacers on a large so the floor doesn’t distort when tightening the bolts down.
@Scruffy sorry for the typo error, I mean Lathe and not large!!!!
 
Actually, what I should have said was the 18mm ply is going on top of the original rubber flooring. Will the bolts still reach?
 
Hi,
Appreciate this is an old thread, but any suggestions on how to accurately drill the big hole in the floor in the correct place!?
 
Hi,
Appreciate this is an old thread, but any suggestions on how to accurately drill the big hole in the floor in the correct place!?
I take it you have some sort of flooring in your van & the lashing points have been covered over & you want to reinstate them ?

If that is the case you need someone to measure, accurately where one of the lashing points is positioned. Once you have that position, you should be able to locate it's opposite pair. With two locations known measuring from these two points should accurately give the locations of the other four positions.

If you are going to use something like a hole saw to cut out your floor you will need to be very careful indeed when you drill through the floor covering so as to avoid damaging the metal floor of the vehicle underneath.
 
@ChrisWatson, sorry the Penny has now dropped, location in the new plywood flooring.
If you drill two pilot holes initially for the bolts then fit the plastic flanged lashing shrouds through the bolts into the floor and draw round the inner diameter to be cut
 
Put some short lengths of studding (can’t remember if its M6 or M8) in the threaded floor holes.
Lay the ply on top so that an impression is made in the bottom of the ply by the studding.
Drill the screw hole centred on the impression.
Mount the plastic on top of the ply and mark out the cut out before centre finding and using a hole saw to cut the final hole In the ply.
 
Back
Top