Well they are done. It was quite a fight.

S+S Panel Retrofit Steps:

- Removed old ply panels by unscrewing.
- Cut away carpet to expose bare metal walls
- Add Dodo Thermo liner and fleece wool to walls
- Cut out holes from carpet on metal to expose the factory holes
- The push clips are quite fussy, the holes need to be completely clear for them to go in so it is quite fiddly
- Panels with no carpet on them were a doddle
- The CNC cut of the S+S panels is good, they match up to the holes really well
- 2 holes needed drilling to move the hole in line slightly

S+S Panels:
I read some comments on poor quality of these. The edges are unfinished, and they are a little rough, but they are designed from a utility perspective and they do it perfectly. They seem tough and personally i much prefer them over having hairy walls. It definitely makes the van feel more professionally done. The addition of insulation behind the panels has been a huge shock as the van is so much quieter! I really like the crosses on the panels as you can hang bungees all over or use "S" hooks. I used two methods for mounting the bungees...

- Cutting a piece and putting a thumb knot in each end, then wedging the knot behind the cross cut outs
- Feeding the elastic behind the panel and connecting the elastic together with a reef knot, then scooting it round so the knot is at the back of the panel

The latter technique seems to work best, using thumb knots just seems to pull the elastic out.

All in all, im really pleased with the panels! They work really well and are a much more contemporary alternative for an adventure van setup.

View attachment 225687

View attachment 225689

View attachment 225690

View attachment 225691
hi van looks nice what you think on Stitches and Steel panels as im looking at getting some for the van i like the swamper look
 
hi van looks nice what you think on Stitches and Steel panels as im looking at getting some for the van i like the swamper look
I personally rate them highly. They are great if you have dogs and bikes etc as they wipe clean. I use "S" hooks to pop things on them when stationary and bungees when on the move. Its also a good way to get behind the panels and ensure your insulation has been done properly. Some dont like the finishing, but my van was always meant to be more of an "adventure van" and a build to last. So I like them!
 
  • Like
Reactions: CAB
Fairly big update as I have been neglecting things lately!

I had been using a cheap fan assisted cool box but it was noisy and didnt really work. Recently found a THQ portable compressor fridge for sale locally so that solved the problem.

We have been using the van over the spring and its going well. Perfect for biking and having wholesome camping weekends. My only issue is the wasted space behind the bulkhead and in front of the bed.

I have been working with a local company that have a CNC machine to design a unit to fit the space. The idea is to move the electrical panel onto the new unit, which is still being designed at the moment.

The badly drawn image is a rough idea of where the unit is going.1718787795241.png
 
Bumpers!

I bought my van with an aftermarket sportline bumper on the front. It wasnt fixed on well and rubbed against the bumper underneath. I was worried about corrosion and general damage underneath. It also didnt really work with the look im going for (kinda counteracts the whole point of lifting the van). So I decided to remove it.

Easy to take off, literally 2 spring clips.

To finish the front end, I added a (completely cosmetic) skid plate to the front bumper. Its just an ABS plastic part but for me it finishes the front look off nicely. Link here! ABS Front Bumper Protector Skid Plate Black - VW T6.1 19 - Vanstyle

Before and after below

1718788279509.png1718788313111.png
 
Ceiling insulation

I insulated the walls of the van when I added the S+S Panels. But as heat rises I guessed a lot of the warmth was vanishing through the roof.

Decided to insulate the ceiling during a quiet weekend.

As the lights were difficult to disconnect I used some trestle tables to hold the panels up, and insulated around the cables. It was a pain, but definitely worth it! The van is much warmer and waaaaay quieter, I guess the roof panels must buffet a fair bit at speed.

1718788521236.png
 
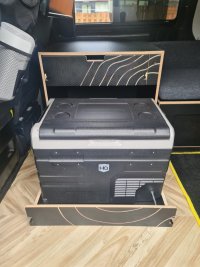
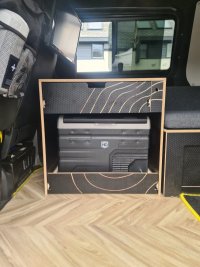
The unit has arrived! The design changed quite a few times over the past 6 weeks or so. But I'm very happy with the outcome. It makes the van feel so much more complete, as well as giving much needed storage and worktop area to put things. What do people think?

The key features being:
- Fridge sliding tray
- Sliding tray with false lid for use as worktop and desk
- False lid can be used as a standalone table
- Pre drilled fittings for movement of electrical panel
- Hard wearing buffalo board

WhatsApp Image 2024-06-19 at 10.08.00 (4).jpeg

WhatsApp Image 2024-06-19 at 10.08.00 (3).jpeg

WhatsApp Image 2024-06-19 at 10.08.00 (2).jpeg

WhatsApp Image 2024-06-19 at 10.08.00 (1).jpeg

WhatsApp Image 2024-06-19 at 10.08.00.jpeg
 
Back
Top