You are using an out of date browser. It may not display this or other websites correctly.
You should upgrade or use an alternative browser.
You should upgrade or use an alternative browser.
For Sale Ambient Cabin Overhead Lighting
- Thread starter saxoboy
- Start date
Vanborghini
The Chlorine King of Bexley
Can you get these in Black?
Last edited:
I've started fitting these but I didn't find it easy. The instructions are okay but I'm not necessarily the most adept at this kind of thing. I read the instructions and then all 9 pages of this thread and you'll need a couple more pointers by searching on Google (even if it leads back to the forum).
Here's some help if you're like me: How to remove the cab interior lights and, if you have a Startline or Trendline model, how to remove the storage box above the interior lights, as this kit means you have to. And then you need to modify the cubby hole box to fit it back in. I've yet to start thinking about how to cut the hard plastic shell and get it back in (to stop my famly losing things through the hole of the box or poking their fingers into the electrics).
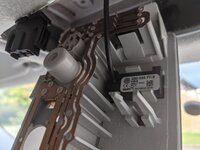
Seating the mic into the clips was difficult. I haven't checked my hands-free yet in case I damaged it.
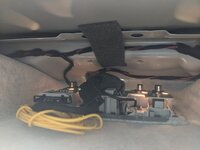
The result in a Trendline (and presumably Startline) before running the yellow wire down.
@saxoboy it might be worth changing your original post/the thread title to make it clear that this is for Highline spec vans only without the cubby hole storage (and not Caravelle, I think I spotted too)? and it's not a simple mod for the Startline and Trendline specs. Also, it's not plug and play given that you need to solder the dimmer wire in, or use a snap-in block (which I need to get some more of, as I'm out of them), so that is a little misleading. I'm okay with the outcome. I'll find a way to modify the storage box, but I would have preferred to have known up-front about that limitation rather than read it several pages into the thread (and I don't think it mentioned Trendline explicitly, so I wasn't 100% sure that I would face the same problem as a Startline owner).
I'm looking forward to the second part of the install, and I'll post another guide to help others with the roof lining, a-pillar and wiring.
Oh, one question - I popped out my headlight switch and there are two grey/blue wires, one has black dots on it. I presume it's the plain grey wire with blue stripe without the dots that I splice into?
Here's some help if you're like me: How to remove the cab interior lights and, if you have a Startline or Trendline model, how to remove the storage box above the interior lights, as this kit means you have to. And then you need to modify the cubby hole box to fit it back in. I've yet to start thinking about how to cut the hard plastic shell and get it back in (to stop my famly losing things through the hole of the box or poking their fingers into the electrics).

Seating the mic into the clips was difficult. I haven't checked my hands-free yet in case I damaged it.

The result in a Trendline (and presumably Startline) before running the yellow wire down.
@saxoboy it might be worth changing your original post/the thread title to make it clear that this is for Highline spec vans only without the cubby hole storage (and not Caravelle, I think I spotted too)? and it's not a simple mod for the Startline and Trendline specs. Also, it's not plug and play given that you need to solder the dimmer wire in, or use a snap-in block (which I need to get some more of, as I'm out of them), so that is a little misleading. I'm okay with the outcome. I'll find a way to modify the storage box, but I would have preferred to have known up-front about that limitation rather than read it several pages into the thread (and I don't think it mentioned Trendline explicitly, so I wasn't 100% sure that I would face the same problem as a Startline owner).
I'm looking forward to the second part of the install, and I'll post another guide to help others with the roof lining, a-pillar and wiring.
Oh, one question - I popped out my headlight switch and there are two grey/blue wires, one has black dots on it. I presume it's the plain grey wire with blue stripe without the dots that I splice into?
Keep at it....I'm sure you'll think it's worth it in the endI've started fitting these but I didn't find it easy. The instructions are okay but I'm not necessarily the most adept at this kind of thing. I read the instructions and then all 9 pages of this thread and you'll need a couple more pointers by searching on Google (even if it leads back to the forum).
Here's some help if you're like me: How to remove the cab interior lights and, if you have a Startline or Trendline model, how to remove the storage box above the interior lights, as this kit means you have to. And then you need to modify the cubby hole box to fit it back in. I've yet to start thinking about how to cut the hard plastic shell and get it back in (to stop my famly losing things through the hole of the box or poking their fingers into the electrics).
View attachment 88735
Seating the mic into the clips was difficult. I haven't checked my hands-free yet in case I damaged it.
View attachment 88734
The result in a Trendline (and presumably Startline) before running the yellow wire down.
@saxoboy it might be worth changing your original post/the thread title to make it clear that this is for Highline spec vans only without the cubby hole storage (and not Caravelle, I think I spotted too)? and it's not a simple mod for the Startline and Trendline specs. Also, it's not plug and play given that you need to solder the dimmer wire in, or use a snap-in block (which I need to get some more of, as I'm out of them), so that is a little misleading. I'm okay with the outcome. I'll find a way to modify the storage box, but I would have preferred to have known up-front about that limitation rather than read it several pages into the thread (and I don't think it mentioned Trendline explicitly, so I wasn't 100% sure that I would face the same problem as a Startline owner).
I'm looking forward to the second part of the install, and I'll post another guide to help others with the roof lining, a-pillar and wiring.
Oh, one question - I popped out my headlight switch and there are two grey/blue wires, one has black dots on it. I presume it's the plain grey wire with blue stripe without the dots that I splice into?
For best results, swap the standard bulbs for led & add the footwell lights....like Blackpool illuminations
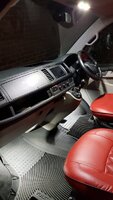
Well, I've found a solution for Startline or Trendline owners...you can adapt the unit to fold the connector back over the unit. It's an pita to do, but better solution than cutting the storage box:
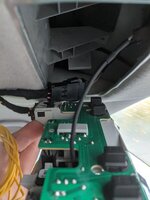
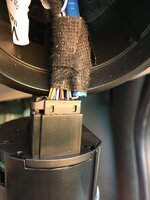
Here's the problem, there's no space behind the light unit.
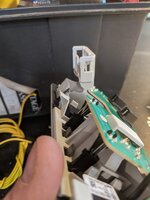
First cut through the plastic mount for the connector.
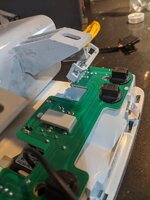
Fold the connector over itself (about an hour of fettling) and then you have to cut the hook off the storage box as it clashes.
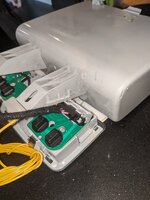
and finally fold it even further to get the light unit back in.
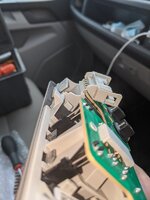
and at the end of a couple of hours I have lights back in, but I still haven't run the wire down for the ambient lighting.
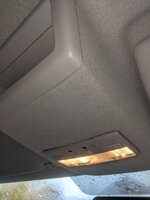
it's not what I anticipated I'd have to do when I bought this. If the rain ever stops I might work on running the cable and then I might feel better

Here's the problem, there's no space behind the light unit.

First cut through the plastic mount for the connector.

Fold the connector over itself (about an hour of fettling) and then you have to cut the hook off the storage box as it clashes.

and finally fold it even further to get the light unit back in.

and at the end of a couple of hours I have lights back in, but I still haven't run the wire down for the ambient lighting.

it's not what I anticipated I'd have to do when I bought this. If the rain ever stops I might work on running the cable and then I might feel better
Well, another hour and a half of fitting and the ambient lighting isn't working. I fitted the footwell lighting at the same time (which had it's own problems as the cutouts are too small for the lights, but I managed to sort that okay) and thought I would run the ambient lighting down the passenger side but I couldn't find a grey / blue line on that side to tap into, so reverted to the drivers side.
It took a while to find the right route down the a-pillar to the light switch and then I found two grey / blue wires, one plain and one with black dots. I umm'd and ah'd about it, checked the colour of every other wire; blue/yellow - grey/white etc, downloaded the wiring diagrams but couldn't find a grey / blue line on the lighting switch on there, and hadn't had a reply from @saxoboy earlier in this thread, so eventually I did this:
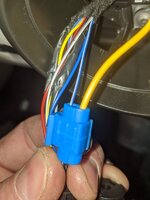
I don't get any illumination or ambient downlighting when I switch on the sidelights or headlights. Any ideas?
It took a while to find the right route down the a-pillar to the light switch and then I found two grey / blue wires, one plain and one with black dots. I umm'd and ah'd about it, checked the colour of every other wire; blue/yellow - grey/white etc, downloaded the wiring diagrams but couldn't find a grey / blue line on the lighting switch on there, and hadn't had a reply from @saxoboy earlier in this thread, so eventually I did this:

I don't get any illumination or ambient downlighting when I switch on the sidelights or headlights. Any ideas?
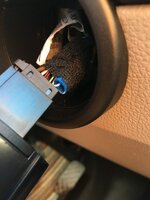
Thanks Matt, I'll try that. Not sure if it's my Trendline that has a different loom to the Highlines, but it has a grey /blue (not discernibly blue / grey, by the way) and a grey / blue dashed or dotted as well. Pin 10 will be the dashed / dotted line. Here's a better picture:Hi Andy the correct blue/ grey wire is in pin 10 (should be the thicker wire). You should find this on the plug that plugs into the switch...Matt
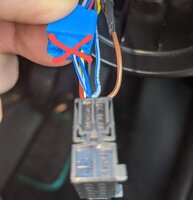
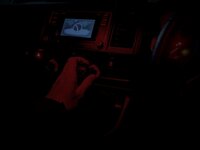
Looking forward to showing the results later
P.S. can someone point me to a kit of led bulbs for this unit?
I got 2 packs of these. Super bright. Probably get some cheaper ones but these are super reliable.Thanks Matt, I'll try that. Not sure if it's my Trendline that has a different loom to the Highlines, but it has a grey /blue (not discernibly blue / grey, by the way) and a grey / blue dashed or dotted as well. Pin 10 will be the dashed / dotted line. Here's a better picture:
View attachment 90437
Looking forward to showing the results later
P.S. can someone point me to a kit of led bulbs for this unit?
Thanks, does two packs cover the three lights in the unit?I got 2 packs of these. Super bright. Probably get some cheaper ones but these are super reliable.
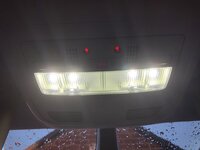
I used these, bit cheaper and guaranteed not to flicker
These are on the photo earlier in this thread
GordyMarsh
New Member
Hi @GordyMarsh just PM'ed you 
Similar threads
- Replies
- 43
- Views
- 10K
- Replies
- 344
- Views
- 49K
- Replies
- 5
- Views
- 4K

