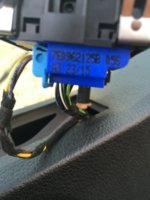
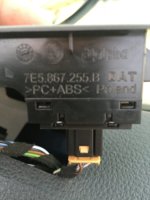
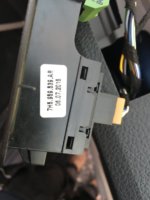
Might not be so simple. The interior locking switch (E150) is connected to:

1: br/sw earth in driver door
2: gr/bl lighting in driver door
3: nc
4: ge switch line, connects to T17l /8 and then to BCM T73a /25

You may have to run a line all the way to the BCM, and then you'll be in the hands of the BCM gods.... who knows what goes on in there.
 
It's not a factory roof though, it's a poptop with some custom trim panels below. I've gone up the drivers side and currently have it coiled up behind the B pillar trim while I decide what to do next. Wish I'd thought of going along the passenger side, there's a lot less to get in the way there! I'll go back to it once I've got the other stuff done and I'm in a betteer frame of mind :D
 
Might not be so simple. The interior locking switch (E150) is connected to:

1: br/sw earth in driver door
2: gr/bl lighting in driver door
3: nc
4: ge switch line, connects to T17l /8 and then to BCM T73a /25

You may have to run a line all the way to the BCM, and then you'll be in the hands of the BCM gods.... who knows what goes on in there.

Oh god, I might have known it wouldn't be easy :( Thanks for the info, if it's a CANBUS connection to the BCM that's beyond my ability so I might have to drop the idea
 
Its not actually as bad as it sounds, three wires and two of them are already inside the door, the third only goes to the BCM which is not far from the door wiring exit point.
Adding a cable to an existing plug is as simple as unplugging it, releasing the locking clip in the housing and pushing the wire into a hole, re-engaging the locking clip and plugging it back in
Obviously theres the issue of getting to the connector and figuring out which plug/terminal etc but its definitely achievable, if it helps i can get you the socket for the back of the door switch terminate three cables into it and terminate the other end of the BCM cable ready to plug in ??
That would be great, yes please, if you let me know how much I'll Paypal it to you! Just nervous of messing something up on the BCM
 
Give me a few days to order the housing and will see what i can sort, guessing somewhere around £10-15 delivered
Can you confirm the part number of the switch you have so can be certain i get the correct connector housing
 
Give me a few days to order the housing and will see what i can sort, guessing somewhere around £10-15 delivered
Can you confirm the part number of the switch you have so can be certain i get the correct connector housing
Thanks, the number on it looks like 7E0962125B , though the last character is quite hard to be sure of
 
What site does everyone use to look up parts? Although there's an indentation on my switch surround the right shape for the central locking switch, there isn't a popout plate so I'd decided I'd dremel out a hole the right size. Having done it I'm not happy with how it looks so I've decided to order a whole new switch surround, but hopefully the version with the built in door switch. Anyway, googling found oemepc.com/vw which looked to be pretty comprehensive but the diagram of a door switch for the 2016 Transporter shows the T5 type with the rounded top and mirror adjusters at the top, instead of the flat top with the mirror adjusters in the middle. Putting the part number, which is clearly stamped on the side, into the search says there's no such part (googling the number shows pics of the one I've got). On top of that it looks like my Feb reg van isn't on the system yet as the VIN isn't recognised.
Is there a newer site for T6 parts that I haven't found?
 
Its tricky as online versions of ETKA are often outdated and not always conclusive, havent found one online yet that has full T6 line up on it but have access through VW so havent looked to hard for quite a while
If you get stuck i can source one for you as i have your cable to send to you anyway so wont cost much more in postage or if you prefer can take my trim of my van and get the part number of the trim/surround
 
Just picked up on this thread. My van isn't here at the moment but I don't believe I have a lock/unlock button either. Mine's a Highline Kombi.
 
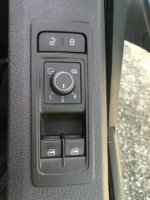
Just been out for a closer look
Switch from above
IMG_4799.JPG
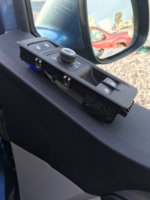
Popped out
IMG_4791.JPG
Part number of switch
IMG_4798.JPG
Part number on plastic trim/surround one number on each side
IMG_4789.JPG IMG_4795.JPG
 
Just picked up on this thread. My van isn't here at the moment but I don't believe I have a lock/unlock button either. Mine's a Highline Kombi.
Mine is a highland kombi, and I have the lock button so I am sure yours will have.
 
Thanks for doing that @Pauly, if the locking switch clips into the surround then I just need the surround then. The part number for my surround is the same apart from the 3rd character which is 0 instead of 5. The other switches are the same number except the suffix letter. One think I've noticed though, your switches are July 16 and all the switchgear and connections I have in that door are stamped Nov 15! For a Feb 17 van. So they must have been saving up old parts just to make my van less functional o_O
 
My van is early, manufacture date aug 15
The 5s look like 6s
 
Ok I can finally bring an end to this, @Pauly sent me the wires terminated with the crimped terminal I needed, along with the correct plug to go into the back of the locking switch, and I had a day free so got stuck into it. I already had the door card off so was able to quickly attach the connections for switch illumination and ground, both available on the back of the mirror adjustment switch, and fed the remaining connector through the door wiring "tunnel" to below the steering wheel. The lower black trim has a couple of torx screws holding it then just unclips, and the trim on the lower half of the dash just pulls off. I also removed the shroud round the bottom of the steering column to give myself a bit more room.

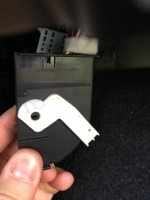
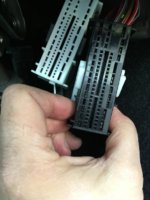
Once upside down in the footwell you can see the two 73 pin connectors that go into the back of the BCM and they can be unplugged without removing the BCM itself by hinging up the white clips and pulling horizontally towards the front of the carFile 21-05-2017, 17 58 16.jpeg (the flat side on the left goes into the BCM). To help distinguish them, one is white and one is black (I wanted the black one 73A), and pushing in a little clip either side allows you to slide the connector block out of the hinged surround. Once you do, you separate the connector block into two halves by holding the sides and sliding in opposite directionsFile 21-05-2017, 17 57 38.jpeg
Once you've done this you can see that each pin is numbered (they're very small but they're there) and once I'd found the pin I needed (25) I found that I couldn't put the crimped connector in as there was already a yellow wire in it. After further consulting with @Pauly he confirmed that was ok and to attach the wire to that yellow. That did prove difficult as it was in the middle of a thick bunch of tightly wrapped wires heading up the dash with hardly any slack, but after just a faint whiff of burning floor mat (oops) I had the connection soldered and heatshrunk. After reassembling the connector and plugging them both back into the BCM it was time to re-connect the battery and hold my breath and ... Success! :mexican wave:

I really find putting the lower trim panel that fits round the light switch surround difficult and it took a lot of bending (and butchering the plastic round the surround itself, which is thankfully hidden when assembled) to get it back on, but with all reassembled it works perfectly and is indistinguishable from factory :D And yes I know the door card isn't back on properly, I can never get that right first time.
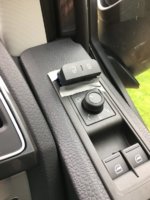
File 21-05-2017, 17 58 49.jpeg

Boosted by the achievement, I then ran the cable for my rear dash cam and installed it, also running the rear cable for my upcoming 360 cam project, plus a spare 12v supply to the back while I had the trim off. All in all a good day, in fact I feel epic! Where's my high heels and hot pants :whistle:

Huge thanks again to @Pauly for all the help, it's an unnerving experience pulling apart a 3 month old van and making new connections to the BCM and he gave me the confidence to give it a go :thumbsup: If anyone ever needs to do this, or you've come across this on a Google search, get in touch and I can give you any more details you need.
 
Back
Top