I tend to use my van for 2-3 days at a time each week, 365 days a year and this time of year condensation is a real issue, especially when cooking on propane which releases moisture as well as any steam from cooking. So I've been looking into active ventilation and was inspired by @TrevorK 's picture of a DIY extractor fan for the sliding side window. I bought a few bits on amazon and using an old piece of acrylic board I've put together a DIY kitchen extractor fan. Incase anyone's interested here's some pictures and details from the build.
Before we dive in my goals were:
1. It has to be very quiet - think the occassional bit of stealth camping.
2. It has to be water tight and something I'm happy to leave in all the time.
3. It has to be something that can be removed and leave the van exactly as I found it - no holes drilled and nothing bonded in place.
4. It has to be secure/safe.

Image 1: Cut the perspex/acrylic sheet to match the window pane. With a bit of flex it fits into the window runners on the top,left and bottom edges so its held in place. The sliding window is then butted up against it in a locked position so there is no way for the acrylic sheet to come out. Note the acrylic sheet already had a hole drilled in it. But I didn't have any to spare so I will plug that hole (top left) later... oh yes and it's white! - spray paint needed! But you get the idea... it's a snug fit that isn't going anywhere and matches the profile/curve of the window.

Image 2: Closeup of the bottom left corner. I got lucky because the acrylic sheet was only about 1/2mm thicker than the window.
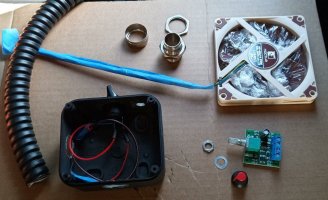
Image 3: OK from left to right anti-clockwise. We've got 20mm outdoor flexible conduit. A conduit box and an inline 12v toggle switch which I've alrady sprayed black and switch fitted. A 12v variable voltage regulator which allows you to dial down the voltage and thus change the speed of the fan. A silent ultra thin (14mm) 92mm diameter 12v computer fan. End terminals for the conduite to attach to the condiut box. PS. The fan is masked up with clingfilm because I'll be spraying it black but its not a good idea to spray paint the blades as any uneven paint deposition may imbalance the fan which will create noise, friction and harm the very delicate bearings. The conduit is left over from a previous job but I love the heavy industrial look it gives. That's just my taste
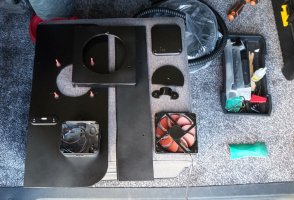
Image 4: OK so now the parts are sprayed I'm on to assembly. The conduit box was glued to the acrylic (I sanded away the spray paint from the bonding surfaces). The four rubber fan mounts are similarly bonded in place.
PS. Yes you may have noticed that some of the straight line cuts are a little wafty. I only had a hand jigsaw and the one piece of acrylic which had already been cut years before so some of its edges were not great. However this is a "Prototype" so at this stage I'm just playing with an idea and having a bit of fun in the process... who doesn't enjoy a DIY project? (AKA. grown up lego) Overall - so far so good but will it work???
Now one of the problems (ne challenges) is that there is a slight curve in the real window and so the thick strip you see next to the fan will serve two purposes. 1. to bridge the join between glass window and acrylic sheet. 2. To force the acrylic sheet to bend to match the window. That's also what the semi-circle piece is for. It will go in the lower corner on the inside to pull the botten edge of this thick strip. it will make more sense in the coming pictures...
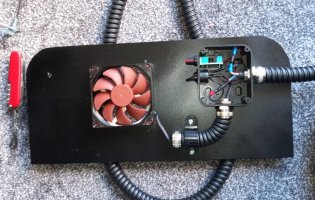
Image 5: Wiring it all together... Before I finish putting it together I'm wiring it up. Out of shot the power supply comes from a 12v cigarette lighter socket. I had a spare plug which I had cut off an 12v socket extension. So that worked out nicely and provides the inline fuse too.

Image 6: OK so what we're looking at here is my dish cloth. But on top of that is the outer strip and what I've done is lined the perimeter with a continuous strip of self-adhessive 8mm door insulation foam. Perhaps you can see at the bottom that the start and end of the foam overlap to form a seal. The diagonal strips deliberately do not reach the edges of the outer strip, to allow air flow. The point of this is to prevent wind/rain from getting behind this piece as it will cover the join between the acrylic inlay and the sliding window, which is locked in place.

Image 7: Assembled with a round 100mm diameter metal vent cover which fits (thankfully) neatly between the vertical strip (see image 6) and the edge of the window.
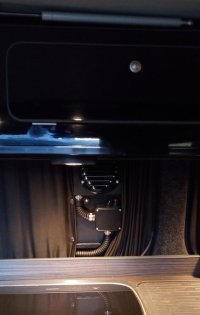
Image 8: OK so here's the view from the inside. You'll notice I've added two poppers to the curtain which fasten to the assembly so that I can close the curtains around it and maintain my privacy. I personally love the chunky industrial vibe about this. The inside vent is as high as I want to go, any higher and its behind the upper cupboards, any lower and its blocked by the glass lid of the hobs. The fan itself is nearly silent. When I turn the voltage down it is almost impossible to hear but still extracts. When I turn it up to full speed you can hear it but most of the noise is simply air being forced out of the vent covers. I'm very pleased with how it functions.
That's all folks it seems to work better than I expected but I've yet to test it in anger... off camping next week so I will keep you posted if you're interested. Thanks again TrevorK for planting the seed of an idea
Before we dive in my goals were:
1. It has to be very quiet - think the occassional bit of stealth camping.
2. It has to be water tight and something I'm happy to leave in all the time.
3. It has to be something that can be removed and leave the van exactly as I found it - no holes drilled and nothing bonded in place.
4. It has to be secure/safe.

Image 1: Cut the perspex/acrylic sheet to match the window pane. With a bit of flex it fits into the window runners on the top,left and bottom edges so its held in place. The sliding window is then butted up against it in a locked position so there is no way for the acrylic sheet to come out. Note the acrylic sheet already had a hole drilled in it. But I didn't have any to spare so I will plug that hole (top left) later... oh yes and it's white! - spray paint needed! But you get the idea... it's a snug fit that isn't going anywhere and matches the profile/curve of the window.

Image 2: Closeup of the bottom left corner. I got lucky because the acrylic sheet was only about 1/2mm thicker than the window.

Image 3: OK from left to right anti-clockwise. We've got 20mm outdoor flexible conduit. A conduit box and an inline 12v toggle switch which I've alrady sprayed black and switch fitted. A 12v variable voltage regulator which allows you to dial down the voltage and thus change the speed of the fan. A silent ultra thin (14mm) 92mm diameter 12v computer fan. End terminals for the conduite to attach to the condiut box. PS. The fan is masked up with clingfilm because I'll be spraying it black but its not a good idea to spray paint the blades as any uneven paint deposition may imbalance the fan which will create noise, friction and harm the very delicate bearings. The conduit is left over from a previous job but I love the heavy industrial look it gives. That's just my taste

Image 4: OK so now the parts are sprayed I'm on to assembly. The conduit box was glued to the acrylic (I sanded away the spray paint from the bonding surfaces). The four rubber fan mounts are similarly bonded in place.
PS. Yes you may have noticed that some of the straight line cuts are a little wafty. I only had a hand jigsaw and the one piece of acrylic which had already been cut years before so some of its edges were not great. However this is a "Prototype" so at this stage I'm just playing with an idea and having a bit of fun in the process... who doesn't enjoy a DIY project? (AKA. grown up lego)
Now one of the problems (ne challenges) is that there is a slight curve in the real window and so the thick strip you see next to the fan will serve two purposes. 1. to bridge the join between glass window and acrylic sheet. 2. To force the acrylic sheet to bend to match the window. That's also what the semi-circle piece is for. It will go in the lower corner on the inside to pull the botten edge of this thick strip. it will make more sense in the coming pictures...

Image 5: Wiring it all together... Before I finish putting it together I'm wiring it up. Out of shot the power supply comes from a 12v cigarette lighter socket. I had a spare plug which I had cut off an 12v socket extension. So that worked out nicely and provides the inline fuse too.

Image 6: OK so what we're looking at here is my dish cloth. But on top of that is the outer strip and what I've done is lined the perimeter with a continuous strip of self-adhessive 8mm door insulation foam. Perhaps you can see at the bottom that the start and end of the foam overlap to form a seal. The diagonal strips deliberately do not reach the edges of the outer strip, to allow air flow. The point of this is to prevent wind/rain from getting behind this piece as it will cover the join between the acrylic inlay and the sliding window, which is locked in place.

Image 7: Assembled with a round 100mm diameter metal vent cover which fits (thankfully) neatly between the vertical strip (see image 6) and the edge of the window.

Image 8: OK so here's the view from the inside. You'll notice I've added two poppers to the curtain which fasten to the assembly so that I can close the curtains around it and maintain my privacy. I personally love the chunky industrial vibe about this. The inside vent is as high as I want to go, any higher and its behind the upper cupboards, any lower and its blocked by the glass lid of the hobs. The fan itself is nearly silent. When I turn the voltage down it is almost impossible to hear but still extracts. When I turn it up to full speed you can hear it but most of the noise is simply air being forced out of the vent covers. I'm very pleased with how it functions.
That's all folks it seems to work better than I expected but I've yet to test it in anger... off camping next week so I will keep you posted if you're interested. Thanks again TrevorK for planting the seed of an idea
