Faulty solar panel ?

dErZ

VCDS User
VIP Member
T6 Guru
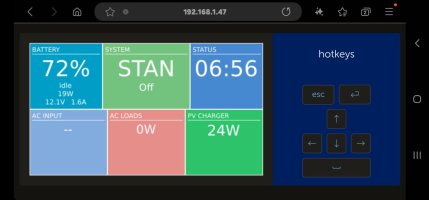
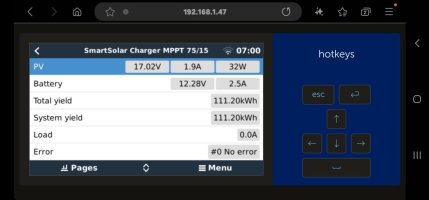
I've been noticing that my panel isnt charging the battery when its sunny in the middle of the day. I know this sounds odd. It does however charge in the morning. I get between 10 and 12v from the solar panel but no Current.....

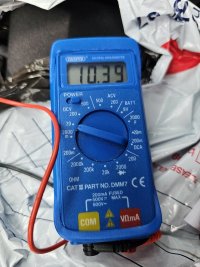
I disconnected it from the Victron MPPT yesterday and the panel was showing 10.5v.

Screenshot_20240613_103906.jpg

20240613_102833.jpg
 
So whats the best way to trouble shoot this ? could the panel have a fault and only works at certain sun angles ?
 
The Victron MPPT needs to see 5v more than your battery voltage in order to begin a charge cycle, then (I believe) 2v higher to continue it.

10v isn't enough to start or continue charging, which is why it's not charging.

A panel has a higher voltage when it's colder.

Do you know the specs of your panel? Wattage, open circuit voltage and closed circuit current?
Hi Paul, Thanks for helping.

Pv Logic STPVF150

Size 1515x665x4mm
Weight (Kg) 6.7
*Watts per day (W) 900
*Amp hours per day (A) 51.12
Charge controller 10Ah
Vmp (VDC) nominal voltage 17.6
Imp (A) nominal current8.52
Voc (V) 21.9
Isc (A) short circuit current 9.2
IP (Ingress Protection) Rating IP69
 
It's a cracked bus bar, panel is FUBAR.
loads of info here search
Second this as most likely cause - your panel is heating up in the sun and expanding and moving the cracked connection apart. When it's cool the crack is close enough together to get some voltage but is high resistance so little current.

Unfortunately with that multimeter it's not going to be safe to try and measure short circuit current independently as you don't have a high current range.
 
Hi Paul, Thanks for helping.

Pv Logic STPVF150

Size 1515x665x4mm
Weight (Kg) 6.7
*Watts per day (W) 900
*Amp hours per day (A) 51.12
Charge controller 10Ah
Vmp (VDC) nominal voltage 17.6
Imp (A) nominal current8.52
Voc (V) 21.9
Isc (A) short circuit current 9.2
IP (Ingress Protection) Rating IP69
Ahh, so a 150w panel with

Voc (V) Open circuit voltage 21.9
Isc (A) short circuit current 9.2

Yeah you should be seeing way more than 10v, I was thinking it was a small 50w panel that might be struggling to get above 15v when it warms up, but that points to what @roadtripper and @Salty Spuds says, yet another semi flexible panel failure...
 
Last edited:
Ridged roof?

Was the ridges filled in when the panel was fitted?

Defo looks like failed panel from micro busbar cracks.

Low power, then no power when panel heats up.
 
That's what happened with mine. When I noticed the lack of charging it was a warm sunny day and solar providing zero. I faffed about measuring voltages and checking things, posting on here for advice etc. Lo and behold first thing in the morning next day there was a minimal charge which gave me false hope. Later that morning when the sun had been up several hours and the panel was warmer the charge had returned to zero. From advice here and elsewhere it was evident that the panel was screwed. Removed and replaced.

Thread here Solar panel Fail?
 
Ridged roof?

Was the ridges filled in when the panel was fitted?

Defo looks like failed panel from micro busbar cracks.

Low power, then no power when panel heats up.
Yes a HiLo ridged roof, ridges not filled.. waiting to find out if Simply Surf Bus are going to replace the panel as its under 2 years old.......
 
yes, well it seems to be well documented that unsupported ridges is what causes the premature failures in the panels,

as it allows uneven thermal expansion which crack the busbars.

I've got flexible panels now 5years old that work perfect . . . as they are mobile and not stuck to a roof.

maybe take a look at this install guide - print out and offer to your fitters?

+++++++++++


++++++++++++++


+++

The mounting surface for the solar panel should be smooth and even. If the surface isuneven, it is recommended to prepare it prior to the installation by filling in the gaps. Forexample, spaces between ridges on a vehicle roof can be filled in as the photos belowshow – this will make mounting easier and quality of bond better. When the gaps are filledin, a greater support surface area for the solar panel will reduce mechanical stress andimprove solar panel longevity.

Gluing with adhesiveYour chosen adhesive should be suitable for both the solar panel and the mountingsurface. It should also be designed for outdoor applications (with a wide temperaturerange, UV light protection etc). Pay attention to the application temperature and dryingtime requirements.The mounting surface must be even, clean (use a degreasing agent) and dry. Theinstallation must be carried out with care and precision, as this permanent method doesnot allow for repositioning.Warning! Although preparing the roof surface for better adhesion is permitted (e.g. byremoving the old paint, grinding, using a primer etc), you must not use any sand paperor other sharp or abrasive tools on the underside of the solar panel.There are two main options for application of the adhesive:1) Apply the adhesive to the underside of the solar panel in parallel beads brokenin the middle of the solar panel. Depending on the application the edges of thesolar panel can be sealed all the way round with the same adhesive at the end

of the installation.2) Cover the entire underside of the solar panel with a layer of adhesive, spreadingit evenly with a trowel or a similar tool.The first option is recommended for smooth and even surfaces. If the surfaces areuneven (for example, roof ridges on a campervan) a larger contact area isrecommended for adhesive and the second application option will be the best.For the default first application option, apply thick 10-12mm adhesive beads on the rearof the solar panel, in parallel to each other, as shown in the diagram and the photobelow:


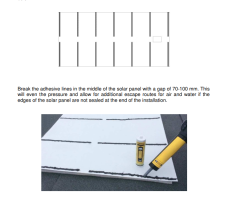
Break the adhesive lines in the middle of the solar panel with a gap of 70-100 mm. Thiswill even the pressure and allow for additional escape routes for air and water if theedges of the solar panel are not sealed at the end of the installation.

The adhesive lines can be as close to each other as required (the number of linesdepends on the strength your chosen adhesive), but a minimum gap of at least 70 mmbetween lines is recommended. In general, for most plastic / fibreglass / metal surfacesHandling and Fitting Manual for semi-flexible solar panels ARFLX, FLPROC and FLAX seriesPage 9 of 12and a good quality adhesive, a gap of 100 - 150 mm between parallel adhesive beadswould form a strong bond.


++++

1718698324003.png1718698387512.png
 
Back
Top