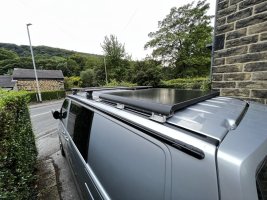
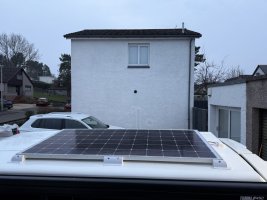
Looks great. I've done very similar, but my panel has a silver frame which clashes with the black theme. I like those dakine pads.
I can't see the wires in the pic though.
I can't see the wires in the pic though.
Go for a 175w Perlight Panel from Bimble Solar.How tough are the rigid panels? Are they all glass with an aluminium frame or are there variations with some more robust?
I ask because I ordered a Renogy 200W rigid type to put on my rhino roof rack but it came with shattered glass despite the packaging being fine. I got a refund but not sure if I should get another as if it broke in the post it's probably not going to last long on my van.

 ttery is a 160 ah, am I over speccing the panel? Should I go 180w?
Great job with this. If I hadn’t “invested” in roof prep channels specifically for the purpose of mounting a rigid panel I would have been interested.I have designed what I think to be an excellent solar panel mounting method that I first fitted to an old T5.1 I had a few years ago (see attached pictures)...
I have since improved the idea and made it more polished by neatly integrating it with Dakine roof pads which makes the whole set up look like a real high end purpose built solar mounting method. The custom powder coated mounting rails are secured to the roof rails with four high quality Rivet Nuts in each.... then the Perlight 175 watt solar panel is mounted on the rails in a stealth yet practical manner... the cable is ran via the rear light grommet meaning no holes need to be drilled into the roof / panels of the van. All in all I think it’s a pretty neat solution... and great if you want to use the roof to carry a surfboards or paddle boards.
I have a 110 amp leisure battery with a mini LG fridge that in summer is left on 24/7. The 175 watt panel & Victron MPPT combination is absolutely QUALITY and keeps the battery fully charged whilst under a reasonable load even in poor sunlight.
Essentially the kit consists of :
1 x Perlight 175 watt solar panel
1 x Victron solar MPPT
10m of solar cable
1 pair of Roof Bars
1 pair of Dakine Roof Rack Pads
1 pair of powder coated mounting rails
Nuts bolts washers and rubber dampers
I am tempted to offer the kit for sale and instillation on a low volume basis or even make up a batch of DIY 'Kits' which would consist of Roof Bars, Solar Panel Rails & Dakine Pads intended for self instal.
Let me know what you think?
Cheers!


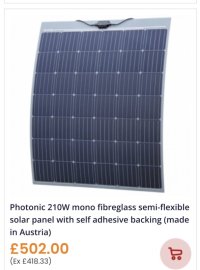
If it fits on your van, go for as much solar as you can (says he with 300w on his roof!). The 100/20 can use about 280w max. 210w is a little small, if anythingSo I’m looking at getting a solar panel fitted to our poptop, I’ve been looking at the 210w semi rigid panel, Comes with a 5 year guarantee, I’m after a low profile panel as I sometimes put cross rails on the roof to carry paddleboards, I realise I’ll not get solar with boards on, but need to keep the option of the cross bars, they are fairly low profile Thule wing bars
So what’s the best way to attach panel to our Skyline roof, it has a slight bump/ridge in the middle of roof
Also the Roamer baView attachment 278253View attachment 278254ttery is a 160 ah, am I over speccing the panel? Should I go 180w?
I’ve already got a Victron 100/20 solar charger that I’ve been using with a portable panel
Cheers for any help
I’ve seen several campervans with flexible PV panels mounted onto a sheet of 10mm twinwall polycarbonate sheet when travelling in Australia. The rationale being that the twinwall sheet provides an air space to prevent cooking the panels in 40°C ambient. I discovered that the owners stick the PV panel to the twinwall with either 3M VHB tape or Sikaflex to form a sandwich. Then in turn, this sandwich is stuck to the roof panel using several strips of 1” 3M VHB tape (type 4950 I believe). The chief reason seems to be that the VHB tape is far easier (at least when compared with Sikaflex) to remove if you ever need to replace the panel.Morning
I’m thinking of a way to stick our flexible panel to our fibreglass pop top.
A few things>
Pop top is black, but I guess doesn’t get hot as a metal surface?
The flexible solar panel has a self adhesive layer to stick to a surface, with a 5 year guarantee, so the manufacturer must realise there won’t be an air gap between panel and surface it’s fixed too?
Our pop top has a slight raised hump in the centre about 8mm high.
Panel is 127cm x 102 cm so fairly large, 2mm thick
So I was thinking of using 8mm thick x 15mm wide strips of closed cell neoprene rubber, running length ways under the panel, about 100mm apart, either side of the hump, about 10 full lengths or so, the strips are self adhesive on one side, that would attach to the roof. The panel would stick directly to the centre hump area.
The other side of rubber strip would attach to the adhesive on panel, I’d stick strips to panel first before fitting to roof.
Should I fill the leading front edge under the panel or leave open?
I if I ever had to remove panel I’m hoping the strips would be easier to remove than Sikaflex?
Any advice welcomed
I went with flexible as needed low profile and also considered weight for when lifting pop top.
I’ll use a Scanstrut roof gland for the two cables through roof.


Very neat jobI ended up using a set of feet to fit my huge rigid panel to my pop top.
I keyed the gel surface of the pop top where the 6 feet sit and stuck them down with sikaflex.
The front 2 feet I put stainless steel bolts right through my roof to make sure it was never lifting at the front at speed.
The panel is solid. There’s no wind noise or drag from it as I fitted it towards the back of the roof.
The pop top is more difficult to lift now and needs help to start with but still goes up on its own.
I’m delighted with the results
View attachment 281713View attachment 281714
Could suspend the rigid between front and rear cross bars so long as it is not obstructing the sun. Perhaps with some engineering imagination it could have adjustable multi way tilt for when stationary for better energy capture. Not sure what height a vehicle might be with normal roof bars and flush cross bars. If the rigid panels could be mounted that way it would give greater thermal build up inside the van on a hot sunny day.Wow looking like an overlander now. Looks great, I like the idea of putting more stuff on the roof.
Im still thinking I want to get under low level car parks though, it was kind of the whole reason I bought a transporter-sized height van. Being around 1.9m high. So I'm torn whether to get to get a rigid panel and increase the height.
Could deflate the tyres if very close.So you did manage to fettle the F40 on to the rack?
I really like the end result of rack/awning/panel and I'd be very tempted longer term if it wasn't for the pesky 2m thing. Even with a stock Caravelle I was inching my way under a barrier marked as 2m in Wales a month ago with MrsRT pointing at all the over T6s and T5s already parked up and rolling her eyes...

I think that is a very elegant fitting! does it have an air gap between roof and panel? As is on the image can you fit under barriers?Great job with this. If I hadn’t “invested” in roof prep channels specifically for the purpose of mounting a rigid panel I would have been interested.
My bodge is not near as neat as yours but it’s done many miles (and comes off the van for winter pretty easily). And a slightly larger version of the same panel (I think) at 200W.
The disappointment of the roof prep channels for me was that you can’t mount anything all the way to the back of the van, but my setup with the thule acrobats allows (short) surfboards to be mounted in front of the panel. Obviously they will cast some shade depending on orientation, but they don’t cover the panel.
Cable runs down to the rear light wiring loom grommet.
View attachment 278306
View attachment 278307
They're only 45! 18 inch rims, not my choice but there you go.Could deflate the tyres if very close.
Mine are 18" rims also, kept getting twigs and stuff between rim and brake disc on a set 17" not a massive problem but a pain. Have 255/55R18 BFG KO AT. Needed to make a purchasing decision chose 18" steel rims. In fact the steel rims probably negates twigs getting jammed in the first place because less of a spoke just smaller holes.They're only 45! 18 inch rims, not my choice but there you go.
Mines fixed to 4mm twin wall using the eyelets in the panel and then the twin wall stuck on with VHB tape - it’s holding strong. Can’t understand why more people don’t use twin wall, it only raises it 4mm but gives the panel airflow under it.I’ve seen several campervans with flexible PV panels mounted onto a sheet of 10mm twinwall polycarbonate sheet when travelling in Australia. The rationale being that the twinwall sheet provides an air space to prevent cooking the panels in 40°C ambient. I discovered that the owners stick the PV panel to the twinwall with either 3M VHB tape or Sikaflex to form a sandwich. Then in turn, this sandwich is stuck to the roof panel using several strips of 1” 3M VHB tape (type 4950 I believe). The chief reason seems to be that the VHB tape is far easier (at least when compared with Sikaflex) to remove if you ever need to replace the panel.
For anyone who doubts that VHB tape will keep things stuck on at sustained high speeds, it’s widely used in the automotive industry to attach badging, trim parts and panels to all kinds of vehicles. Provided the surface is prepared in accordance with the 3M VHB tape usage guide, it seems more than capable of keeping the panel on the roof at sustained high motorway speeds for prolonged periods at high ambient temperatures (it’s good for up to 90°C). And because there’s little windage (around 13mm) at the front of the PV panel plus twinwall sandwich, the sheer force is actually lower than you might think. It seems that when in motion the airflow over the windscreen creates a small vortex above the cab roof which actually pushes down the leading edge of the PV panel sandwich. It’s worth watching this video by an American who objectively tested the use of VHB tape to stick PV panels to the roof of his RV…
Cheers! Yes there's a gap all the way between panel and roof although it's close in the middle due to the domed shape of the roof. The "roof prep" channels were rather expensive for what they are. If I did it again I would probably go with an aftermarket t-track rail and mount it further to the rear, allowing more mounting options / space at the front end.I think that is a very elegant fitting! does it have an air gap between roof and panel? As is on the image can you fit under barriers?
Thank you for that information. Your version does look very neat and tidy I believe that any manufacturer would be more than content with that. It reduces drag, reduces thermal contact between panel and the vehicle appears made for the vehicle. The panel appears to be a good fit for the available space. Very well done!Cheers! Yes there's a gap all the way between panel and roof although it's close in the middle due to the domed shape of the roof. The "roof prep" channels were rather expensive for what they are. If I did it again I would probably go with an aftermarket t-track rail and mount it further to the rear, allowing more mounting options / space at the front end.
This goes under 2.1m barriers with room to spare, van is on standard wheels (18" Springfield factory alloys in summer, 17" Steel GP's for winter) and standard suspension (T30)
