As promised...guide to updating to software 0478. I can't take credit for working this out, it was the clever people on the german forum, I've just rewritten the instructions and added the photos...
There's nothing illegal in this, it's just for updating to version 0478, and I am not going to post about removal of component protection or generation of swap codes.
Guide to updating 02xx/03xx to v0478 on Discover Media PQ Technisat/Preh
Prerequisites:-
-Firmware MST2_EU_VW_PQ_P0478T
-
MIB2std toolbox
-metainfogenerator.exe
-8gb SD card (formatted to FAT32, 4096kb blocks)
-Knowing how to get into emergency mode if it goes wrong (see end of post)
(PM me if you need the above files and I'll send you a link)
First off, check your coding of the 5F module with VCDS or similar. Make absolutely sure that byte 17 (skin) is set to 01 (Highline). And connect your vehicle's battery to a suitable charger...
View attachment 129376
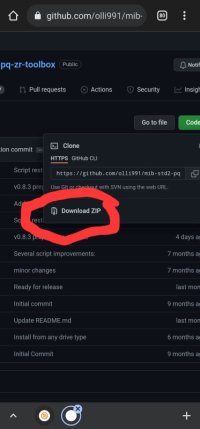
Download MIB2std toolbox, extract onto an SD card, and for 02xx only, as per the instructions "replace `cpu` folder in the root of the SD card with `cpu` folder from `\toolbox\gem` folder"
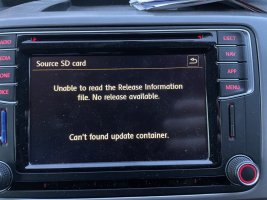
Insert SD into right hand slot (navigation), hold down menu button, click software update/versions, software update, SD card, MIBSTD2_Online_approval, follow the prompts and install it. Ignore the 'connect diagnostic tester' bit
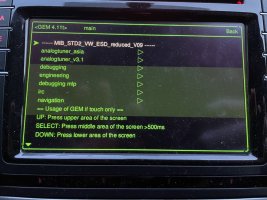
Once complete, enter GEM by holding down menu button for 10 seconds. Enter mib2std toolbox, go down to 'Tools' and select 'Patch tsd/mibstd2.system.swdownload to accept any metainfo2.txt'
Let it do its stuff, then restart the unit (hold down power button for 10 seconds)
View attachment 129373View attachment 129374
Once rebooted, hold the menu button again, press Software update/versions, software update, press the current version, and the logging ID is displayed in brackets under CPU. For mine, it was 13. Make a note of this number.
View attachment 129377
Now, unpack the 0478 firmware archive to your SD card. We now need to modify the metainfo2.txt to let us install it on an 02xx/03xx device. Stick metainfogenerator.exe onto the SD card, and run it. Press enter twice, then type in the logging ID you recorded earlier and press enter twice again.
View attachment 129369
Delete your original metainfo2.txt, and rename the modified one.
Stick your SD card back in, then hold down menu, click software update/versions, software update, SD card, MST2_EU_VW_PQ_P0478T, and install it. Again, ignore the 'connect diagnostic tester' bit for now. There will be a couple of updates that appear to fail (emergency), this is normal, I believe it's because it's tried to install them after it has rebooted, and it knows it's a modified metainfo2.txt again. You can safely ignore them.
View attachment 129371View attachment 129361
You should have now booted up into software 0478! Assuming your unit is factory fitted and hasn't been previously messed with, you have nothing else to do and can carry on, your FeC/SWaP codes will not be touched. MIB2std toolbox will have been lost, so re-install it again if you want it back, but as you are now on 04xx, don't mess with cpu folder this time.
View attachment 129372
To get the grid style menu, press Menu, Settings, Screen, and select 'Grid'
View attachment 129375
If you want the extra skins as well, extract the skins archive to an SD card, insert into right hand slot (navigation), hold down menu button, click software update/versions, software update, SD card, MIBSTD2_Online_approval, follow the prompts and install it. Once its rebooted, hold down menu, press Testmode, and go to HMI Skin Change.
Known issues:-
-No Transporter graphics are present. Code the unit as a Crafter instead, I am working on copying/creating suitable Transporter graphics for the skin package
-WiFi may not work any more, working on a fix for this. I tried the method detailed
here, and also tried removing all references to updating bluetooth from metainfo2.txt, but it still stopped working.
-DTC 1555 appears. Using VCDS or similar, go to 5F, Adaptations, and 'Confirmation of installation change'. Enter the 4 digit hexadecimal code
here and enter the new code that is generated and save it. You can now reset the code and it'll go away
-DTC 1556 appears. Enter GEM, Mib2std toolbox, Tools, then select 'Clean SWDL history and keep only non-duplicated FW updates'. Reboot the unit, and you can now reset the code and it'll go away.
-If it goes wrong, you need to enter emergency mode to recover, which involves using a FT232DL and opening the unit. Further info below.
EMERGENCY MODE
So, you've messed up. Your unit is stuck in a boot loop, all you see is "Welcome to Volkswagen" and you feel like a right idiot. All is not lost...
Firstly, assuming you've left it a suitable amount of time to let it do what it's trying to do, hold the power button in until it reboots, you never know, it might just need a restart.
Secondly, double check the coding of the 5F module, make sure you're on Skin 1 (Highline). If you're coded to a skin that doesn't exist on this version of firmware (like Hybrid), it won't boot. You should be able to code it and access it via CAN even with it stuck in a bootloop.
If that's not solved it, we need to do an emergency mode flash. You need a firmware package relative to the unit's hardware, so if you were starting off with an 02xx firmware, you need to recover with 02xx, etc. Stick that on your SD card, and put it in the Navigation slot.
Next, remove the unit from the vehicle, and take the lid off the unit, 4 screws in each corner, one underneath a warranty sticker. Lift the CD/DVD drive out, and disconnect the ribbon cable.
View attachment 129366
Connect your FT232DL to the large plug at the back of the unit as shown, you need 2x Junior Power Timer connectors. Twisted cable is ideal but single wires should be fine for a short run. Connect the GND pin of the FT232DL to the metal case of the unit. If you need clarification, its the orange/purple and orange/brown wires in the photos.
View attachment 129363View attachment 129365
Connect the USB end to your computer. Using PuTTY or a similar terminal emulator, connect via Serial, enter the COM port number (check Device Manager), and set the baud rate to 115200. If you get a load of garbage appear, swap Tx and Rx around and try again.
View attachment 129364
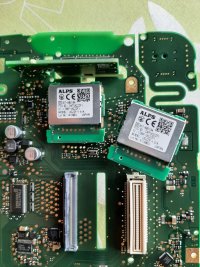
Next, remove power from the unit. You now need to bridge the two contacts shown below, I used metal tweezers. Keep them bridged, and apply power to the unit. A menu should appear on the PuTTY session with a number of options, as soon as you see this, remove the bridge. Hit "2" on the keyboard, and Emergency mode should start, and it'll begin installing the firmware.
View attachment 129367View attachment 129362
Once you're back to normal, you can remove the FT232DL and try again, but just don't do whatever you did to break it this time.


 I updated anyway, all ok