You are using an out of date browser. It may not display this or other websites correctly.
You should upgrade or use an alternative browser.
You should upgrade or use an alternative browser.
Rob's T6 Overland Camper Build Thread
- Thread starter T6NOMAD
- Start date
Removed the front bumper as its time to fit the new one that has been painted. While the bumper was off, I measured and fabricated up some brackets for the spotlights. The bracket will be mounted to the chassis cross bar and up through the grille.
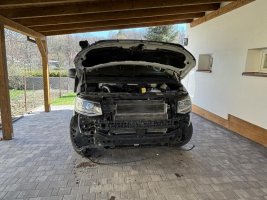
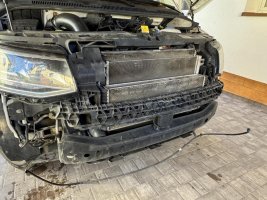


These are the brackets, tomorrow they will get a few more snips to ensure a perfect fit, primer, a coat of black paint and on they go. The bumper will follow.


These are the brackets, tomorrow they will get a few more snips to ensure a perfect fit, primer, a coat of black paint and on they go. The bumper will follow.

Yeah they're made out of 6mm thick steel. They will be holding 7" spotlights further up, next to the VW logo so don't want vibration - making provision for the forces all the more when we are taking the roads less travelled. Learned from my mistakes when I made a custom bracket I made on my Disco 4 back in the day.Those lamp brackets look real heavy duty
Will still trim down the gussets to fit through the grille
I just couldn't help myself, had to finish the spotlight brackets and install the new bumper! Curiousity.......!!
First thing was to test fit the brackets and trim those gussets for a perfect fit. Also marked up the holes at the bottom.

The below photo shows how much they stick out and the gap from the intercooler.

Test fit with the grill on, and to trial the spotlights and trim.

Triming and hole drilling complete. Now they sunbathe a bit to dry the black paint.

Bolted down... It was a tricky exercise getting those bolts in...


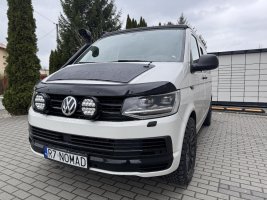
Spotlights fitted. They have a neat profile and don't stick out too much I think!
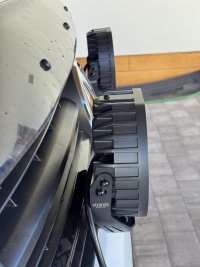
Also fitted the new bumper! It came out really nice!!!!!!!!
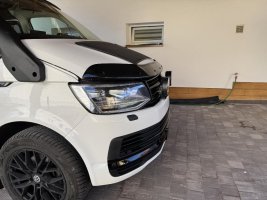
I prefer these spotlights to the Lazer lamps! it works better with the Swamper offroad look I think!


So happy with the result!!!
First thing was to test fit the brackets and trim those gussets for a perfect fit. Also marked up the holes at the bottom.

The below photo shows how much they stick out and the gap from the intercooler.

Test fit with the grill on, and to trial the spotlights and trim.

Triming and hole drilling complete. Now they sunbathe a bit to dry the black paint.

Bolted down... It was a tricky exercise getting those bolts in...


Spotlights fitted. They have a neat profile and don't stick out too much I think!

Also fitted the new bumper! It came out really nice!!!!!!!!

I prefer these spotlights to the Lazer lamps! it works better with the Swamper offroad look I think!


So happy with the result!!!
Good job
The van is no more wireless!!!  Finished up hard wiring of the Victron system last night; that Lynx distributor is a game changer and will now be included in all my future setups!
Next is to set up the Ekrano screen and complete the Victron network with V.E Direct cables.
Last step of all the electrics is to install the solar panels on the roof, and then run the cables in to the MPPT. 3 x 175W panels on the roof + 100W switchable panel on the bonnet. By switchable, it has its own little MPPT which charges the starter battery when we are parked up for a long time, it can also be switched to add to the 525W on the roof making it a total of 625W of solar / roughly 38Amps charge per hour at peak.

(Union Jack patch pays homage to the work done on the van in the UK)
Next is to set up the Ekrano screen and complete the Victron network with V.E Direct cables.
Last step of all the electrics is to install the solar panels on the roof, and then run the cables in to the MPPT. 3 x 175W panels on the roof + 100W switchable panel on the bonnet. By switchable, it has its own little MPPT which charges the starter battery when we are parked up for a long time, it can also be switched to add to the 525W on the roof making it a total of 625W of solar / roughly 38Amps charge per hour at peak.

(Union Jack patch pays homage to the work done on the van in the UK)
It is all coming along nicely now. A couple of things, Their appears to be a fashion that has developed over the last few years towards short bridging ladders / sand ladders. I am not quite sure why that is but I would have thought shorties would be far less effective and might not be long enough to get a run going before having to stop to start over again. The other concerning the bridging ladders is recovery of the same. I should imagine that short ladders are more easily lost because they have a tendency to bury under the slime or sand what ever they are being used for. Years ago these things used to be manufactured from steel or aluminium pierced planking, so plastic is lighter but may flex more possibly so it might be e reason for reduced length but it may be because more people travel on expedition but then can not find anywhere to put longer versions. I do not know what the current advice is. In the past some have attached some sort of tell tail that floats above the immersed ladder short rope or even longer attachment to allow the ladder to follow the vehicle, so avoiding the necessity of a long walk back or a short one that might prompt getting stuck again.
The other thing that struck me was the lamp brackets, very useful and strong but also could cause tremendous personal injury. Not sure on solution exactly but rounding the corners might be one and linking them together with something a little blunter and person/animal friendly. Perhaps a length of angle iron/aluminium blunt side forward linking them might be the easiest and fastest solution. Could always add some padding wrapped in white reflective tape. Might make all the difference and reduce attention for scrutiny.
White is the best colour for vehicles I believe for hot days and climates and the mounting of a panel on the bonnet very sensible solution to reduce reflective glare. It reduces glare from strong sun and other vehicle lights or even ones own additional lighting if mounted high on the roof, less fatiguing on long days. It is not bulky or heavy and is an ideal solution, frees up some roof space too. BFG AT KO2 are very strong and robust will take knocks and stone abrasions in their stride far better than many other easily available tyres. Snorkel is good reducing the ingestion of dust and water. I would like and have use one of those, not sure about the dust here but water can be a great problem in wet Wales flooded fords and emersed roads. Keep us informed.
It is all coming along nicely now. A couple of things, Their appears to be a fashion that has developed over the last few years towards short bridging ladders / sand ladders. I am not quite sure why that is but I would have thought shorties would be far less effective and might not be long enough to get a run going before having to stop to start over again. The other concerning the bridging ladders is recovery of the same. I should imagine that short ladders are more easily lost because they have a tendency to bury under the slime or sand what ever they are being used for. Years ago these things used to be manufactured from steel or aluminium pierced planking, so plastic is lighter but may flex more possibly so it might be e reason for reduced length but it may be because more people travel on expedition but then can not find anywhere to put longer versions. I do not know what the current advice is. In the past some have attached some sort of tell tail that floats above the immersed ladder short rope or even longer attachment to allow the ladder to follow the vehicle, so avoiding the necessity of a long walk back or a short one that might prompt getting stuck again.
The other thing that struck me was the lamp brackets, very useful and strong but also could cause tremendous personal injury. Not sure on solution exactly but rounding the corners might be one and linking them together with something a little blunter and person/animal friendly. Perhaps a length of angle iron/aluminium blunt side forward linking them might be the easiest and fastest solution. Could always add some padding wrapped in white reflective tape. Might make all the difference and reduce attention for scrutiny.
White is the best colour for vehicles I believe for hot days and climates and the mounting of a panel on the bonnet very sensible solution to reduce reflective glare. It reduces glare from strong sun and other vehicle lights or even ones own additional lighting if mounted high on the roof, less fatiguing on long days. It is not bulky or heavy and is an ideal solution, frees up some roof space too. BFG AT KO2 are very strong and robust will take knocks and stone abrasions in their stride far better than many other easily available tyres. Snorkel is good reducing the ingestion of dust and water. I would like and have use one of those, not sure about the dust here but water can be a great problem in wet Wales flooded fords and emersed roads. Keep us informed.
What an awesome message, thank you KoB
Recovery Tracks: I agree with you on the shorties, I have never actually used them. My thinking is, short tracks for self recovery are better than no tracks as I dont have the place to fit full length ones.
I have however extensively used and tested the standard full length ones throughout my adventures around sub-Saharan Africa. They work amazingly and the Maxtrax branded versions are internally reinforced so quite strong. They also double as a spade as can be seen in this funny little clip - VIDEO - the Mrs and I share the work when it comes to a self recovery, she does her side and I do mine. In this case I dug quicker and quickly took a video. We got very very stuck in thick sand and tracks that are truck width as they are primarily used by military trucks, Unimogs etc. When you purchase a set they come with a strap that you attach to the tow bar ball so when you drive off they are dragged along for easy recovery of them.
They also serve a fantastic purpose in leveling of the vehicle for flat sleeping.


Lamp Brackets: You make some valid points there, I will put some thought into this - it never crossed my mind actually as we don't really think about that when fitting the bull bars to our vehicles in Africa.
I like white colour on an expedition vehicle, it works with my tyle when kitting out a car for an expedition.
The bonnet mounted solar panel is switchable, between charging the starter battery on extended stops and contributing to the overall roof installed solar system. There will be 3 x 175W Solar panels installed on the roof + the 120W panel makes for a quick charge on the battery
I had BFGs KO2s on my Discovery 4 and loved them, when I sold the disco and replaced it with the Hilux I also fitted BFGs and hated them. They didnt match well with the Hilux. On the van so far they seem to be a great match and durable too. The EU version of the BFGs KO2 is different to that in Africa, in EU its a softer compound and they are all season tyres. so time will tell on how they settle in with the van.
And it reduces interior heating through solar radiation, no bad thing at all. I believe Ford started this in the 1970s on the mk1 Transit, painting them white instead of grey as the stock factory colour due to complaints about interior temps in fine weather.I like white colour on an expedition vehicle, it works with my tyle when kitting out a car for an expedition.
Great images, love the elephant! I only tentatively suggested linking brackets to soften the knife or stab, puncture effect on impact not suggesting a bulbar which are not legal in UK and most probably the EU either, perhaps just grinding the corners down might be the better solution. Anything that minimises potential contact with living things really. My BFG AT KO2 are All Season also, a strong motivation for me to have bought them. Other Tyre manufacturers are also stretching the spec of AT tyres to add All Season capability, a great idea IMHO. BFG are bringing in the KO3, slowly, a few sizes at a time. Supposedly they have better performance in certain areas. Hopefully that does not compromise them. They have been a due change, competitors have moved on. Michelin used to manufacture off road tyres particularly suitable for military machines. XL for mud and general use and XS for sand. I still have specifications and sizes in a booklet somewhere I do not know if they even manufacture those sort of tyres now. I use XL for many years 9.00x16 but they became almost impossible to buy during and after the Gulf War and that is the last I heard of them. I do not drive the LR101FC any more and on reflection those tyres where for another age. Any way best of luck with your expeditionary machine. Their aught to be a lot going on and information on some of the specialist German Forums they are great expedition type travellers.What an awesome message, thank you KoB
Recovery Tracks: I agree with you on the shorties, I have never actually used them. My thinking is, short tracks for self recovery are better than no tracks as I dont have the place to fit full length ones.
I have however extensively used and tested the standard full length ones throughout my adventures around sub-Saharan Africa. They work amazingly and the Maxtrax branded versions are internally reinforced so quite strong. They also double as a spade as can be seen in this funny little clip - VIDEO - the Mrs and I share the work when it comes to a self recovery, she does her side and I do mine. In this case I dug quicker and quickly took a video. We got very very stuck in thick sand and tracks that are truck width as they are primarily used by military trucks, Unimogs etc. When you purchase a set they come with a strap that you attach to the tow bar ball so when you drive off they are dragged along for easy recovery of them.
They also serve a fantastic purpose in leveling of the vehicle for flat sleeping.
View attachment 282929
View attachment 282930
Lamp Brackets: You make some valid points there, I will put some thought into this - it never crossed my mind actually as we don't really think about that when fitting the bull bars to our vehicles in Africa.
I like white colour on an expedition vehicle, it works with my tyle when kitting out a car for an expedition.
The bonnet mounted solar panel is switchable, between charging the starter battery on extended stops and contributing to the overall roof installed solar system. There will be 3 x 175W Solar panels installed on the roof + the 120W panel makes for a quick charge on the battery
I had BFGs KO2s on my Discovery 4 and loved them, when I sold the disco and replaced it with the Hilux I also fitted BFGs and hated them. They didnt match well with the Hilux. On the van so far they seem to be a great match and durable too. The EU version of the BFGs KO2 is different to that in Africa, in EU its a softer compound and they are all season tyres. so time will tell on how they settle in with the van.
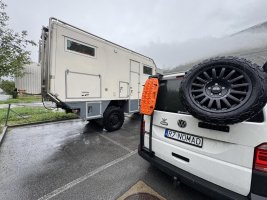
Some very serious Off Road Camping Vehicles over there. I should imagine the inside is impressive also.


