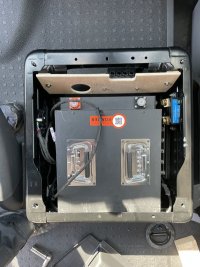
I have also decided to go down a similar battery route. Have you decided to terminate to a bus bar / mega fuse - midi holder for under the seat install ? i have discounted Renogy due to its physical size and decided on either a redarc or victron solution as I would like to keep all of the electronics under the passenger seat if possibleSo I’ve bitten the Lithium bullet and ordered one of those Roamer under Seat batteries.... the life vs depth of discharge data looks good with >7000 cycles at 80% DoD.
Steve at Roamer is being very helpful despite being away on holiday somewhere!
I’ve also decided on 2x 150w barrow panels from Photonics Universe...
Just the electronics to decide on now...
The Victron stuff looks good but is pretty pricey; my question is...
Is it worth it? & why?
Cheers
You are using an out of date browser. It may not display this or other websites correctly.
You should upgrade or use an alternative browser.
You should upgrade or use an alternative browser.
Hi, no decisions yet, I'm having a session with Steve at Roamer batteries shortly, so will be sure to discuss it.I have also decided to go down a similar battery route. Have you decided to terminate to a bus bar / mega fuse - midi holder for under the seat install ? i have discounted Renogy due to its physical size and decided on either a redarc or victron solution as I would like to keep all of the electronics under the passenger seat if possible
I'm aiming to have the Li battery under the drivers seat and the electronics will all go under the single passenger seat... if possible
great , ok so we are on the same strategy . All I am thinking of at the moment is terminating the battery cable to either a bus bar or fuse box and putting an isolator under the drivers seat . I see that the battery has a 120A continuous rating rating. Have you decided on what size cable and main fuse you would use ?. I have also seen on the forum that a redarc has been squeezed down the seat base .
Higreat , ok so we are on the same strategy . All I am thinking of at the moment is terminating the battery cable to either a bus bar or fuse box and putting an isolator under the drivers seat . I see that the battery has a 120A continuous rating rating. Have you decided on what size cable and main fuse you would use ?. I have also seen on the forum that a redarc has been squeezed down the seat base .
I've decided to go full Victron!
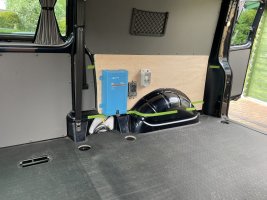
currently working on the details with the help of Steve at Roamer, who is recommending a 32mm^2 candles between the battery (under the drivers seat) & the combined inverter/charger in that dead space in the Ovano, just behind the Kombi seats.
Gower you getting on?
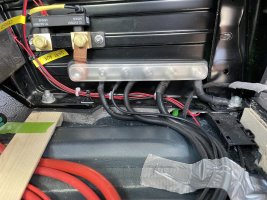
is that 35mm2 cable ? Fitted some 5mm alu. plate under the the drivers seat on 20mm M6 pillars, plenty of clearance for new and existing looms. Left all fuse holders in original positionsI’m worried those 32mm^2 “candles” might melt, I think I’ll got for traditional copper cables and try harder to type accurately!
So, if that is a 5mm x 20mm (100mm^2) solid Aluminium bus bar... I reckon you'll be fine.passenger seat !
It sounds like a nice solution, a pic would be good.
I'm still deciding between putting the DCtoDC and the solar units under the passenger seat or back with the combined charger/inverter in the Ovano space to keep it all together; main downside of that is what happens if I need to take the Ovano out for some reason...
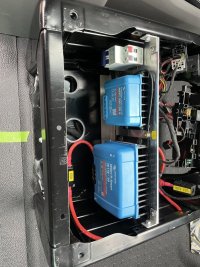
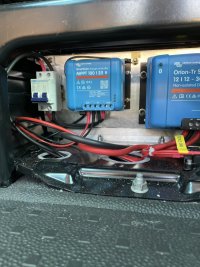
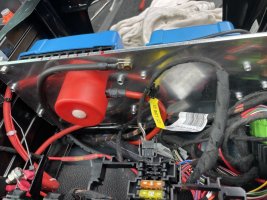
Its 270 x370 x 5mm Alu. plate . Inverter mounter on the this on the RHS , top view . I have cut an arc on the LHS so it is easy to keep the existing cables intact when you remove the seat base. I just need to remove the captive fuse holder bolts and the base just slides out . Keeps original OEM wiring looms intact and you don't need to keep disconnecting the fuse holders. Will send through a photo as soon as possible. I will use the seat base top rail that has some M6 size holes in , with some angle brackets and put two 12mm ply dividers across and a couple of angle brackets to mount to the base. Cut an arc out of the ply dividers for the Inverter as it is mounted on the base and cable glands are drilled through the plate to get the vertical cable access for the solar and DC charger to keep the wiring simple . 2 dividers allows the solar mppt, dc -dc charger and a isolator all fixed vertically through the ply. This maximises the remaining volume , gives a solid plate for fixing through and a 20mm air gap under the plate also giving easy access for the new cables.
no worries , just trying keep it simple. I have gone for a 12/375 invertor . I am going to use the victron fuse holder located under the drivers side to keep the cable length sort 0.5M to the battery .Haven't decided on the cable size, either 35mm2 or 25mm2. Fuse at 125A for the battery . Put in a 200A isolator and and put in a shunt before a 300A neg. bus bar (I couldnt find a 200A one that has a cover) Also allows the leads to be sized for M8 and M10 lugs.
A question for those that no more than me…
In my set up I have a 1 pole breaker on the solar panel live (between panel and MPPT), with the negative straight to my MPPT controller. What is the advantage or difference for using a 2 pole breaker and isolating both live and negative connection?
No real difference on a single panel Camper van install ... Single is fine.
But dual is used on large arrays with multiple panels linked in series and parallel configurations for total isolation. (To stop other panels back feeding high voltage and making them safe to work on)
But dual is used on large arrays with multiple panels linked in series and parallel configurations for total isolation. (To stop other panels back feeding high voltage and making them safe to work on)
Similar threads
- Replies
- 6
- Views
- 664
- Replies
- 4
- Views
- 441
- Replies
- 10
- Views
- 406

