T6 LWB Indium Grey - MTB Camper Build Thread

Good Spot. I took the photo last year, it makes a great background. Such a good water park.

We (SWMBO & 2 kids) had 3 weeks in USA last year from mid July onwards 12 days in Florida, 2 days each Key Largo & Key West then 5 days in New York. It was fabulous - we’re definitely heading back to NY!

I was the only one brave enough to do the shute from the top of the mountain.
 
Loved it there , we went Xmas 2017 and I think it hadn't been open long. Those tappi tappi things save a bit of queueing. Didn't do any of the drops inside the volcano I wimped out lol

You're not the only one! Those drops are huge!

We (SWMBO & 2 kids) had 3 weeks in USA last year from mid July onwards 12 days in Florida, 2 days each Key Largo & Key West then 5 days in New York. It was fabulous - we’re definitely heading back to NY!

Once corona dies down we'll be back. There's no holiday quite like it. 3 weeks would of been great. It was my second time out there but I went with my sister for Halloween and did horror night at universal. Very highly recommended!
 
This build is taking shape quicker than I ever expected. Next couple of weeks are going to be busy.

I pick up the pop top on Friday with the hope to have on over the weekend.

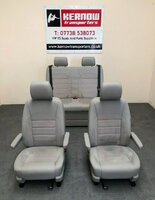
The following Friday I'm making the drive to Kernow Transporters at Lands End to have California front and rear seats fitted on Cali rails with full altro flooring. They aren't what I was planning initially but this is the best option for having a safe rear passenger seat that turns into a bed and gives me a lot of space in the back for the bike garage. They are the upgrade Alcanatara and Leather seats so save me re-upholstering my front seats later. Swivel and heated too, can't be bad. Not a cheap option but for piece of mind and some pretty cool seats that will have great resale it's a no brainer.

20200812_064711.jpg
 
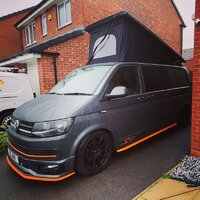
Big update. I collected my Pop Top from Denby Campervans in Leek on Friday. The weather held out and we managed to fit the roof on Saturday and I sealed it on Sunday. It wasn't easy and it isn't finished yet. Edges of the roof need shaping to the body and the front spoiler needs fitting. These will be done this week. Interior trim and elevating bed are still to do but less of a priority,

On the whole it was a success. Not easy, as expected, but it's on and seems to be watertight. The hardest job is getting the canvas fitted correctly and not being clumsy with a drill into the canvas.

The mechanical work was easier than the tent part. I did make a couple of mistakes and the gaps around the front edge aren't the best but the gaps have been filled with silicon and I'm going to fit an extra seal on the roof at the front where the tent meets the body, purely for aesthetics so you don't see a huge amount of silicon. The roof ribs are difficult to get around. I should have pre-formed it to the roof ribs before fitting. Other than that the roof is solid, waterproof and I'm happy with it.

Denby Campervans have been very helpful and their roof kit is very good quality. Instructions aren't perfect but if you are attempting this kind of job you should have the technical knowledge to work around the issues. The main thing is the dimensions were correct and with a little bit of adjustment the roof sits square.


20200815_111413.jpg20200815_115109.jpg20200815_162822.jpg20200815_184401.jpg20200816_102707.jpgIMG_20200816_092956_319.jpg
 
Fitted the front spoiler today. I hate glue... I'll leave it at that.

Now it's time to tidy everything up and make a proper job of it inside and out. (Roof needs shaping to the contours of the roofline and excess glue removed)

20200818_163424.jpg
 
Dash is now in. I had a fight with carpet but luckily it lost. Tidied the carpet up and I'm very happy with results. I think I went a little OTT on the sound deadening and that's why I was struggling around the pedals. Regardless it's in and it's not perfect but it's good enough. I have a new switch coming for the leisure battery audio power so I can make it recess into the dash and make it look OEM. I have also ordered some custom veedub mats with orange trim.

Black lower dash is so much better. Next jobs are door focused. Remove door cards again. Clean and spray them up with the buzzweld. Fit the Van X drivers window switch unit and I've got all the components to do LED ambient lighting. In a few weeks time I'll be starting the camper conversion with the pop top fitting.

I really need a new gear knob, gaiter and steering wheel. They really let the cab down as they are really worn and I've lost the top cap to knob. Any suggestions let me know!

View attachment 78998
View attachment 79000
Watching this build with interest. I have a couple of questions, if you don't mind?
1) The VanX comfort dash - Does the panel below the top(new) glove box, cover the USB port?
2) I am interested in running my head unit( same 1 as yours) from my leisure battery. I assume that's what you bought the new switch for? I would appreciate a step by step guide for this job if you get some free time??

Regards,

Peter D.

Hi Peter,

1) The panel below the new glove box is covering the USB port. That panel is magnetic and comes off with ease. Think of it as a secret storage cubby hole. The new glove box has a cutout inside which you can move that usb port into. I think it comes with a blank too. I never used it. I just ran my 2 usb cables from the headunit into the glove box using the cutout.

2) Speak to Absolut5 Audio. They can give you a new loom for the back of the DMX8019 with a relay and switch for a leisure battery. I have this. I haven't tested it with the leisure battery yet as mine isn't here yet. I just wired it back to the main battery to complete the circuit. I didn't do anything clever so wouldn't be able to give you a step by step other than the physical install. That credit goes to Absolut5 Audio.
 
Hi,

The van is looking great - just a quick question if that's o.k.

Did Denby supply the spoiler in front of pop top, or is it from elsewhere ?

Cheers, Andy..
 
Front spoiler was provided by denby. It's only for LWB models. Let me know if you need any more info. :)
 
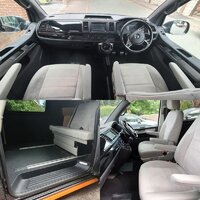
Another big update, progressing way quicker than I thought I would. Cali front seats and rear seat on rails now fitted along with altro flooring. All done by Richard and his guys at Kernow Transporters. Great guys and excellent quality to their work. The seats are amazing, they contrast the dark interior nicely and they are by far the comfiest seats I have had. I drove non stop 6hours from lands end to the midlands yesterday and got out with no aches or pains at all. They swivel and are heated (need to sort retro fit wiring at some point). So glad I went OEM.

Whilst down there I did a deal on some black with aluminium finishing door cards. They really finish the cab off nicely. To finish the cab off all I need to do now is sort the audio leisure battery switch out, fit a new gear knob cap and put my carpet mats down when they finally arrive from customveedubs. Then at some point a new steering wheel.

Next up is tidying the roof up. Get rid of excess sealer and shape the roof so it sits nicely, Carpet line the new cant rails, trim the headlining and fit the elevating bed. After that wiring loom is on it's way from Rayne automotive in the next couple of weeks and work out my next steps for the MTB layout, bulkhead and furniture options.

Let me know what you think!
IMG_20200822_151653_394.jpg
 
Looking good.

RandoM question but does your Cali seat go all the way back, or does it hit the wheelarch?
 
I've got SWB rails so won't the seat won't get to the wheel arch. The seat would need modifications to slide over the arch though. I've seen it on another thread. I think you cut the corner off the box section nearest the wheel arch.
 
I've got SWB rails so won't the seat won't get to the wheel arch. The seat would need modifications to slide over the arch though. I've seen it on another thread. I think you cut the corner off the box section nearest the wheel arch.
Yeah I was curious about that bit. I modified mine for my SWB van.
Where do your SWB rails end? Around the wheel arch area?
The modification isn’t a lot to be fair and is certainly worth it for the extra room (it’s made trips to Ikea a lot easier!)
 
Elevating bed is now in and fitted. All that's left on the roof is to carpet line and tidy up the sealer on the outside edge.

A few more bits ordered. Leisure battery came today and the rest of the loom comes tomorrow from Rayne automotive. Planar Diesel heater with modem ordered and arrives tomorrow.

I've started getting materials and designing the rear bike area and bulkhead in the cabin. Looks like I'll be making a double skinned bulkhead. 1 side carpeted with a recess for a folding shelf that will complete the california bed and on the other side another piece of ply which is going to be covered in either Altro or LVT. This wall covering will follow down onto the base of the shelf for the bikes and then again on the front panel of the box the shelf sits upon. If I get it right it should look really smart.

20200824_154350.jpg
 
  • Like
Reactions: CAB
I'm finally back to a tidy looking T6. I've finished carpet lining, not perfect but not bad for an amateur.

I'm now at a turning point for the MTB layout. I'm going to be mocking up the bike platform and seeing if the theory works of having a bike garage in the back. It will fit but is it usable, that's what I need to work out. Otherwise plan B is to have the bike mounted lengthways behind the cali bed in the forward position and have to take the bikes out of the van to use the bed and the van as a camper, not ideal as it means always having an awning when camping to store the bikes in. I really want to get away from having the bikes on a carrier externally.

20200829_143644.jpg20200829_143639.jpg20200829_140940.jpg20200829_133626.jpg20200829_133102.jpg
 
Back
Top