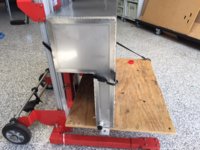
T6 Midroof LWB Wheelchair Campervan Build

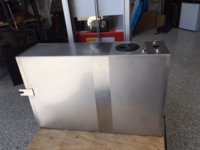
Well, the Tank was ready to be picked up, so i picked it up and took it back to the workshop.

I noticed when i unloaded it, that they missed a mounting point and i'm not to happy with the internal baffle they installed.

I'll deal with that tomorrow, i should have noticed that a mounting point was missing before i took it.

Edit: It will be going back, as the tank wasn't pickled internally :mad:, so ill get the other mounting point put on.


IMG_2089.JPG IMG_2090.JPG IMG_2092.JPG
 
Last edited:
Well the capacity of the water tank in 95 litres, i'm happy with that:)

Although i'm not happy that after i got the tank back after getting the new mount welded on is that i noticed 2 pin holes when filling up the tank to see what the capacity is:mad:

So the tank goes back again tomorrow:mad:
 
Well its been a while, but i finished the renovations in our old apartment, so thats finished and leased, so back onto the van this week.

Installed two breathers for the hot air extraction and the water tank, i used 16mm fuel tank breather with a mesh for both to stop bugs getting in the van.


IMG_2148.JPG

I installed the 50mm2 Inverter cable in 25mm conduit and then refitted the water tank, with 10mm Tee Nuts installed in the cabinet, i fitted the tank sender, connected the water inlet, fitted a valve to empty the tank via a hose connection for cleaning the tank.

IMG_2146.JPG

Just need to refit the Pump and water Filter once i've finished running the electric's, i had to remove it to get better access to fit the wiring

So i started on the Wiring today, wish i had more space to work with, but it is what it is.

I've got a few hours tomorrow to make some more cables, so i picked up a few more cable lugs for tomorrow.

This van build has dragged on for too long, i need to get this finished.

IMG_2149.JPG
IMG_2149.JPG IMG_2150.JPG
 
Can't believe that I have only just found this thread. What an amazing build. Cannot wait to keep up with your progress.
:D

You can tell you have had cabinetry training, your attention to detail is spot-on.
 
Cheers guys for the kind words.


Didn't do much over the weekend as i glued down the floor, i let the Vinyl adhesive dry, although it looks like it'll have to come up and be replaced as, it know has thin indented lines from the wheelchair tires from being in the van today.

Something has gone wrong with the adhesive, i let it sit for 72 hours under weight.. well thats a job for another day:mad:

So i'm back into wiring, it seems never ending.

But the good news is that i got the pump and filter back in place today after the JG pipe inserts arrived from the courier.

The 50mm2 earth cable will be mounted through the factory tie down point (there is a temp bolt and washer in the photo) and i also have a 25mm2 earth cable connected to the VW factory earth bolt that will be connected to the neg bus bar to give me two earth points

IMG_2156.JPG
 
Been getting a few hours into the van, its been 35-38 degrees in the workshop, so not much has gotten done apart from wiring, soldering and heat shrinking.

My DC speed controller didn't work with the Magnetic fans, so i used a voltage controller to slow down the fan speed to reduce the noise. it just adjust via a screw turn, its currently set at 6 volts

I'll be running these exhaust fans on a separate switch, instead of running them all the time for now, i need to see how hot it gets in there while the Triple Charger and Inverter do there thing.

I can always change it to auto switch via a thermostat in the future

IMG_2164.JPG

While i was there i installed some 10mm reflective insulation to reduce any sound coming through at night.

IMG_2165.JPG

The cupboard are all back together on the floor of the workshop, so i can now chase and run the all wiring and plumbing before putting it back in the van.

I'd rather test it all, while in the workshop before installing it in the van.
 
Got the fridge exhaust fans in and working today, so that should help drawing the warm air from behind the fridge cavity.

IMG_2166.JPG
I used Stainless Steel vent covers, and lined them up with the Sink hinges.

Fitted the Filtered water tap, and a 25mm waste water S trap and chased more conduit through the rear of the cupboards along with JG Pipe.

IMG_2172.JPG

It's getting there, just need to finish off the wiring to test and fit the hot and cold pipes to the sink tap
 
Well i had a bit of a holiday and be getting stuck into it.


I pulled it all apart after testing all the electric and plumbing and then refitted the wardrobe back into the van, also wired up the safety hub for the starter battery for the DC-DC, Lift and for a light bar in the future

IMG_2240.JPG

I've been working on a battery box for the House Battery and i also installed the Air Compressor within the RIB bed frame as well the Hot water unit, All items installed with with Rivnuts and Bolts, so they aren't going anywhere.

IMG_2256.JPG

This was a earlier photo, I now have a fuse block on the + terminal and all the timber supports the touch the battery have a 1.5mm rubber backing, so there is no movement at all.
IMG_2252.JPG

This Battery box has quite a few ventilation ports, as the lithium battery asks for it, i also installed some cable duct glands, so i can easily access the terminals and isolator switch

IMG_2259.JPG

I've still got room to mount the hand held UHF's, the PLB and the First Aid kit in front of the battery box

IMG_2258.JPG

Tomorrow i start on the making and laminating the front RIB frame panels and doors, so can i hopefully refit the bed on the weekend, so i can reinstall the other cabinets
 
So this arrived today.

IMG_2261.JPG

It is a small induction cooktop that can use stainless steel cookware and also has variable settings from 300watt to 1200watt, which works well for my 1200 watt inverter

On the 900 watt setting it was using about 80 ah and on 1200 watt it was using about 103 ah.

The dimensions of the induction top are 27cm wide, 22cm deep and 6.7cm high, so it fits into the drawer unit.

I had a Tefal induction cooktop i planned on using, but it was just too big and it was too easy to accidentally switch it on to the 2000 watt mode.

It boils 250 ml of water just under 2 mins, so i can wait that long for a cuppa
 
Well i haven't been slacking off, i've been able to use the van, so we have down a few trips.

Having said that, there was an issue with the Triple charge and there display panel, not displaying the amps, even though it was showing the charge, so i had to pull the cabinets apart and disconnect all the wiring to remove to the electronics:mad:

i thought id left enough room, but the switch unit stopped me from removing it out of the access port by 10mm, and the way i fitted the switch unit, meant i couldn't remove it :mad:. i'm annoyed with myself.

So that is currently on its way to Germany to be looked at and fixed.

In the mean time, i've laminated the lower bed fasciae panels and doors, just need to fit them.

I've been under there van installing there CAK waste water tank, i had to drill a few holes for the hangers, but it fits well, i installed a tank sender gauge and also an waterproof access port to clean it.

thanks for there tip to wrap the muffler with heat wrap, the inlet is damm close to the muffler

IMG_2288.JPG IMG_2283.JPG


I drilled through the chassis to run the waste hose, what a pain, just need to chase the tank send wires and external temp thorough then i'll seal it.

While the van is up on stands, i'll hopefully have the diesel hater installed in place later this week

It's just taking longer as i have to get someone to winch me off the mechanics trolley as i can't get back in the chair, first world problems.
 
haven't done to much

I drilled out the 140mm hole for the diesel heater plate, painted the steel with undercoat and and installed some rivnuts.

I removed the handbrake mount from the seat base, what a pain, i had to end up drilling out the spot welds to get it off.

I then welded on 50mm x 3mm flat bar to the inside of the seat base and then welded the outside of the base to fill in the drill holes.

i just need to give the base one more coat of satin black on the outside before its ready to go back in

IMG_2308.JPG
 
Hiya Bryn
Welcome back fella.

I’ve not been frequenting this forum for a while so I’m only just catching up too.

Your build continues to inspire me and is awesome. I must admit to being a little bit disappointed that you haven’t built a suit aka Ironman stupid to allow you to get back in the chair yourself :whistle:

As a leckie numpty, the most recent posts have been in a different language mate, although I do understand rivnuts and channels!

Keep up the great work, it’s on the home straight :thumbsup::thumbsup::thumbsup:

Cheers, oldrat

It hasn't been easy, i kinda bit off more than i am able to do in a timely manner, but i'm getting there.

An ironman suit would be handy, my shoulders are gone, i got RSI in both wrists and then arthritis in the spine where they installed the titanium rods to fuse the spine back together.

I've noticed my recovery days are getting a little longer, but the end is almost there :thumbsup:
 
That’s a real rough deal Bryn.
You seem to have faced up to it with dignity and what you are achieving has nothing but my total respect fella. :thumbsup: :thumbsup:


If only I could make you an Ironman suit .. I’m not as capable as you are though :p
 
Well i haven't post much as i've been waiting for my electronics to come back from Germany, took over 2 months to get it repaired to a display issue and returned:mad:.

I was disappointed by the poor communication from Votronic, and then waiting two weeks after it was fixed to finally send it back. will look at other options next build.

In the mean time, i fitted the diesel heater, didn't take any photos as it was a pain in the ass job for me to fit

I then reassembled all the cabinets and rewired the switches once it got the electronics back from being repaired last week.

Good thing is that they are working as they should and i also decided to get a bluetooth module to keep track of the electronic system.

I got rid of the Moll factory battery and replaced with with a larger Varta Silver dynamic battery, as the factory battery wasn't holding a charge, the Votronic charger has been keeping the starter topped up with solar, handy function as I'm not a fan of a starter battery not being completely charged.

IMG_2363.JPG

Sink, water filter and fridge are installed, the 12 volt hot water system works well, draws about 25-30 amps to heat 6 litres to 70 degrees.

But it'll be worth it for a quick hot shower in winter, and to do dishes at night.

I still can't believe how quick this lithium battery charges up to 100%

IMG_2368.JPG

Now i just have to finish off the RIB doors and install the latches.
IMG_2369.JPG

Im booked in for new sightly larger 225/65 R17 All Terrain KO2's tires on Friday, as we hit the road full time in 6 weeks, so the next 5 weeks will be short weekend trips to shake down issues before our lap of Australia.

happy days:)
 
Well i got the doors made and latches installed, and while i was there i installed some mountings for the First Aid kit and fire blanket.

I also fitted a Co2 Alarm just to be on the safe side.

I was hoping there would be enough room in there for the Eprib and handheld UHFs, but i'll have to find another spot for them.

Im not a fan of the visible gap between the slider unit and the RIB, so i'll make up a laminated panel to hide the battery switch and box.


IMG_2374.JPG
IMG_2376.JPG
 
Back
Top