As @t0mb0 indicated @dazzler1973 be aware the DCC50S has a solar voltage input limit at 20 odd volts DC which is why I stuck my panels in parallel.
You are using an out of date browser. It may not display this or other websites correctly.
You should upgrade or use an alternative browser.
You should upgrade or use an alternative browser.
Ultimate off-grid electrical setup
- Thread starter dave1986
- Start date
After experimenting on my boat with series and parallel due to shading from the mast, and the fact that at anchor it never stays still ... my conclusion over a 3 week holiday was that there was no discernable difference between the two.Amazing responses @Stay Frosty and @Oceanis thanks for the help I really appreciate it. I really like the setup of both. @Oceanis it looks like you have one cable from each solar panel and then one cable feeding down through the pop top.....can I ask why you decided to go in series for your setup and not parallel for your panels? Also it looks like the same for your batteries too or am I reading the diagram wrong? if they are in series too can I ask why you choose that way and not in parallel here too please?
Wiring in series doubles the voltage and keeps the current the same as one panel, in parallel the current doubles and the voltage stays the same as one panel. Wiring is current dependent so less current means less loss in the wires (or thinner wires). It also means the MPPT hits it's start voltage reliably, and earlier than a parallel system does - this may be why I didn't see a difference in the daily yield but that is just speculation. I saw no difference so went for series on my van as it also gives one extra advantage, if a panel fails you notice immediately because the max voltage seen by the MPPT halves - in parallel, one panel masks the other and you see a normal voltage but lower yield and less current - which is harder to spot.
My batteries are charged in parallel - there is a direct path to every battery from the MPPT (through the battery isolator). As they are all AGMs I use an AGM profile in the MPPT. It would look very different if I had Lithium leisure batteries.
I thought when panels were wired in series and one fails you lose all output, also with a maximum potential of 350 watts available I've used 6:00mm2 cable which should be adequate for the less than 4m run.
They have bypass circuitry, that's how I spotted a failed panel on my boat - it was in the history stored on the MPPT ... some days I was only seeing 2/3 of the normal Max Voltage (3 panels in series) and as with all things, the intermittent fault eventually became permanent.I thought when panels were wired in series and one fails you lose all output, also with a maximum potential of 350 watts available I've used 6:00mm2 cable which should be adequate for the less than 4m run.
dazzler1973
Member
thanks everyone for your help so far.....so I have now got a 360w panel on my roof, Victron MPPT solar controller, 2kw sine wave renogy inverter connected and 2 renogy 100ah lithium batteries connected in parallel......it all works brilliantly.
my next question is......do I have to change the settings on my sterling DC-DC charger? I haven't changed it yet and whilst the new batteries were charging when driven for the first time since having the van ( 2years) the fan is coming on, on the sterling charger, so its clearly getting hot.
if the settings need changing does anybody know what I should change it to? Renogy says they should charge at 14.4v but there isn't a setting for that but when the engine is running the LiFePO4 light is lit up.
Any help advice given is greatly appreciated, I don't want to ruin my batteries due to being poorly set up.
dazzler1973
Member
Thanks @Howzat good to know.
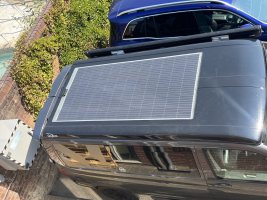
Just for info for anybody else that might come upon this thread at some point. I put the solar panel on the pop top myself with the help of a friend. The panel is really big (takes most of the roof) and I couldn't figure a way to do it by applying the Sikaflex glue and then lifting onto the roof. So I placed the panel on the roof, got it square then masked it off, so any overspill from the Sikaflex could be cleaned and tidy. I only had one ladder so decided the only way to do it was to climb on the roof, which was a worry as wasn't sure if it would support me ( I weigh 95kg). no problem though and actually needed two of us up there ( combined weight of 190kg) without issue.
Then lifted the panel onto its side and held by my mate whilst I pumped the Sikaflex into the masked out area ( it took 2 tubes). Then lowered the panel down onto the glue, being sure to get it exactly right as there was no moving it to adjust once on the glue. Pressed it down and ran my finger round the edges to smooth out mastic/glue then removed the masking tape.
Job done....then just the wiring which was really simple to connect.
I couldn't find any figures beforehand about load bearing on the roof but it took two grown ( fatish) fellas without issue which made the whole job sooooooo much easier.
I'm sure others will have better more professional ways of doing all of this but this worked for me.
p.s
I had a smaller 80w panel on the roof which had to be removed before fitting the new panel. I firstly tried the cheese wire windscreen removal type tool and tried for an hour to cut through the Sikaflex previously used to bond the panel directly to the roof by the company that originally fitted it. It was bloody hard work and I got nowhere with it. I had to resort to literally ripping the panel off with brute force. The solar panel debonded from the Sikaflex but I did slightly bend the previous panel but it only took minutes to get it off. I hadn't planned to reuse or sell the panel so was no issue. I tried a number of ways to remove the Sikaflex from the pop top roof but gave up as its so well bonded. I basically used a sharp retractable blade and cut down and then sliced along it whilst pulling it to remove the bulk of it. The new panel was going over the top so no issue with it not looking amazing.
Hope this helps somebody else....again I'm sure there are better ways of doing all of this but this was my experience and it all work out well.

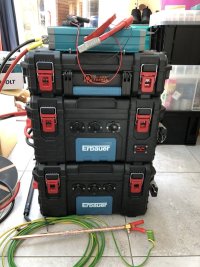
Alternative view…….like a lot of owners went down the route of 100ah Agm with Ctek and a sub for my audio all under the seats but only put a bed at the back ..so just a day Kombi….it still all works well but didn’t want to rip it out…so after camping with the likes of @Dellmassive was in ore of his Mobil setup…..so I built this... Lithium Valence Magnusson Battery Box
it’s modular so can be separated depending on my needs ..this all lives in the tent so keeps the van for day trips ( beer runs)…good thing about it you spec your own components…

ps thanks to… @6Legger for starting the thread
it’s modular so can be separated depending on my needs ..this all lives in the tent so keeps the van for day trips ( beer runs)…good thing about it you spec your own components…

ps thanks to… @6Legger for starting the thread
dazzler1973
Member
yep horses for courses......everybody has their own specific needs and works out what is best for them......just out of curiosity @VanDamMan how do you charge them? are they plugged into a trickle charger when your done?
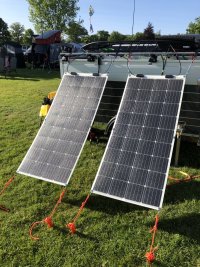
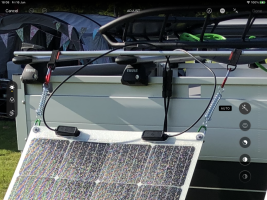
Hi @dazzler1973 …. Both batteries are charged prior to camping via Victron blue smart charger and then via Victron 100/30 mppt solar charger using 2 175w panels if needed while on campyep horses for courses......everybody has their own specific needs and works out what is best for them......just out of curiosity @VanDamMan how do you charge them? are they plugged into a trickle charger when your done?

panels hang off trailer…..but could easily hang off side of van using awning rail….

dazzler1973
Member
Just for info....I have just spent the week in Cornwall completely off grid. we used our strip lighting, toaster, sound bar, phones, computers, hairdryer, fridge etc and max use we saw was 20% of just one of our lithium batteries ( we have 2 renogy 110 AH).....by 1pm each day we were fully charged thanks to the 360w panel on the roof ( even on the cloudy days)......have to say I'm over the moon......may have been a bit excessive getting the two batteries in hindsight but better to be prepared then left wanting in my mind.
I'll give you a tenner for the spare battery 
Same deal here regarding the amount of leisure battery you actually use when everything is running as it should.
I'm independent of mains hook up when required and the only downside is getting the 230Vac from the inverter side sorted. Initially I thought great, electric toaster, kettle, George Formby ukulele grille and microwave oven, yep all this from a 1000 watt inverter, turns out the kettle draws 87A, George Formby was actually nearly 2kw so my bad there and the 700 watt microwave sucks 97A at 13.4 Vdc.
Now I've been wanting a 2kw inverter for a while but these things are the size of a carry on case and take around 200A input to get near that 2kw output so need 0 gauge leads in... I will get one though as using the gas feels wrong these days regardless of people in orange shirts.
Running a Roamer 230Ah seatbase battery and two 175 watt Renogy flexible panels here. By way of a confession I did make a bit of an incorrect snarky comment on a recent THQ video on YouTube where they were pushing a Clayton all in one power centre and pointed out that their claims were a bit ambitious assuming that the bit of kit was the 1500watt device at just over 2 grand, turns out it was the 3kw version at a bit over £4k bonkers, 4 bags buys a lot more wattage than that when you DIY.

Same deal here regarding the amount of leisure battery you actually use when everything is running as it should.
I'm independent of mains hook up when required and the only downside is getting the 230Vac from the inverter side sorted. Initially I thought great, electric toaster, kettle, George Formby ukulele grille and microwave oven, yep all this from a 1000 watt inverter, turns out the kettle draws 87A, George Formby was actually nearly 2kw so my bad there and the 700 watt microwave sucks 97A at 13.4 Vdc.
Now I've been wanting a 2kw inverter for a while but these things are the size of a carry on case and take around 200A input to get near that 2kw output so need 0 gauge leads in... I will get one though as using the gas feels wrong these days regardless of people in orange shirts.
Running a Roamer 230Ah seatbase battery and two 175 watt Renogy flexible panels here. By way of a confession I did make a bit of an incorrect snarky comment on a recent THQ video on YouTube where they were pushing a Clayton all in one power centre and pointed out that their claims were a bit ambitious assuming that the bit of kit was the 1500watt device at just over 2 grand, turns out it was the 3kw version at a bit over £4k
Similar threads
- Replies
- 23
- Views
- 937
- Replies
- 6
- Views
- 566
- Replies
- 9
- Views
- 1K
- Replies
- 12
- Views
- 851
- Replies
- 11
- Views
- 598
