This is less a guide and more a walk through of how you might do it. I've called it utility lighting as this is more about illuminating the area round the van than for looks. For projector puddle lights there's other threads and kits that use the door lock latch sensor wiring, and that doesn't need much guidance.
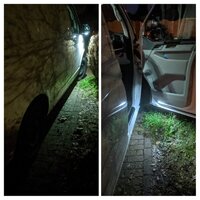
I'm currently using these in the mirrors: 2pcs Car 6000K White LED Side Mirror Puddle Lights For Ford Mustang Mondeo MK5 | eBay
On the door cards I'm using some reeeally cheap lights. Not as elegant a solution as the projector puddle lights, or red warning lights which people normally use but you don't actually see these fittings at all. They came from here: 2Pack Car Motorcycle Rear Tail Brake Stop Light Lamp LED ABS Round Reflector | eBay
After much to'ing and fro'ing I've wired these into the courtesy lighting circuit so that they are under the protection of the BCM auto switch off if you leave the door open for too long. But this means that you have to bring wiring into the door as the courtesy lighting circuit isn't available in the door loom, and on into the wing mirror.
The benefit of the wing mirror puddle lights is the remote folding feature which allows you to direct the puddle light down the side of the van (second picture), which when pitching camp, or going round the offside of the van to secure an awning is going to be great.
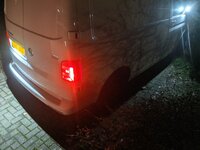
You see from the pictures that the rear of the van can be very adequately illuminated by upgrading the number plate bulbs, which is also covered elsewhere on the forum (but check for a big gotcha with them).
I've already got footwell lighting that taps into the courtesy lighting circuit behind the glove box, so these steps are about tapping on from there and running into the doors.
To work on the wing mirrors you'll need to remove the wing mirror glass, cover and trim, and to do that without breaking a clip you'll need VIP membership to read this guide: https://www.t6forum.com/threads/gui...s-from-a-t6-without-breaking-any-clips.23606/
To remove the door cards, you can use this guide: [GUIDE] How to remove the front door card on a T6
One thing I've found really useful is a loom making kit, like this one: Connector Wiring Loom Automotive Harness Auto Terminal Repair Kit Set Motorcycle | eBay I've found that the pins don't need a crimping tool, I use long-nosed pliers to close the inner clips round the copper core and the outer clips round the plastic insulation and the resulting connections are really strong, dry connected (so won't degrade like solder) and repeatable as you can extract the pins and change the pins around if you have polarity issues.
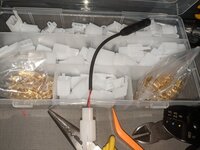
And while we're on the subject, some TESA tape like this: 19mm x 25m TESA Tape NEW CABLE ROLL ADHESIVE CLOTH FABRIC WIRING LOOM HARNESS | eBay to tidy up the wiring you add - it's easy to work with (tears with your teeth!) and looks very professional.
So, mirrors first. Here's those Ford lights going into the mirror [lower] trim:
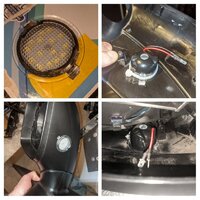
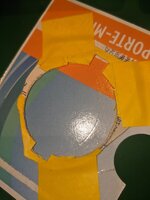
There's a nice spot in the middle of the base which is quite flat, not contoured, which doesn't conflict with any of the antennae or supports. I made up a cardboard template and then transferred the pattern of the cut-out to the mirror trim with a craft knife, before using a Dremel milling bit to carve out the hole. On the first attempt I went a little too loose with the cut out and so the light has a cable tie as a collar to prevent it coming out, although it's doubtful it would. This was a spare mirror trim, so didn't matter if it went wrong.
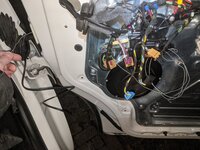
Then you need to get power from the main cab courtesy lighting circuit into the door, so it was off with the door cable grommet (the rubber ends just pull off and push back on) and a bit of old semi-stiff wire that I use for cable pulling to find the way alongside the door loom out of the assembly carrier grommet. I made a secondary hole for this cable as the grommet into the door (next to the speaker) is crammed full. So I made a hole with a bradawl and pushed the cable through, which is a nice tight fit.
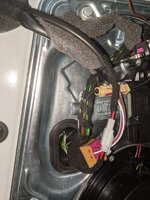
Whilst on the subject, I've got a habit of bringing both positive and ground into the door (and did the same for my reversing camera feed in the barn door) as I can use off-the-shelf double insulated twin 5 amp from Halford's round the corner, it is robust enough to deal with repeated opening and closing of the door, and any camper convertor who works on the van will know that's it's an aftermarket addition. Within the door I've been using some paired black and red single insulated cable (possibly uprated speaker cable) which is the same size as the larger loom cores, and again it's obviously not original.
Also in that first picture you can see the wire coming in from the wing mirror. To do that you need to remove the wing mirror off the door and thread a new cable into the door. Instructions for how to do that are here: [SOLVED] Bad radio reception + no electric mirror control = cut loom
And then you can see the new loom connectors I've made. They are really nice as I can now disconnect the mirror line without having to worry about damaging individual crimp connectors.
And this week I've extended that line by splitting the courtesy circuit like this:
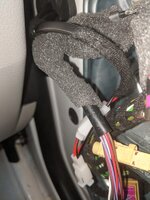
The lower white connector is the power coming in from the door loom grommet. There's then two lines crimped into each pin of that connector to allow one pair to go to the wing mirror using the upper white connector with the longer tail wrapped onto the door card loom to this connector for the door card: (the white connector hanging out to the far right)
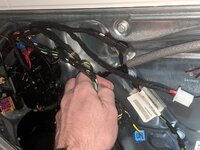
If you look closely you can see two t-taps on the left which take an ambient lighting feed from the electric window switch backlighting and, together with the courtesy lighting lines, create a 4 pin connector to feed the door card. I've aligned the position of this new connector to match the door lock pin LED wiring connector (which is the black connector at the top middle of the picture), so that when removing the door card I disconnect both at once, which looks like this:
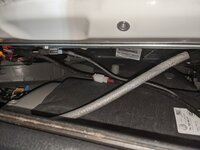
Whereas on the passenger side, the lock pin has no LED so my connector is the only connector to disconnect when removing the door card, apart from the door handle cable.
Last but not least is the mounting of the puddle light on the door card, and the ambient lighting at the same time.
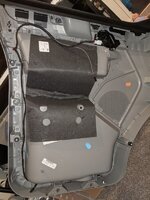
Here's the back of the door card. The connector at the top brings in four lines (at the time, the ambient and courtesy lighting couldn't share a ground, so you could have three lines if you were to jump to using the courtesy circuit for the puddle lighting) which then runs around to feed the puddle light at the bottom right. The puddle light is on a threaded stud and you can use a bradawl and screwdriver pushed through to make a hole. There's a nut to lock it in place. And then make a little hole for the cable to come through the same way - no Dremeling required!
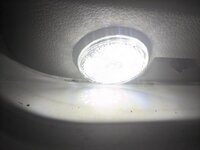
These lights are low-profile so they don't foul on the step but also throw light sideways a little. They come with two lighting levels, as they are designed like tail/brake lights. I tried the brightest level and they were insanely bright so went for half the LEDs on, and they match the footwell lighting really well:
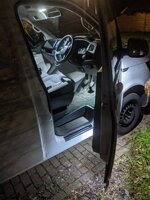
Here's the effect of the mirror puddle and door card puddle lighting combined with footwell LEDs and LED bulbs in the cab courtesy light. Done!


I'm currently using these in the mirrors: 2pcs Car 6000K White LED Side Mirror Puddle Lights For Ford Mustang Mondeo MK5 | eBay
On the door cards I'm using some reeeally cheap lights. Not as elegant a solution as the projector puddle lights, or red warning lights which people normally use but you don't actually see these fittings at all. They came from here: 2Pack Car Motorcycle Rear Tail Brake Stop Light Lamp LED ABS Round Reflector | eBay
After much to'ing and fro'ing I've wired these into the courtesy lighting circuit so that they are under the protection of the BCM auto switch off if you leave the door open for too long. But this means that you have to bring wiring into the door as the courtesy lighting circuit isn't available in the door loom, and on into the wing mirror.
The benefit of the wing mirror puddle lights is the remote folding feature which allows you to direct the puddle light down the side of the van (second picture), which when pitching camp, or going round the offside of the van to secure an awning is going to be great.
You see from the pictures that the rear of the van can be very adequately illuminated by upgrading the number plate bulbs, which is also covered elsewhere on the forum (but check for a big gotcha with them).
I've already got footwell lighting that taps into the courtesy lighting circuit behind the glove box, so these steps are about tapping on from there and running into the doors.
To work on the wing mirrors you'll need to remove the wing mirror glass, cover and trim, and to do that without breaking a clip you'll need VIP membership to read this guide: https://www.t6forum.com/threads/gui...s-from-a-t6-without-breaking-any-clips.23606/
To remove the door cards, you can use this guide: [GUIDE] How to remove the front door card on a T6
One thing I've found really useful is a loom making kit, like this one: Connector Wiring Loom Automotive Harness Auto Terminal Repair Kit Set Motorcycle | eBay I've found that the pins don't need a crimping tool, I use long-nosed pliers to close the inner clips round the copper core and the outer clips round the plastic insulation and the resulting connections are really strong, dry connected (so won't degrade like solder) and repeatable as you can extract the pins and change the pins around if you have polarity issues.

And while we're on the subject, some TESA tape like this: 19mm x 25m TESA Tape NEW CABLE ROLL ADHESIVE CLOTH FABRIC WIRING LOOM HARNESS | eBay to tidy up the wiring you add - it's easy to work with (tears with your teeth!) and looks very professional.
So, mirrors first. Here's those Ford lights going into the mirror [lower] trim:


There's a nice spot in the middle of the base which is quite flat, not contoured, which doesn't conflict with any of the antennae or supports. I made up a cardboard template and then transferred the pattern of the cut-out to the mirror trim with a craft knife, before using a Dremel milling bit to carve out the hole. On the first attempt I went a little too loose with the cut out and so the light has a cable tie as a collar to prevent it coming out, although it's doubtful it would. This was a spare mirror trim, so didn't matter if it went wrong.

Then you need to get power from the main cab courtesy lighting circuit into the door, so it was off with the door cable grommet (the rubber ends just pull off and push back on) and a bit of old semi-stiff wire that I use for cable pulling to find the way alongside the door loom out of the assembly carrier grommet. I made a secondary hole for this cable as the grommet into the door (next to the speaker) is crammed full. So I made a hole with a bradawl and pushed the cable through, which is a nice tight fit.

Whilst on the subject, I've got a habit of bringing both positive and ground into the door (and did the same for my reversing camera feed in the barn door) as I can use off-the-shelf double insulated twin 5 amp from Halford's round the corner, it is robust enough to deal with repeated opening and closing of the door, and any camper convertor who works on the van will know that's it's an aftermarket addition. Within the door I've been using some paired black and red single insulated cable (possibly uprated speaker cable) which is the same size as the larger loom cores, and again it's obviously not original.
Also in that first picture you can see the wire coming in from the wing mirror. To do that you need to remove the wing mirror off the door and thread a new cable into the door. Instructions for how to do that are here: [SOLVED] Bad radio reception + no electric mirror control = cut loom
And then you can see the new loom connectors I've made. They are really nice as I can now disconnect the mirror line without having to worry about damaging individual crimp connectors.
And this week I've extended that line by splitting the courtesy circuit like this:

The lower white connector is the power coming in from the door loom grommet. There's then two lines crimped into each pin of that connector to allow one pair to go to the wing mirror using the upper white connector with the longer tail wrapped onto the door card loom to this connector for the door card: (the white connector hanging out to the far right)

If you look closely you can see two t-taps on the left which take an ambient lighting feed from the electric window switch backlighting and, together with the courtesy lighting lines, create a 4 pin connector to feed the door card. I've aligned the position of this new connector to match the door lock pin LED wiring connector (which is the black connector at the top middle of the picture), so that when removing the door card I disconnect both at once, which looks like this:

Whereas on the passenger side, the lock pin has no LED so my connector is the only connector to disconnect when removing the door card, apart from the door handle cable.
Last but not least is the mounting of the puddle light on the door card, and the ambient lighting at the same time.

Here's the back of the door card. The connector at the top brings in four lines (at the time, the ambient and courtesy lighting couldn't share a ground, so you could have three lines if you were to jump to using the courtesy circuit for the puddle lighting) which then runs around to feed the puddle light at the bottom right. The puddle light is on a threaded stud and you can use a bradawl and screwdriver pushed through to make a hole. There's a nut to lock it in place. And then make a little hole for the cable to come through the same way - no Dremeling required!

These lights are low-profile so they don't foul on the step but also throw light sideways a little. They come with two lighting levels, as they are designed like tail/brake lights. I tried the brightest level and they were insanely bright so went for half the LEDs on, and they match the footwell lighting really well:

Here's the effect of the mirror puddle and door card puddle lighting combined with footwell LEDs and LED bulbs in the cab courtesy light. Done!
