Exactly what I'm trying to avoid. Really appreciate the confirmation guys.A few years back I read it was 9mm and ordered a long reach one only to find it was too big when I went to do my brakes
You are using an out of date browser. It may not display this or other websites correctly.
You should upgrade or use an alternative browser.
You should upgrade or use an alternative browser.
Brake Pad & Disc change - How I Done It -
- Thread starter Dellmassive
- Start date
@Dellmassive says he used a 9mm for his big brakes in this very guide.
It's 9mm long for T32 big break calipers
And
7mm long for standard break calipers. T28,T30
..
It's also detailed in the workshop docs at the start of the thread.

..
And
7mm long for standard break calipers. T28,T30
..
It's also detailed in the workshop docs at the start of the thread.
..
Here....Can anybody confirm the Allen key size for 340mm brakes? Where did the 9mm originate from?

Brake Pad & Disc change - How I Done It -
Brake Pad & Disc change - How I Done It - After a recent trip to the Dealer for Service and Cambelt job, ( we had the dealers do it as we are in a 2yrs extended warranty ) : Cambelt + Water Pump Replacement - Official guidance At the time, they advised that the rear pads were 90% worn...
.

Have a look at the price of Pagid discs and pads from Halfords. You will be surprised.Thanks for sharing this post...i have a 2017 T32 204 Sportline and found this great when looking for details of the front brake parts....Just ordered the Brembo parts from ECP.
Speaking of Halfords (again!) I had by brake fluid changed at my local National Auto Center (who I've used in the past before Halfords bought them out so I already know and trust the guys that work there) after I'd changed my disks and pads myself then found my brake pedal had gone squishy. Brake fluid bled and changed for £35 (was on offer at the time, normally £40)
Martin (the mechanic) told me he bled 2.5 liters through to get the brake pedal back. For that sorta money it's not worth getting your hands dirty.
Sourced and fitted the disks and pads myself (pagid all round from Halfords - and well worth getting your hands dirty to save on VW/Indie labour charges) and the brake fluid change/bleed for a total of £220. You'll pay more than that just sourcing the brake parts for the front only from ECP.
Halfords used to be expensive for bits and bobs but they've really suprised me this last few weeks.
OK so taking this on at the weekend - front pads and discs. First timer! And I'm a guide/video follower - not a natural mechanic. Think I've assembled all the bits required in @Dellmassive's list. Have some nutexa pads and discs to go on. But reading really conflicting advice on jacking and axle stands in all the threads here.I did my fronts a couple of weeks ago. Make sure you get all your ducks in a row before you start.
I got a new torque wrench, a loooong breaker bar and a 9mm long Allen key socket and brake cleaner and axle stands.
It was straightforward. Jack up, axle stands, wheels off. Spray release agent onto retainer bolt.
Remove retainer clip,which on the big brakes is a bugger, then unbolt caliper carrier bolts. Breaker bar worked a treat here.
Then undo the carrier bolts and remove the caliper carrier.
Remove retainer screw and use a big persuader (lump hammer) to knock the disc off. Clean the hub mating face so it shines lol then wind back the pistons.
I used a wind back tool because I already have one. BUT with twin pistons you need to put a piece of ply or similar across the two pistons otherwise as you wind one in the other comes out. Doh!
Oh yeah, remove brake fluid cap before this stage and put some old rags round in case you push fluid out in the wind back process.
Then new disc, retainer screw and reassemble using ceratec lube (not copper slip) on moving edges and rear of pads (that’s what it stated on my pads). Also lube the slider bolts before you reinsert them.
Then pad into caliper and put caliper on and tighten to correct torque. Then put carrier/pad on and bolt up to correct torque. Then put the retainer clip back on. That is massive fun…..not.
Then clean the caliper and paint it orange and put the wheels back on.
Reservoir cap back on then pump the brake pedal a few times until firm.
Then follow pad manufacturer instructions to bed them in.
If I’ve missed anything I apologise but that’s just from memory.
It’s pretty straightforward.
View attachment 162532
Have a 3t bottle jack and axle stands - also new and unused. I can see @Bigsidavies jacked and used axle stands as did @Dellmassive. Dellmassive video on web had the jack going under the front of van somewhere - presume subframe somewhere? But photos here show jack to the side but with axle stands places somewhere underneath. But can I jack one wheel at a time and then add an axle stand, if so where to place axle stand? Or is it best to lift the van in one go and then put both axle stands on the jacking points. If so, where to jack?
If not, @Loz seems to have some good advice - and surprisingly I already have some polymorph somewhere.
I jack the front up using a bottle jack on the jacking point one side at a time then place an axle stand under the big tubular section that I think supports the engine. Then do the other side. Done it a fair few times with no problems.
If you go for a new tyre they will jack it up with a trolley jack until the rear wheel is nearly off the ground too. I don’t think the van is going to bend.
If I’m going to lie under it then the bottle jack AND the axle stand are in place or a couple of off cuts of railway sleeper etc. Never a single point of suspension.
Completed at the weekend. All in all pretty straightforward (with this thread and forum!). Hardest thing was cracking the wheel nuts - had to take the van to tyre place in the end. They were super tight. I’ve since bought a digital torque adapter to help with both the 21mm caliper bolts, wheel nuts - everything really.
Nutexa frictions service and kit is all tip top.
Thanks for all your help

Nutexa frictions service and kit is all tip top.
Thanks for all your help

p4:
...
...
now to check the master cylinder oil level and cap. . .
...
View attachment 152931
next up is to pump the break peddle, , ,6 or 7 times . . .
this is to take up the slack from the piston push back . . .
ding ding round two . . .
now repeat for the other side of the van.
Can some of you elaborate when to do this and when you dont have to? Many tutorials and video's online you dont see people doing this.
Although this makes sense (Since I sort of do the same with the MTB brakes).
Ding Ding Round#2
After the van being in for an 70k ALL-IN service, they reported front pads & discs 75% worn.
more on that here: @Dellmassive`s T6 T32 Sportline 204 LWB DSG PV MY18 - Van Adventure
and the awesome guys over at NUTEXA getting us sorted with a new set of fronts. . . Thanks @Pauly & @Nutexa Frictions
see here: NUTEXA - Brake Pad & Disc change - How I Done It -
.
it was time to get it done. . . . remember last time we split the 21mm sockets on the front calliper bracket bolts. (so couldnt swap the discs)
so this time we have the new IMPACT rated socket set, the breaker bar and extension pole.
plus a new set of M16 21mm bolts (calliper bracket to hub) as according to the book the are stretch bolts and need replacing after removing.
.
starting off on the easier drivers side, id cracked the wheel bolts a half turn then jacked up the front.

I've used two jacks and two axle stands for this job. . . .
the jacks are on the jack points and the axle stands were fitted after on the sub frame.

also not forgetting to undo the brake fluid reservoir and place blue role around to catch any drips when the pistons get pushed back.

slider pins undone,
then piston pushed back using a pry bar against the pad and disk. . . . .
your see the calliper hanging on a calliper-hook to keep it safe and prevent the hose getting damaged.

this time i was ready for those tuff 21mm caliper bracket bolts. . . . id pre soaked them with WD40 already.
i tried the new IMPACT socket with the Nut gun - they didn't budge,
so it was time for the breaker bar + extension . . . . . they were very tight, but with a crack and a groan they come free. - sweet.
using the gun after that they come flying out.

now for the good stuff. . . . check out these NUTEXA discs and pads. . .

re assembly was simple enough. . .
clean everything with the wire brush.
new disc on, with spline keeper bolt + torqued to spec - see the pdf at the top of the tread. (TTS)
calliper bracket on with new 21mm M16 bolts ( purchased from the local TPS for almost £20 for the four! ) + TTS
pads in piston and on carrier.
small amount of appropriate grease on the slider pins and pad-calliper contact points
calliper on bracket and slider pins + TTS

while we are down here. . . . heres a quick look at the "CMS - crankshaft main seal," the van has just been in to VW as the sump seal was leaking( after them doing the CMS), so they have just redone it FOC.
the sump gasket is a type of silicone stuff.
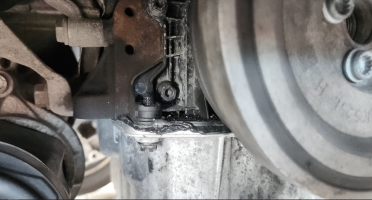
Nice . . .
so its wheel back on, and move over to the other side. . .
+++++++++++++++++++++++++++
the other side is the same, except we have the pad sensor to deal with. . .
this part is damaged on this van - so i needed to repair the loom, but ill cover that in a different thread.

so same procedure to get to this point. . . . .
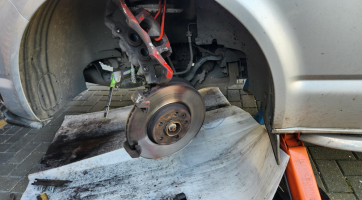
here's a closeup of those tuff bracket bolts while they are soaking in WD40.
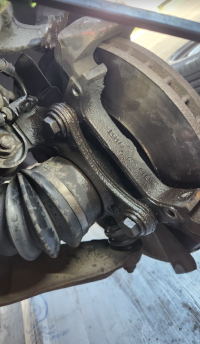
this is with bracket and disc off, plus the pad sensor loom repaired. . . .
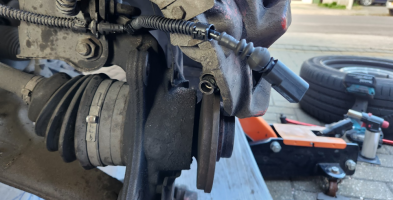
a quick rebuild - same as the other side we get to here . . . .
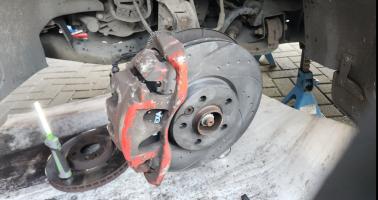
with the new pad sensor load - this time cable tied in to make sure it cant come out its mounting bracket

a final clean-up and have re fitted the calliper spring plate. . .

here is another look at the jack and stand positioning. . .

wheels back on, bolts TTS, and its back on the floor. . . .
here you can see why i didn't bother sorting out the red callipers - with these Dutchy rims you hardly see them, so i didn't bother touching up the paint.
maybe when i swap out to the Cantera's or Sportline alloys ill take another look at the painted pots

next up was to replace the brake fluid cap. . . no loss of fluid here as the level wasn't topped up as the pads wore down - so the level is now back to the MAX line.

now a few presses of the peddle to take up the slack till the peddle firms up.
now time for a gentle test drive. . .
the discs come with that sweet looking black protective coating, and the pads need seasoning / bedding in.
so its out for a local 5miles loop being very carful on the braking. . .
during the test drive with the window open there is a definate fluttering sound that the pads and discs are making - this is normal for the start of the drilled and vented discs.
after the test drive there is a small puff of smoke as the oils and paint coating get used to the hot temps. . .
cheaking all round you can see the pads bedding and wearing off the black coating. . . .
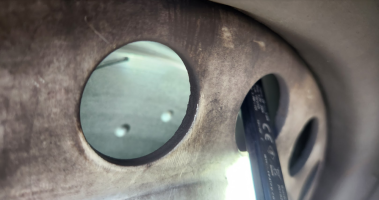

Pic Limit for this post. . .
so that it for now. . . the pads will need a while to bed in . .
so ill go easy for the next 100miles / 5days.
...
.
/
.
After the van being in for an 70k ALL-IN service, they reported front pads & discs 75% worn.
more on that here: @Dellmassive`s T6 T32 Sportline 204 LWB DSG PV MY18 - Van Adventure
and the awesome guys over at NUTEXA getting us sorted with a new set of fronts. . . Thanks @Pauly & @Nutexa Frictions
see here: NUTEXA - Brake Pad & Disc change - How I Done It -
.
it was time to get it done. . . . remember last time we split the 21mm sockets on the front calliper bracket bolts. (so couldnt swap the discs)
so this time we have the new IMPACT rated socket set, the breaker bar and extension pole.
plus a new set of M16 21mm bolts (calliper bracket to hub) as according to the book the are stretch bolts and need replacing after removing.
.
starting off on the easier drivers side, id cracked the wheel bolts a half turn then jacked up the front.

I've used two jacks and two axle stands for this job. . . .
the jacks are on the jack points and the axle stands were fitted after on the sub frame.

also not forgetting to undo the brake fluid reservoir and place blue role around to catch any drips when the pistons get pushed back.

slider pins undone,
then piston pushed back using a pry bar against the pad and disk. . . . .
your see the calliper hanging on a calliper-hook to keep it safe and prevent the hose getting damaged.

this time i was ready for those tuff 21mm caliper bracket bolts. . . . id pre soaked them with WD40 already.
i tried the new IMPACT socket with the Nut gun - they didn't budge,
so it was time for the breaker bar + extension . . . . . they were very tight, but with a crack and a groan they come free. - sweet.
using the gun after that they come flying out.

now for the good stuff. . . . check out these NUTEXA discs and pads. . .

re assembly was simple enough. . .
clean everything with the wire brush.
new disc on, with spline keeper bolt + torqued to spec - see the pdf at the top of the tread. (TTS)
calliper bracket on with new 21mm M16 bolts ( purchased from the local TPS for almost £20 for the four! ) + TTS
pads in piston and on carrier.
small amount of appropriate grease on the slider pins and pad-calliper contact points
calliper on bracket and slider pins + TTS

while we are down here. . . . heres a quick look at the "CMS - crankshaft main seal," the van has just been in to VW as the sump seal was leaking( after them doing the CMS), so they have just redone it FOC.
the sump gasket is a type of silicone stuff.

Nice . . .
so its wheel back on, and move over to the other side. . .
+++++++++++++++++++++++++++
the other side is the same, except we have the pad sensor to deal with. . .
this part is damaged on this van - so i needed to repair the loom, but ill cover that in a different thread.

so same procedure to get to this point. . . . .

here's a closeup of those tuff bracket bolts while they are soaking in WD40.

this is with bracket and disc off, plus the pad sensor loom repaired. . . .

a quick rebuild - same as the other side we get to here . . . .

with the new pad sensor load - this time cable tied in to make sure it cant come out its mounting bracket

a final clean-up and have re fitted the calliper spring plate. . .

here is another look at the jack and stand positioning. . .

wheels back on, bolts TTS, and its back on the floor. . . .
here you can see why i didn't bother sorting out the red callipers - with these Dutchy rims you hardly see them, so i didn't bother touching up the paint.
maybe when i swap out to the Cantera's or Sportline alloys ill take another look at the painted pots

next up was to replace the brake fluid cap. . . no loss of fluid here as the level wasn't topped up as the pads wore down - so the level is now back to the MAX line.

now a few presses of the peddle to take up the slack till the peddle firms up.
now time for a gentle test drive. . .
the discs come with that sweet looking black protective coating, and the pads need seasoning / bedding in.
so its out for a local 5miles loop being very carful on the braking. . .
during the test drive with the window open there is a definate fluttering sound that the pads and discs are making - this is normal for the start of the drilled and vented discs.
after the test drive there is a small puff of smoke as the oils and paint coating get used to the hot temps. . .
cheaking all round you can see the pads bedding and wearing off the black coating. . . .


Pic Limit for this post. . .
so that it for now. . . the pads will need a while to bed in . .
so ill go easy for the next 100miles / 5days.
...
.
/
.
epiphany_boz
Member
Hi, there is some brilliant advice on this thread. I am getting ready to do the front discs and pads on my T6 T32 with the 'big' 340mm discs. I have gone for EBC discs and EBC Greenstuff pads.
My question is related to the torque setting of the caliper mounting bolts. These are M16 x1.5mm Grade 10.9 bolts. The OEM manual treats them as stretch bolts (hence replacement each time) and specifies "180 Nm+45 degrees" of rotation. My trusty 1/2" drive torque wrench only goes to 135 Nm! A 'standard' torque value for a bolt of that specification (non-stretch application) is 250-315 Nm, depending on the thread lubricant. I assume it takes a fair bit more torque to stretch a bolt.
What method (and tools) are you using to install these bolts? Many thanks in advance
Last edited:
Here's the kit I used...
Basically I got a small and large TQ wrench.

 www.t6forum.com
.
Basically I got a small and large TQ wrench.

Brake Pad & Disc change - How I Done It -
Brake Pad & Disc change - How I Done It - After a recent trip to the Dealer for Service and Cambelt job, ( we had the dealers do it as we are in a 2yrs extended warranty ) : Cambelt + Water Pump Replacement - Official guidance At the time, they advised that the rear pads were 90% worn...
.
epiphany_boz
Member
Thanks, but the 'torque' or bolt stretch seems to be beyond 1/2" drive hand tools.Here's the kit I used...
Basically I got a small and large TQ wrench.

Brake Pad & Disc change - How I Done It -
Brake Pad & Disc change - How I Done It - After a recent trip to the Dealer for Service and Cambelt job, ( we had the dealers do it as we are in a 2yrs extended warranty ) : Cambelt + Water Pump Replacement - Official guidance At the time, they advised that the rear pads were 90% worn...www.t6forum.com
.
A "standard" torque setting is based on 40-60% of the yield stress in a bolt - in a typical, non-stretch application. A 'stretch bolt' is tensioned beyond yield, by definition. This is implied by VW recommending these bolts are replaced each time that are used and by defining the 'tension' setting as a torque (of 180 Nm) plus 45 degrees of rotation (0.2mm stretch).
To achieve a bolt stress of 100+% of yield in M16 x1.5mm pitch Grade 10.9 bolts could take a torque of 500+Nm? I don't think I have the arm and leg strength for that!
I'm thinking of using a 1/2" drive torque wrench to get them to the specified 180 Nm, then use an impact gun to add the 45 degrees of rotation. Thoughts & comments welcome.
I got a draper half inch torque wrench and tightened to 180 then turned it the extra 45 degs. Not convinced the extra 45 degrees needed 500nm.
epiphany_boz
Member
I finally got round to replacing the front discs and pads on my T6 T32. It is the larger 340mm discs. FYI I chose EBC discs and EBC Green pads.I got a draper half inch torque wrench and tightened to 180 then turned it the extra 45 degs. Not convinced the extra 45 degrees needed 500nm.
I was intersted to know what torque the caliper mounting bolts require to achieve the 180 Nm + 45 degrees rotation. My torque wrench only goes to 230 Nm, so it tightened the bolts initially to 130 Nm, painted a mark on the hex head and caliper bracket and installed a torque angle guage. I then torqued the bolts to the recommended 180 Nm. As best as I could tell, that +50 Nm rotated the bolts about 15 degrees. I re-marked the bolt head. I then repeated this to 230 Nm and the bolt rotated about another 15 degrees. I then fitted my 660mm breaker bar and rotated 45 degrees from the 180 Nm paint setting.
So, 15 degrees is approximately equal to 50 Nm, which implies the factory setting of 180 Nm + 45 degrees is around 330 Nm. My angle measurements were +/- as it was awkward using the torque angle gauge in the wheel arch, so I wouldn't use these figures in preference to the factory method, but just as an illustration of the force required.
Also, the factory manual recommends a long reach 9mm bit socket to remove the sliding pins. That works fine but I didn't need a long reach. The hex head isn't recessed, so a short reach bit socket would also work.
That’s one hell of a force. No wonder I was lifting the van with the breaker bar when I was undoing the previous fitment.I finally got round to replacing the front discs and pads on my T6 T32. It is the larger 340mm discs. FYI I chose EBC discs and EBC Green pads.
I was intersted to know what torque the caliper mounting bolts require to achieve the 180 Nm + 45 degrees rotation. My torque wrench only goes to 230 Nm, so it tightened the bolts initially to 130 Nm, painted a mark on the hex head and caliper bracket and installed a torque angle guage. I then torqued the bolts to the recommended 180 Nm. As best as I could tell, that +50 Nm rotated the bolts about 15 degrees. I re-marked the bolt head. I then repeated this to 230 Nm and the bolt rotated about another 15 degrees. I then fitted my 660mm breaker bar and rotated 45 degrees from the 180 Nm paint setting.
So, 15 degrees is approximately equal to 50 Nm, which implies the factory setting of 180 Nm + 45 degrees is around 330 Nm. My angle measurements were +/- as it was awkward using the torque angle gauge in the wheel arch, so I wouldn't use these figures in preference to the factory method, but just as an illustration of the force required.
Also, the factory manual recommends a long reach 9mm bit socket to remove the sliding pins. That works fine but I didn't need a long reach. The hex head isn't recessed, so a short reach bit socket would also work.
Similar threads
- Replies
- 44
- Views
- 6K
- Replies
- 9
- Views
- 535
- Replies
- 7
- Views
- 2K
