Cab heater only blowing cold air

Finally got my heating controls fixed!
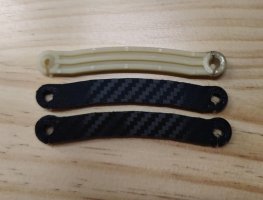
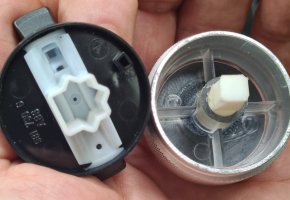
The issue was the white arm in the picture. One of the ends had snapped off.
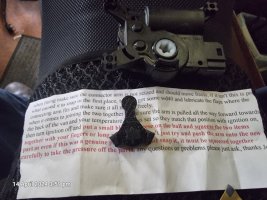
Now replaced with a 3D printed one (black)View attachment 233109
I have spares so feel free to message me or email me (shepherdkai@hotmail.com) should anyone be in the same situation and need one!
Where abouts is this? I have yet to locate it behind the driver side dash looking up from the floor with the black underside removed.
Must be great getting it sorted
 
Finally got my heating controls fixed!
The issue was the white arm in the picture. One of the ends had snapped off.
Now replaced with a 3D printed one (black)View attachment 233109
I have spares so feel free to message me or email me (shepherdkai@hotmail.com) should anyone be in the same situation and need one!
Did you manage to replace this without taking the dash out? Also any pics of the offending broken part from below? Like Hamster I'm still struggling to locate mine in Sportline T6 with climate control.
 
The offending part was the white arm in the photo above. I found the broken end (the circular bit at each end) and superglued it back together to get the exact original shape.

No need to take the dash out. Very difficult to get to but not impossible. Will take some photos of its location.

Pleased to have it back working!
Any photos greatly appreciated. Just got my T6 back from EGR pipe replacement at Leeds garage and that was twice the quoted price so defo can't afford to have them do it!
 
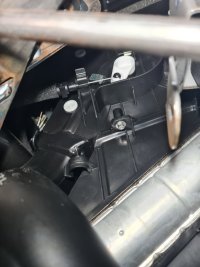
The red arrow points to the black 3D printed arm. You have to remove the bolt to release it from the motor.
Its fiddly and a pain in the arse but doable without taking the dash out.
Theres another bolt around the corner (opposite the blue one) that was just loosened off, as to get to that you would need to remove more of the dash.
Hope this helps
IMG_1172.jpegIMG_1173.jpeg
 
The red arrow points to the black 3D printed arm. You have to remove the bolt to release it from the motor.
Its fiddly and a pain in the arse but doable without taking the dash out.
Theres another bolt around the corner (opposite the blue one) that was just loosened off, as to get to that you would need to remove more of the dash.
Hope this helps
View attachment 233613View attachment 233614
Thank you for posting that, there seems to be something missing or broken from mine in comparison.

I never thought this would take so long to fix, I can only assume my whole arm has broken off and fell down the bottom of the centre console.

20240320_160855.jpg

20240320_161112.jpg
 
I'm wondering if mine is different too. I'm going to take cover off and look if it's fine tomorrow aft

I came across this in ebay. it's the cable you can see in my pic. It's listed as a defroster valve pull cable.

I'm trying to get a detailed drawing of the parts that should be connected to it.

At the minute none of the heater controls move the white plastic piece connected to it.
 
I found my problem today. The aftermarket dial that I had fitted was not catching, so whilst the dial was turning nothing was happening behind.

I put the original back on and stuck my head under the dash and the cable was operating as it should.

A two minute fix after 2 months of fearing the worst.
20240324_123915.jpg20240320_160904.jpg
 
That's great! Could you tell me which panel you need to remove to see this under the dash...and how please? I've looked today and can't see a way to remove either the grey one (nearest driver) or the black one (nearest Pedals).

Also how did you remove the dial? Unlikely to be that as I haven't replaced mine but could be an easy place to just check. Still think mine is related to the bit of metal I found in the footwell.

Thank you. .and glad.you got yours fixed
 
Watch a YouTube video on dash removal. A trim removal tool will prize the dial off, the light grey trim can remain in place.

The black trim that is underneath the dash is all that needs to be removed in order for you to look up and see what mechanism moves the flaps that blend the cold/ warm air.

There were only 2 screws, the rest were clips.
 
This has happened to my t6 now!
So grateful for this forum.
On mine though its the long arm within the circled in red area thats snapped. I cant find the part anywhere!!
Does anyone know of anyone doing 3D printed spares?…
Thanks
Hi I’m afraid I don’t supply the arm
 
Niknak from this forum found out the problem with mine, top bloke.
I had to buy the heater Matrix to get the part which was used as a pattern to 3D print a stronger modified version.
It took a good 5-6 hrs to take off and re-fit from under the dash.
I’m of the same opinion as you with regards to VW.
Hopefully they will all break before warranty’s are over then they might do something about it as must cost the dealerships a fortune.

View attachment 111789

View attachment 111790
Hi Tony. Reading this thread as this is exactly what has broken on my unit as well. Do you have any of these left?
 
I've managed to get the heater flap motor out and I am about to reinstall motor with new 3d printed actuator spindle (from ebay). I've reconnected the power and signal cable, hooked up VCDS and have ran IDE01546-Adapt door end stops (with flap linkage still disconnected). BUT! the motor is trying to go past the end stops. Is this indicating that the actual signal from the control panel hot / cold dial is faulty? Or is there something else I could do using VCDS?
 
Last edited:
A little update on my post above. The black plastic arm I bought from ebay, snapped, before i refitted the motor! It snapped during the setting stops procedure using VCDS, the motor kept trying to puch past the end stops. So I contacted Tony P and ordered a couple of his white plastic arms (much better quality). After the ebay black arm snapped, I started thinking that maybe it was the HAVC control unit was faulty and was sending bad instructions, so I disconnected it to examine it and ordered another cheap one from ebay for testing.

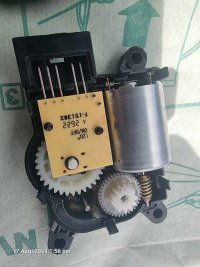
Meanwhile, I also kept researching, I started reading about the stepper motor potentiometer getting gunked up with grease and giving bad readings. I bought this van 3rd hand, the previous owner had it in a garage last December getting the heater fixed, the motor had been replaced then, but what if the garage had bought a 2nd hand motor from ebay? So, I opened up the motor and I found a big pool of grease in the corner. I cleaned out all of the grease using a spray contact cleaner and tested it with a multimeter.

In the meantime, Tony P's replacement plastic arms turned up, I had x2 to play with, so I hooked up the orignal HAVC control unit and fitted one of Tony P's and ran the VCDS calibration for the end stops, this time it actually worked, the motor stopped trying to drive past the end stops.

Now, I'm not sure whether cleaning the potentiometer in the motor fixed it, or disconnecting the HAVC control unit and reconnected it did, or it was a combination of the two!

NB; I managed to dig out the original snapped plastic arm which had fell down into the abyss below the gear stick, it turned out to be one of Tony P's 3d printed arms, so the garage that tried to fix the heater last December must have been on this thread and ordered one from Tony P.

So if anyone is struggling with this fault, this is what to do.

1. Order replacement arm from @Tony P.
2. Open up motor and clean the potentiometer (black circle thing on green PCB)
3. Disconnect the HAVC unit for 24 hrs and reconnect.
4. Test and calibrate motor end stops with new arm using VCDS before refitting to heater unit and linkage.
5. Refit once happy.

Fingers crossed this will hold out.

436834701_1148605829807840_5037913256433575912_n.jpg

438095010_1302418094050454_1763074422795830009_n.jpg

438137672_402830012660366_6455254368812937249_n.jpg
 
Weety this is very interesting.
You have gone to a lot of effort hopefully this will help a lot of people out as have had quite a few people having problems going past the stop point.
Nice one
Tony P
 
Back
Top