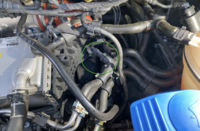
Fault code 15898 [Resolved] Fuel Temp Sensor wiring
- Thread starter Jer1978
- Start date
Yes, come down now, I'm on the caseMorning loz, are you about this morning ?
cheers
Okay, this is now solved, but there are some interesting issues we all need to check for.
On the first examination, the cable was chafing against the charge cooler and had gone through the insulation on the brown/green lead but not broken the conductor.
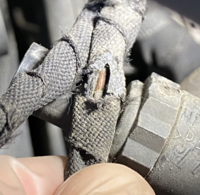
So we taped that with loom tape and tested it but still, the fault was present.
We swapped in my sensor for his and still, the fault was present.
Then we examined the connector again and found this.
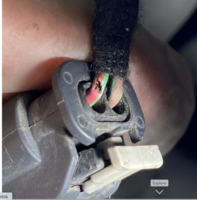
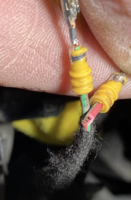
Due to the angle of the bend and the constant vibration it was broken right next to the connector.
We dismantled the connector and removed the pins, and soldered the wire back toghether.
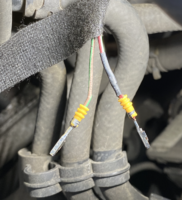
Tested, cleared, test drove and the fault cam back again, but the cable failed closer to the pin (it was too brittle)
So we took it apart again and this time grafted a new wire onto what was left at the pin.

soldered, heatshrink, and put the connector back together. tested and all okay this time.
Taped it back up with tessa tape and all good.
The only issue we had was the purple retainer clip for the pins was too brittle and it broke, so we need a new connector, if only for the purple pin retainer.

So, please check that your cable comes out of the plug straight and is not rubbing on the charge cooler. If you remove the plug from the sensor and twist it over and plug it back in, it should stay away from anything it can rub on.
I might check mine over and check that none of the loom that I can see, is rubbing on anything.
Also, the fault is checked at each startup, so if you fix this, the lights will go out at the next start, but it will be stored as a fault.
On the first examination, the cable was chafing against the charge cooler and had gone through the insulation on the brown/green lead but not broken the conductor.

So we taped that with loom tape and tested it but still, the fault was present.
We swapped in my sensor for his and still, the fault was present.
Then we examined the connector again and found this.


Due to the angle of the bend and the constant vibration it was broken right next to the connector.
We dismantled the connector and removed the pins, and soldered the wire back toghether.

Tested, cleared, test drove and the fault cam back again, but the cable failed closer to the pin (it was too brittle)
So we took it apart again and this time grafted a new wire onto what was left at the pin.

soldered, heatshrink, and put the connector back together. tested and all okay this time.
Taped it back up with tessa tape and all good.
The only issue we had was the purple retainer clip for the pins was too brittle and it broke, so we need a new connector, if only for the purple pin retainer.

So, please check that your cable comes out of the plug straight and is not rubbing on the charge cooler. If you remove the plug from the sensor and twist it over and plug it back in, it should stay away from anything it can rub on.
I might check mine over and check that none of the loom that I can see, is rubbing on anything.
Also, the fault is checked at each startup, so if you fix this, the lights will go out at the next start, but it will be stored as a fault.
Last edited:
Rightmove search string = “Near @Loz”@Loz is a good bloke to have living nearby!
And great explanation with pics tooBrilliant Loz, Great fault finding and repair skills.
Victoria11
New Member
Hi, I would love your advice.Hi, welcome to the forum. You’ll need to scan your van to add some more detail. It could be a number of different things.
Carista is a good cost effective option. You get a month trial included in the cost.
Does the van drive any different? Did the light go after a restart? Any other symptoms?
Not sure of the warranty status or VW assist availability due to being over 100k but worth checking.
I have a 2012 T5 Transporter and have had the flashing glow plug and the engine light come on. The coolant pump B control circuit open code came up so mutual mechanic replaced the egr coolant pump. $1000 later both the engine light and flashing glow plug has started again. The van is driving well though. Any ideas? Would be so grateful for some help. Thank you
The flashing coil light occurred on my 2017 150 BHP 28k miles last weekend. VW assist scanned and reset. The resulting comments were:
Carry out 6150.
Fuel sensor pressure
Anyway, my next drive out was fine, until today. Back to flashing coil plus engine light this time. I have a cheap scanner, which picked up P0183, which I couldn’t delete.
Any ideas? Does anyone have Carista or VCDS in the Chester area that could scan properly please?
Follow up... rather than buying a new plug (mine was fine) I just replaced the wiring and soldered it into the loom. You can do this using part number 000979034EA (it comes as one length with a connector at each end so you cut the cable in half to end up with two cables).
Photos attached... the yellow cables are the new ones mid-installation. I also added a small connector / tie wrap combo to hold the offending cable / pipes apart so that it doesn't happen again.


Photos attached... the yellow cables are the new ones mid-installation. I also added a small connector / tie wrap combo to hold the offending cable / pipes apart so that it doesn't happen again.


Similar threads
- Replies
- 2
- Views
- 329
- Replies
- 4
- Views
- 592
- Replies
- 0
- Views
- 436
- Replies
- 2
- Views
- 187
- Replies
- 2
- Views
- 1K

