You are using an out of date browser. It may not display this or other websites correctly.
You should upgrade or use an alternative browser.
You should upgrade or use an alternative browser.
Heated washer jets
- Thread starter Alan Croft
- Start date
thanks PaulyI ha e a couple sets here will confirm the price and let you know later

Just had a look and these are going to be £95 delivered
Thats for the two heated jets and the wiring to go with them, the wiring is open ended (needs to be cut ends to feed it through grommets) so the negatives will need a crimp ring terminal on the end which is supplied and the positives will need to be connected into an ignition live supply somewhere
I have six kits available at the moment and two are sold so send me a PM if you are after a set
Mikeef
New Member
Just had a look and these are going to be £95 delivered
Thats for the two heated jets and the wiring to go with them, the wiring is open ended (needs to be cut ends to feed it through grommets) so the negatives will need a crimp ring terminal on the end which is supplied and the positives will need to be connected into an ignition live supply somewhere
I have six kits available at the moment and two are sold so send me a PM if you are after a set
could you give us some idea where to connect the positive pleaseJust had a look and these are going to be £95 delivered
Thats for the two heated jets and the wiring to go with them, the wiring is open ended (needs to be cut ends to feed it through grommets) so the negatives will need a crimp ring terminal on the end which is supplied and the positives will need to be connected into an ignition live supply somewhere
I have six kits available at the moment and two are sold so send me a PM if you are after a set
Theres no set way of doing, there is a grommet behind battery thats takes you through to behind glovebox as per the picture i posted further back in the thread so i think the easiest way would be to take the positive wires to dash fusebox and use a piggy back fuse to tap into the top half of the centre column which are all ignition lives
Got heated washer jets on the van, but the other day something froze up, probably down to not having a good enough screenwash mix.
anyway the headlight washers worked but no screen wash, . . . tried a few times. . . . . then nothing, no washer motor sound or anything!!
ok so i though leave it for now, it was too cold and snowy to worry about.
few days later after all the snow dispersed i had another go, still nothing.
checked the fuse in the engine bay fuse box, which was blown! OK so i replaced it. . . . but it blew straight away when the washer stalk was pulled. . . . . Grrrrrr!
blown washer motor i thought, but before i ordered a replacement i got under the van and banged on the washer reservoir by the pump, put another new fuse and hey presto it all started working.
so it looks like the washer bottle/pipes/motor froze up causing the motor to stall, and cause the motor brushes to arc/spot weld themselves to the armature. (thats why the replacement fuses were blowing)
after banging on the reservoir i must have dislodged the brushes/motor enabling it to run again.
Moral of the story: heated jets wont help you if your screen-wash mix isn't strong enough for the low temperature and the motor/pipes/reservoir freeze. (now added a ton of -30 screen-wash in the tank =] )
Did anyone find the part number for heated washer spray nozzels rather than the 3 jets ones? I can see many upgrade kits listed but they are for cars, not transporters. As Pauly found, the jet angle isn't perfect so if I'm going to the trouble to upgrade, I want to get the right ones.
Edit - Searching more it looks like the only heated ones for the transporter are the 3 jets type - 7E0955987A and 7E0955988A. I'm wanting the best of both, heated and spray nozzels.
Edit - Searching more it looks like the only heated ones for the transporter are the 3 jets type - 7E0955987A and 7E0955988A. I'm wanting the best of both, heated and spray nozzels.
Last edited:
Thank you for posting that pic @SofaKing, I've just check my van and I have them, though I don't have a heated screen!
I was about to take a ticket and get in the queue for one of @Pauly's soon-to-be-launched kits! Think I will continue to hover in the sliding-door power-latching queue for when I'm brave enough to tackle that job!
I was about to take a ticket and get in the queue for one of @Pauly's soon-to-be-launched kits! Think I will continue to hover in the sliding-door power-latching queue for when I'm brave enough to tackle that job!
and cyclists love it too!I add isopropanol to my screenwash... makes for an intersting drive
3 jets..........I direct one of the passenger nozzles to hit one particular lycra-clad, baboon-arsed MAMIL road warrior as my kids confiscated the Super-Soaker I wanted to use.@JOG Are there 3 jets on each one or is it a spray pattern?
*JOKING, before anyone gets on their high-horse at me!
Thanks for checking. I think there isn't any heater spray pattern washers for the T6, just the 3 nozzel type.
My first response to you was with my tongue firmly wedged in my cheek! I've just been out and checked my Cali - it IS 3-jet units.Funny
Thanks for checking. I think there isn't any heater spray pattern washers for the T6, just the 3 nozzel type.
Got my heated washer jets retrofitted and all working fine, great service, thanks @Pauly .
The fitting is pretty easy, 4 out of 10 on the T6 DIY difficulty chart. The only annoying bits were getting the wiring through the existing grommets and the bulkhead.
I can confirm that the T6 is same as the T6.1 or at least it is the same as my mates T6.1.
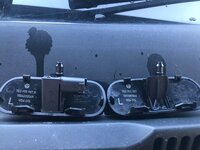
Heated jet on the left original frozen one on the right
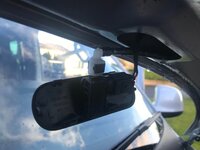
They just pop out. I hooked my thumbnail in the top edge and pushed back and down.
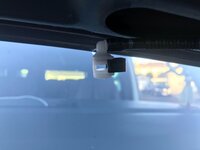
The hose comes off by pulling the black clip across, comes out easy.
In the kit @Pauly sent me were the units and a wiring loom terminated with the plugs for the jets. Pop out the grommet on the at the side and push the cables into the bonnet frame and out of the jet unit holes.
Hooked up the plugs and connected the hoses then clipped the jet units back into the bonnet. Part A done.

Next the cable needs to run out of the same grommet the hose follows between the bonnet frame and the wing. Luckily most of it is already there. Just snip off the end of the blank grommet tube that you took out and thread the cable through towards the hinge.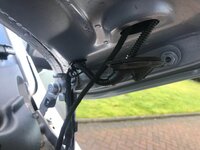
I unwrapped the tape securing the cable guide and used the spare clips along with some narrow convolted tubing. Loom tape would work fine.

Then down through the scuttle grommet into the ventilation space. To do this remove the scuttle panel. Two torq screws and pull it forward.
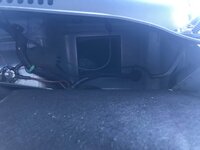
Sorry bad picture. The first electrical connection is the earth, Pauly sent a ring crimp, you can see it at the 11oclock position on the left earth stud. I didnt have any heat shrink so left it uncovered but will go back to it in the summer as it is in an pretty exposed location and as any aircraft engineer knows 95% of electrical snags are bad earths!!
The positive feeds can be seen going into the van through the grommet at the back right of the picture. I have other camper cables you may have more or none.
Then you can put the panel back and close the bonnet up.

As said earlier in the thread the easiest way to get power (after finding and threading the wires) is with a piggy back fuse holder. The heated jets are the lower one in the photo and the middle row is where it needs to be for 'ignition on'. Using a 2A fuse which is fine for the very low current draw. (For the curious the other one is 'IGN' feed for the Renogy DC-DC unit.
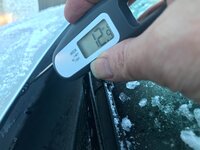
It was about -1 degrees C outside and snow on the ground when I finished this job and tested the heater jets with a food thermometer. They just come on when the ignition is on.
All working fine and I was surprised how hot they got relative to the outside temperature.
Very happy, thanks to @Pauly for making it easy to get the parts and cables without having to leave the house.
No more dirty screen on the A9 in freezing conditions
The fitting is pretty easy, 4 out of 10 on the T6 DIY difficulty chart. The only annoying bits were getting the wiring through the existing grommets and the bulkhead.
I can confirm that the T6 is same as the T6.1 or at least it is the same as my mates T6.1.

Heated jet on the left original frozen one on the right

They just pop out. I hooked my thumbnail in the top edge and pushed back and down.

The hose comes off by pulling the black clip across, comes out easy.
In the kit @Pauly sent me were the units and a wiring loom terminated with the plugs for the jets. Pop out the grommet on the at the side and push the cables into the bonnet frame and out of the jet unit holes.
Hooked up the plugs and connected the hoses then clipped the jet units back into the bonnet. Part A done.

Next the cable needs to run out of the same grommet the hose follows between the bonnet frame and the wing. Luckily most of it is already there. Just snip off the end of the blank grommet tube that you took out and thread the cable through towards the hinge.

I unwrapped the tape securing the cable guide and used the spare clips along with some narrow convolted tubing. Loom tape would work fine.

Then down through the scuttle grommet into the ventilation space. To do this remove the scuttle panel. Two torq screws and pull it forward.

Sorry bad picture. The first electrical connection is the earth, Pauly sent a ring crimp, you can see it at the 11oclock position on the left earth stud. I didnt have any heat shrink so left it uncovered but will go back to it in the summer as it is in an pretty exposed location and as any aircraft engineer knows 95% of electrical snags are bad earths!!
The positive feeds can be seen going into the van through the grommet at the back right of the picture. I have other camper cables you may have more or none.
Then you can put the panel back and close the bonnet up.

As said earlier in the thread the easiest way to get power (after finding and threading the wires) is with a piggy back fuse holder. The heated jets are the lower one in the photo and the middle row is where it needs to be for 'ignition on'. Using a 2A fuse which is fine for the very low current draw. (For the curious the other one is 'IGN' feed for the Renogy DC-DC unit.

It was about -1 degrees C outside and snow on the ground when I finished this job and tested the heater jets with a food thermometer. They just come on when the ignition is on.
All working fine and I was surprised how hot they got relative to the outside temperature.
Very happy, thanks to @Pauly for making it easy to get the parts and cables without having to leave the house.
No more dirty screen on the A9 in freezing conditions

Similar threads
- Replies
- 4
- Views
- 1K
- Replies
- 40
- Views
- 2K
- Replies
- 3
- Views
- 1K
- Replies
- 16
- Views
- 3K


