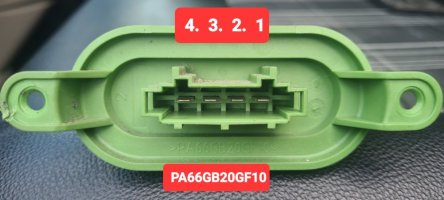
Heater only working at maximum

Just changing the resistor pack/thermal fuse and not looking into why it blew it in the first place is a recipe for a repeat burnout.
Have you taken the motor apart and cleaned/lubricated the bearings to ensure they are not the cause of the increased current draw?
See Post #18 in this thread by @Andys though I wouldn't use WD40, it's not a lubricant, use a light oil instead.
Just avoid set point 1, I’ve had 3 failures, every time in set point 1.
 

There's your problem.


There's the solution.
Thank you for this. 20 min job even for me.
 
Same issue...replaced the resistor pack with one from Travelin Lite on my 2017 204 T6 and all good!!

Similar issue I've noted on the heater though; there's no middle ground on the temp, it's either cool air or as soon as I turn it up to around 20 it gets really warm! Could this be a similar issue to solve?

Thanks!
On windscreen settings ours is always on full blast heat. Turning dial to feet or face looks like it gives more adjustment.
 
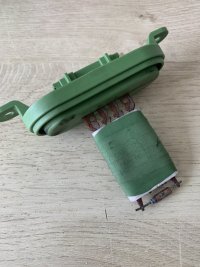
View attachment 37807 Gambled on this from eBay works fine, easy DIY fix, remove black plastic cover under glove box. Get your head under. Unplug ,remove two screws, replace. View attachment 37807
I bought this part but found removing old part far more difficult than this suggests … it’s wedged up at the back .. another black plastic section that is bolted on seems to in the way….
edit …..ok I see it is a matter of fiddling around in a tiny area to get at the part .. but mine is so wedged up at the back you can’t even see the plug or wires .. ill give it another try tomorrow ..
but it seems so tight in my van I can’t see removing it or fitting the new one will be without major hassles …
 
Last edited:
Just changed mine, all working now!

I want some of what VW were smoking when they decided a 5.5mm head was a good idea! And why are the bolts so long!!

B576851F-37E5-41BA-B1C2-586FFA472608.jpeg
 
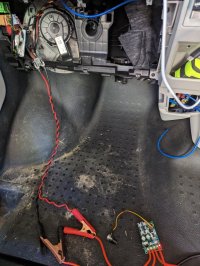
Testing out a PWM controller for the blower. Seems to do a pretty good job at 13v 2A (I'd estimate about the stage 1 volume of air by the noise & blowing more at 3A than stage 2 measured as 6A above!). Better efficiency at low speeds makes more sense since it's PWM rather than resistors, but I guess I was expecting more draw than this. As you crank it higher the numbers get closer. Flat out at 13v it's pulling 18A. I'm leaving it running at 3A in the sun for the rest of the day to see how it goes temp wise, but at 3A my aux battery can easily sustain this any time I leave my car in the sun! Pretty happy about that!

PXL_20230225_054717952.jpg

PXL_20230225_054717952.jpg
 
Last edited:
That's an interesting mod, how does the motor deal with the PWM supply Vs the voltage dropper of the standard resistor? ( Get hot at all?)
 
Testing out a PWM controller for the blower. Seems to do a pretty good job at 13v 2A (I'd estimate about the stage 1 volume of air by the noise & blowing more at 3A than stage 2 measured as 6A above!). Better efficiency at low speeds makes more sense since it's PWM rather than resistors, but I guess I was expecting more draw than this. As you crank it higher the numbers get closer. Flat out at 13v it's pulling 18A. I'm leaving it running at 3A in the sun for the rest of the day to see how it goes temp wise, but at 3A my aux battery can easily sustain this any time I leave my sun in the car! Pretty happy about that
That's an interesting mod, how does the motor deal with the PWM supply Vs the voltage dropper of the standard resistor? ( Get hot at all?)
It's been running for about 5h now on the bench power supply and the motor is cool to touch. It's just controlled with a pot at the moment but it'll be swapped out for a microcontroller which will be able to turn it on and off automatically triggered by temperature
 
Has anyone managed to remove this on a kombi with carpet ? I can't get the plug out, but have manged to get both screws out which I thought might buy me some extra wiggle room but I'm unsure as to how the resistor will actually manage to be removed ever with the plug disconnected. I'm losing my fingertips here!
 
Has anyone managed to remove this on a kombi with carpet ? I can't get the plug out, but have manged to get both screws out which I thought might buy me some extra wiggle room but I'm unsure as to how the resistor will actually manage to be removed ever with the plug disconnected. I'm losing my fingertips here!
I don't have a kombi but everything about the blower including the resistor is an absolute b*****d to get out! My advice is find someone with smaller hands ;)
 
Has anyone managed to remove this on a kombi with carpet ? I can't get the plug out, but have manged to get both screws out which I thought might buy me some extra wiggle room but I'm unsure as to how the resistor will actually manage to be removed ever with the plug disconnected. I'm losing my fingertips here!
I remember it seems impossible but there is a certain angle and it comes out easy … sorry it’s been a while since I did mine .. it can be done though I struggled too
 
Once again, the forum came to my rescue. Same problem as many of you have reported - blowers works on 4, but not 1,2 or 3. Ordered the part from Travelin-lite and twenty minutes later, I got all the blowers working again, the trickiest part was actually detaching the clip.

Anyway, big thanks to all you knowledgeable folks out there, saved me lots of time and hassle, and money of course!
 
  • Like
Reactions: CAB
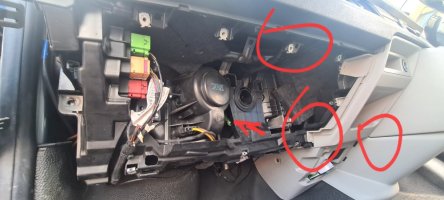
Hi guys.. new member here... I’ve got a 2016 T6... My blower works on 3 & 4 but not 1 & 2.... Some great info on here, thanks!.... Got a new resistor off eBay.. went to change it this morning.. and the location of it seems different than any videos I can find on here and google.... So I’ve taken the panel below off and the glovebox... The resistor is positioned right behind this piece of plastic... the piece goes underneath and round the side.. I’ve taken the screws off that I can see but still can’t get it off.. Does anyone know the best way to access it? I apologise if the info is already on here

View attachment 135823
Did you get info on how to remove the plastic cover, i looked at mine and it appears you need to remove the whole under dash plastic. The section to be removed is retained by the centre plastics - i am guessingvthe centre is held in by the drivers side..Major strip down for a simple part. Anyone got an update on how to remove from this type of build.
tried attaching mympics, red circles show where black plasyic is being retained.

20240803_164044.jpg

20240803_164123.jpg
 
I think you’re looking at the wrong section, I didn’t have to detach the panel that’s shown in your picture. I just unclipped the plastic cover that’s underneath the glovebox area
 
I think you’re looking at the wrong section, I didn’t have to detach the panel that’s shown in your picture. I just unclipped the plastic cover that’s underneath the glovebox area
The resistor in mine (66 plate Trendline), sits at an angle bottom left screw at say 7 and top right at 1 on clock face.
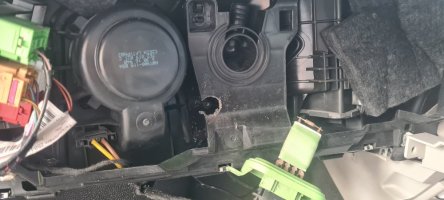
Couldnt be Ars#d pulling the whole dash apart- Ridiculous setup for a consumeable part- I just drilled a 20mm hole in the plastic to get driver access to the bolt head. 2mins later the units out. prise the plastic forward to allow some clearance while pulling the base down.

20240803_174032.jpg

20240803_174132.jpg

20240803_174219.jpg
 
Seems like it would be better to make a replacement using much higher rated resistors, these are clearly not up to the job and burn out.
 
Back
Top