Indium Grey 6.1 Ownership Log

T4goneby

Senior Member
VIP Member
T6 Guru
Hi Everyone

Thought I’d start a thread for this to keep a track of ownership as much as anything.

I’ll unlikely be doing anything too much to the van in the near future, just some basic bits - some of which have already come to fruition, but plans are focused around a usuable daily for me, that carry’s my bike on a weekend with the option to crash in the back when needed, and the ability to use with an awning for a holidays with the kids next year.

I’ve previously owned a 2001 1.9td T4 that I fully converted from a tired, bare and unloved decorators van into something that gave me and my wife a shed load of trips, experiences and memories. Two of the best were Switzerland and Skye.
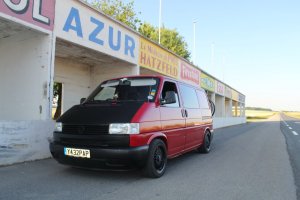
797444D4-5DC0-4973-ABAE-D28FB6C85918.jpeg

We owned that for 6 years, but when we had our first child, the set up wasn’t practical at the time so it wasn’t being used and didn’t want the van to sit outside and rot until we could afford to put a pop top in so we sold it, with the intention to revisit the van ownership in a few years time.

6 years later, I’m finally back….
7CE6DE5B-CD5B-48BC-A37F-D2163114760B.jpeg

345DC3D6-5E6F-428E-9030-EA310A7DA0E0.jpeg

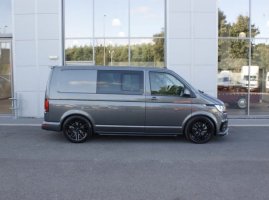
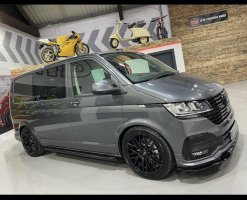
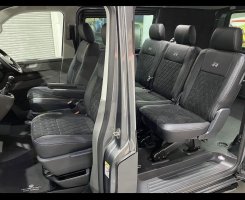
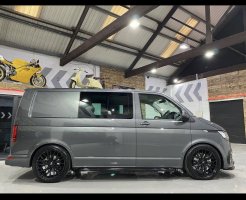
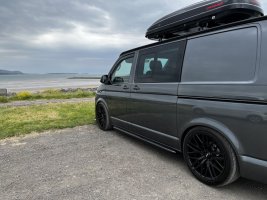
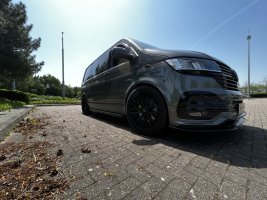
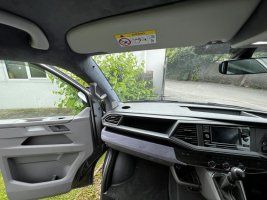
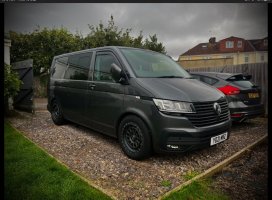
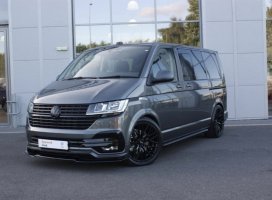
So this is it. It’s. 2021 T32 150, indium grey tailgate w/single slider, manual, twin captains and 2+1 rear seats with a few extras that were added by GTE customs, before being sold on by dealer (bilstein b14, 20” wheels, side bars, blacked out front end and then alcantara and leather retrim inside)

So spec wise it’s almost perfect (only h4 lights and was on the fence about manual / auto) for me but looks wise, I love it and basically exactly what I wanted.

It was delivery mileage when I collected it, and covered 600 miles since which have been faultless. The drives fantastic, plenty of power, handling is suprisingly good for something this size, albeit the rides a little bumpy on a B road - which I fully expected being as low as it is, brakes are ok but initial bite isn’t as confidence inspiring as id like.

Interior wise, lovely place to be, we never had the captains seats in the t4, so sitting in this with arms down on a motorway is eye opening!! Basically like driving a desk chair. I love it.

I’ve already started messing with a few things, so first things added were
  • Additional door seals to front doors - worthwhile doing made the door closing sound a lot better with less rattle and a slight improvement in road or wind noise on the move
  • Dash top seal
  • Seat cover to try and stop the kids destroying the back seat
I’ve also started to insulate and sound deaden the rear in anticipation of trips away next year and a few nights crashing in the back for me when I’m away riding etc along with the key benefit of making it more comfortable for daily use!

So, I’ve been using dodo products and working my way from the back forwards Going through the process of removing the alcantara panels in the back, sound deadening with dodo extreme and then covering that with dodo thermo liner. Super easy to use and making a good difference so will continue to do so. Will also be doing the wheel arches externally and the cab area once I’ve finished in the back. I’ve not got any pictures of this to date but will add some shortly.

The only other thing I’ve done so far is a good wash, coating in megs hybrid ceramic for a bit of initial protection and then applied some Gyeon q2 Glass to the windows. This was fantastic on my last car and once up to speed avoided the need for wipers in the rain, completely different league to rain x I’ve used in the past.

I’ll keep this updated over the next few years anyway, but just wanted to get this started now so I can keep on top of the few bits I’m planning.
 
That's a nice looking motor mate.

I’ve read about so many interesting conversions and personal modifications recently I thought I’d jump on the band wagon too. My camper is parked on the road in central London and has already been broken into twice, so I have deliberately kept it as van like and unappealing to interested parties as possible...on the outside. A bit tongue in cheek but I’ve even considered having a muddy old rust bucket wrap made for it. It could be made like a racing drivers tear off for when I go away and want to show it off. ;) Seriously though, I’m now a long way past my peer pressure days which were followed, when married by the keeping up with the Jones’s days. Now, having endured 75 years as lifes football I’m using all that experience to make the last few years as active but easy going as possible. Practicality is now my design criteria but I confess to still feeling some pride and ego twitch when showing off not only the solid oak Rolling Homes conversion but all the extras I’ve added to make van life easier. eg. A collapsable toilet compartment with cushioned seat which means I can sit at the back drinking my coffee in the morning or cooking in the galley behind the tinted windows as if I’m in a conservatory watching the world go by. The rear galley has virtually no work space in a SWB so I’ve made a detachable 14”x11” top from some matching Corian offcut which I fixed to a redundant TV swivel arm. It can move in all directions when the tailgate is open but will fit nice and tight inside when I’m just winter or wild camping. As it happens it struck me that it’s dangerous to not be able to open the tailgate from inside. I was told it could be done but would cost at least £180 so bought a push button on/off button for about a fiver, wired and connected it to the tailgate actuator and fitted it on the tailgate card. Simples. :thumbsup: A few other mods like louvre vents on cupboard doors because of the heat build up from the exchanger under the galley and a modified computer case that fits to the back of drivers seat so my grand daughter has a fold down in flight type of table when travelling. I’ve installed a 1000w inverter but don’t use it much, it's a huge drain. Charging the leisure battery has always been a problem because I can’t simply plug into the domestic supply when I get home. After absorbing as much of Dellmassives and other experts solar installation advice on this forum my next big project is solar on the roof. I now know exactly what I’m going to buy and I’ve been up there on the pop top and it easily takes my weight so I'm confident with my installation plans. I might have to dust off my balaclava and sawn-off to get the money together but when I’m ready I’ll start taking progress photos.
 
Lovely van mate! Mine looks similar actually ;)
But why do people sell a lovely van like that though and not soundproof/insulate especially having lined it out in alcantara? Seems very strange to me. Oh well.

Anyway, I’ve stripped off all the chrome now and replaced nearly all the black plastic parts for gloss. Just the beacon to do really.
It’s basically a grey & black van which I absolutely love. My Mrs thinks it looks like a vehicle to drive celebrities around in. Ha ha!
Just this morning someone stopped us in the park and commented on what a lovely van it was :)

Good luck with your other mods!
No idea!! Particularly with how long it takes to remove all the panel clips they use to fix the panels….. ‍

Saw your van on the other thread - new plastics look good to me!! Nice work
 
Happy New Year everyone, here’s hoping we’re all in for a better year.

I thought I’d add a small update to this picking up some of the jobs completed over the past month or two since I started this.

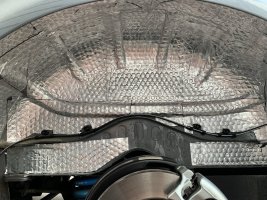
First up was adding some sound proofing (Dodo) to the back end of the van and external wheel arches.

The only photo I took of the whole process was one of the external arches. Went through process of removing the liner, adding as below and then apply some adhesive rubber / foam id found suggested in another thread. You won’t get a lot on there without causing issues with the liner going back in but a decent amount on the face of the arch itself, which has made some decent reductions in road noise in the cab.

60CB93F4-45C7-4A15-91CB-F69A07FD0D0C.jpeg

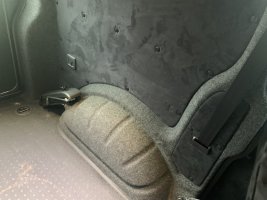
The inside of the van took a couple of layers of this to all the flat surfaces - walls and ceiling, before having a layer of dodo thermo liner. This was all done before the van was dropped down to Apple County Customs in Bristol to have the bare metalwork carpet lined and an additional 12v socket by the tailgate installed.

Again, noticeable difference in sound levels from both of these steps, the squeaks rattles and general road noise being thrown around in the back have reduced as I’d hoped.

Quick picture of the back of the van now after apple county is worked their magic. Great bunch of guys and quality / service is second to none if your in the Bristol area.

651C6642-B9A7-49B0-A708-199DC61B50F7.jpeg

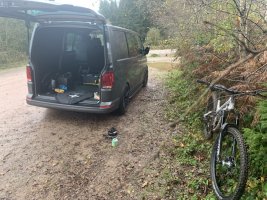
A good week ends using the van for one of the reasons I bought it followed, carting the bike around and getting dirty.

5BA92DAA-23DE-436B-96AA-94E2B96EAF5D.jpeg

Before it was given a clean, and few simple things changed to tidy up the back end

- plain rear number plate added without dealer tag. Simple change but tidys the back up.
- rear wiper removed and proper blank installed. Again, simple change, I never use the wiper as don’t like the clean / dirty sections on a back window so removed as it tidys up the window no end with the right blank installed.
- temp set of THQ rear black out curtains to give some privacy in the back, whilst I save for a set of Vanshades all round. For the money, these are a great buy. Full black out, good quality, rails cut to length and may end leaving these in place of the tailgate full time.

Also tracked down the original converter who did the work prior to me buying it from VW Van Centre in Leeds. It was on GTE customs instagram page, so good to know who did the work on it and able to make contact, asked who they’d used for supplying alcantara to do the rear head lining, so sourced some more to do the cab area along with a and b pillars

They’ll likely be next jobs on the list along with sound deadening front arches, cab and front doors.

Couple of pictures GTE posted just after finishing the work

E05188FC-E14A-428D-A7C2-2DBB2C28CB2D.jpeg

269CE70E-0B36-4F53-A798-E20747046840.jpeg

F766AA2A-110B-4218-8DC0-0B3354BC97DE.jpeg

I did have to go and check the colour on the front door after looking at that picture ^ I can only assume it’s lighting in the workshop as it’s not been sprayed and no difference in colour in person.

That pretty much brings us to where we are with it now, plans for 2022 are to use as much as possible and enjoy it for what it is.

There will be an awning rail and drive away awning on the radar in the next few months but let’s let things settle down after Christmas for a while first.
 
Happy New Year everyone, here’s hoping we’re all in for a better year.

I thought I’d add a small update to this picking up some of the jobs completed over the past month or two since I started this.

First up was adding some sound proofing (Dodo) to the back end of the van and external wheel arches.

The only photo I took of the whole process was one of the external arches. Went through process of removing the liner, adding as below and then apply some adhesive rubber / foam id found suggested in another thread. You won’t get a lot on there without causing issues with the liner going back in but a decent amount on the face of the arch itself, which has made some decent reductions in road noise in the cab.

View attachment 140155

The inside of the van took a couple of layers of this to all the flat surfaces - walls and ceiling, before having a layer of dodo thermo liner. This was all done before the van was dropped down to Apple County Customs in Bristol to have the bare metalwork carpet lined and an additional 12v socket by the tailgate installed.

Again, noticeable difference in sound levels from both of these steps, the squeaks rattles and general road noise being thrown around in the back have reduced as I’d hoped.

Quick picture of the back of the van now after apple county is worked their magic. Great bunch of guys and quality / service is second to none if your in the Bristol area.

View attachment 140156

A good week ends using the van for one of the reasons I bought it followed, carting the bike around and getting dirty.

View attachment 140157

Before it was given a clean, and few simple things changed to tidy up the back end

- plain rear number plate added without dealer tag. Simple change but tidys the back up.
- rear wiper removed and proper blank installed. Again, simple change, I never use the wiper as don’t like the clean / dirty sections on a back window so removed as it tidys up the window no end with the right blank installed.
- temp set of THQ rear black out curtains to give some privacy in the back, whilst I save for a set of Vanshades all round. For the money, these are a great buy. Full black out, good quality, rails cut to length and may end leaving these in place of the tailgate full time.

Also tracked down the original converter who did the work prior to me buying it from VW Van Centre in Leeds. It was on GTE customs instagram page, so good to know who did the work on it and able to make contact, asked who they’d used for supplying alcantara to do the rear head lining, so sourced some more to do the cab area along with a and b pillars

They’ll likely be next jobs on the list along with sound deadening front arches, cab and front doors.

Couple of pictures GTE posted just after finishing the work

View attachment 140158

View attachment 140159

View attachment 140160

I did have to go and check the colour on the front door after looking at that picture ^ I can only assume it’s lighting in the workshop as it’s not been sprayed and no difference in colour in person.

That pretty much brings us to where we are with it now, plans for 2022 are to use as much as possible and enjoy it for what it is.

There will be an awning rail and drive away awning on the radar in the next few months but let’s let things settle down after Christmas for a while first.
Nice set up bud.
what wheel bag is that out of curiosity? The one I bought the other day wouldn’t fit 29er when it said it would!
 
Nice set up bud.
what wheel bag is that out of curiosity? The one I bought the other day wouldn’t fit 29er when it said it would!
Funnily enough, I’d given up on wheel bags since going 29”. That “bag” is actually just a stitches and steel changing mat I use (very useful - one of those things you don’t think you need until you get it)

Bike usually stays in one piece at the minute fits across diagonally, held in place with a strap. Won’t be permanent solution but works for now.
 
Just adding some more info into this thread now a few more jobs have been ticked off over the past few weeks.

H7 and H15 bulbs changed to Osram night breakers +200 in the h7. Neither have changed the temp of light from the standard yellow but hopefully will give a marked improvement in use which is all I’m really worried about. Absolute nightmare to fit H15, space limited for both but we got there in the end with the help of the forum and some previous threads

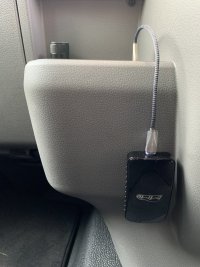
Wireless apple car play adaptor. Saw the video THQ did on this, and something that should have been standard without needing the adaptor in my mind but is what it is. Went with this one given the reviews and feedback, works well for what it is, streaming videos etc can sometimes be a bit flakey but put this down to mobile signal as much as anything. Straight forward to fit, black tacked to lower dash out the way and phone connects in about 15secs from starting up. Expensive, but definitely useful to have and find myself using Spotify etc a lot more again with not having to plug in every time.

804E706E-1E4E-454C-8417-E214FC81EFD3.jpeg

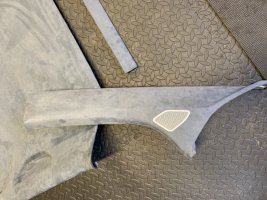
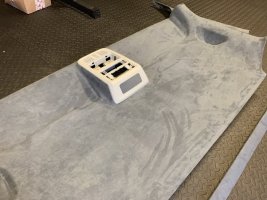
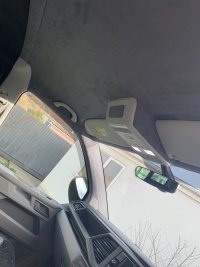
Next up, had some suede fabric in the garage, which I’d ordered to line the cab headlining with to match the back. Only I’d ordered charcoal with it being the darkest colour Harrison trim supplies had that wasn’t black. Of course, it didn’t match but too late to send back so have covered it anyway, along with the a pillars and b pillars. Keeps the cab a bit brighter than anything darker, but definitely an improvement on the original lining. Wasn’t too bad a job, just time consuming taking everything out initially. May well end up redoing in the future if it does bother me, but for now it looks intentional and I’m happy with the finish so leaving as is.

7AFA8A3C-0D68-4EF1-B684-A63693F142BD.jpeg

D8E06737-77B9-4D63-9F0D-A1C4F151F17D.jpeg

303C88DD-C712-4BF7-B98A-715C179C7266.jpeg

Insulated, and sound deadened the roof and a pillars whilst everything was off, along with adding some foam insulation to the back of a pillar plastic trim. Hopefully every little bit adds up and makes it a more comfortable place to be on longer trips.

Another update next week hopefully
 
Quiet Saturday morning for a change so thought id drop some updates into this thread covering the last few months

The plan with the vans always been around a useable daily with it being my work transport, and having something that suits trips away with the family and still being able to get my bike in the back for solo trips where I can still sleep somewhere so the usual Fortywinks / Ovano set ups are not an option for me.

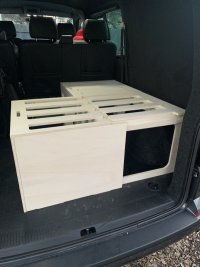
Eventually I’ll be getting something like the ply guys torrindon, but as temp measure to get through this year I picked up a kombi bed from vanfurniture. It’s cheap, does the job and will get us through a few trips this year to get the routine and requirements sorted out. Kit turned up unsanded and pretty rough cut to be honest, after a decent lead time, I was a little disappointed. I wasn’t expecting it to be finished / treated but a final sand before sending out would have been nice.

This was put together and sides have been carpet covered to give a little more durability with the bike in the back, and rest painted black. It’s a temporary solution but works well enough for now. I then built a high level wheel arch box with removable lid on the other side, which gives me a full width bed when needed and a useful storage / table area when sat in the back.

FA589849-70C5-42EC-B755-31F6701CA101.jpeg

Will add some more photos of the box and finished set up

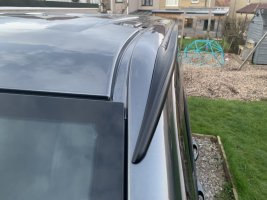
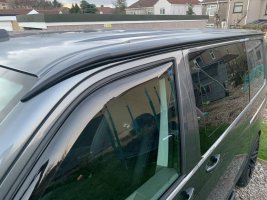
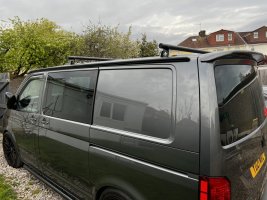
I then booked into Apple County Customs to get a Reimo Rail fitted, decided on this over the others as it’s a lot more subtle in my mind and looks like it’s supposed to be there. Not personally a fan of the bolt on options and wanted something I could have installed and forget about. Great job by them as always and very happy with the rail in use

FB5FC6A3-4E65-495B-BD30-11AAF9A47C4F.jpeg
4BAC2256-23CF-463E-B628-4909A35F3647.jpeg

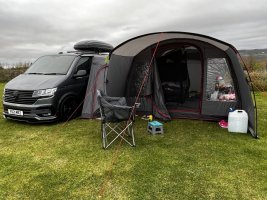
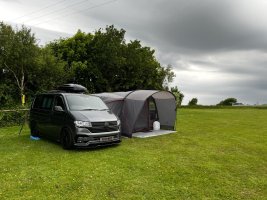
We’d looked at various options for a drive away awning, requirements were big enough for a living space for the 4 of us and a bedroom compartment that me and the wife could sleep in whilst the kids are sleeping safely in the van.

Ended up with the Vango Galli 3 (poled) and whilst there’s a couple of very minor design issues that are annoying, overall it’s been great and plenty big enough for what we need. Set up time from driving onto the site to sitting down with a beer, everything set up including bed in the van is around and hour at present.

D44EFE9C-C88C-4881-A58B-E191932E8B32.jpeg

0394CF8A-5B1C-40B6-8F21-C63A4A991CE4.jpeg

7C840D6A-AC1C-4522-841B-35B3A7FFF803.jpeg

I’m still amazed at how much space we have left when the vans packed for trip, but for organising everything I needed to get the roof box out, looked at a few options on roof bars, didn’t fancy the usual roof rails every one fits and wanted something I could remove nice and quickly without spending a huge amount on new Thule bars.

Ended up with Retro Racks bars, which are a bargain my opinion, less than £100, powder coated in your choice of colour and look good when on. The Kamei box I’ve got bolts straight onto them and had no issues whatsoever with them since fitting. Bit of faffing about deciding where on the roof they would be best placed with the box, ended up using the two middle fixings on each side rather than too far back, which also means I can use the side step to access when parked and disconnected from the awning which is useful.

We Tend to put all of the awning set up in the box so we arrive empty the box and set up, then empty the van. Leaving a site with wet kit and awning it all stays out of the van, goes into the box and means the family can be in the van ready to go whilst I’m taking down the awning if raining which is a little less stressful.

948B5A4F-01BA-4226-B785-FE1E0EF73432.jpeg

A13A29FC-ACE6-4315-9556-8AFB9537BEDC.jpeg

A few other little jobs have been completed over the last few weeks,

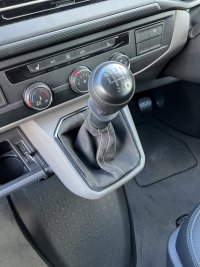
New gear lever gaiter to match the seats, suede with white stitching. Nightmare to fit wouldn’t recommend! Looks good now it’s done though.

58D01497-CBEF-465D-89F7-44CECA50FE3C.jpeg

finished covering the b pillars in suede to match rest of the cab headlining / a pillars etc

(Need to get a photo of this)

In the back We’d been using some temp black out blinds on the side windows in the back, which have been working great as a temporary solution, but finally took the plunge and splashed out on some Vanshades in time for the last trip away.

Lead times direct from Vanshades for a relatively standard colour (anthra carpet and greyblinds) was a little longer than expected (4weeks exactly) and wonder if getting this from THQ who show as in stock and dispatched within 4 days would have been quicker, but they arrived and were installed in about 30mins. (Worth noting this was what was suggested on the website)

Great purchase, well worth the money (almost) and look quality installed in the back - finishes it off nicely. I’ve kept them down over the past few days with the heat to try and reduce the temp in the back of the van, which does seem to have made a difference.

(Pictures to follow)

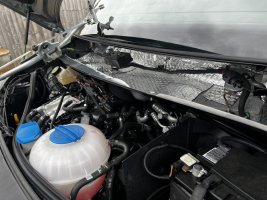
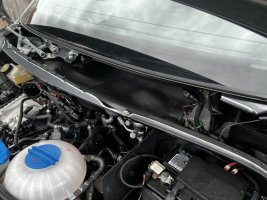
Fair bit of time spent finishing off some sound deadening around the van, front doors have now been done and the scuttle panel area in engine bay aswell. Both using layers of dodo 2mm and then some foam backed in select places. Just the front wheel arches and cab floor left to do at some stage now.

B383BA04-CC96-4EDD-AFFC-20FA5E4BCAFF.jpeg
3C86E005-69AA-4C9A-80AB-B742428D2FAE.jpeg

Other than a regular wash it’s just being used as much as possible now, and is on 6000 miles, had 80 or so on when I collected it august / September last year.

Future plans are just using it as much as possible, change the bed set up in the back over the winter and potentially a wheel change at some point for something smaller with more tyre!

As it stands yesterday

2F36EB44-FEBD-4FDF-BBFF-F1CBEB61A8BB.jpeg
 
Love the van and your subtle, well thought out additions - nice to see that there are some people who don’t go the default camper conversion.
 
What wheels and tyres are you running at the moment, they look spot on.
 
Small little lunch time job ticked off, saw a clip somewhere i think of one of THQ vans with this section of the dash trimmed up.

Adds a little more soft touch suede up front, breaks up the hard surfaces and ties the can headlining / A and B pillars in a bit more at the same time.

D46052D9-3CBD-4B5D-8A98-867A173DB633.jpeg

They’d also do the door handles, but given how dirty these get now, i don’t think it’s a good shout. Plan with the door handles and dash surround detailing is body matched indium grey. Won’t be going crazy with it as it’ll look cheap if too much going through interior, but again, just breaks up the sea of plastic surfaces and hopefully brings everything up a level.
 
Been a while since I’ve updated anything on this thread, plenty been going on just not been recording anything due to a lack of time…

Van‘s now got just over 16k on it, I bought it new with less than 90 miles on it when collecting, and I can honestly say it’s been faultless. Appreciate others on here have had many issues with the 6.1’s but I’m grateful that we’ve managed to bag a good one. Just back from a week in France again, testing the ferry crossing with young kids, ready for a trip further afield next year.

The only issues I have had have all been self induced… which leads me onto one of the bigger changes I’ve made to the van since collecting.

When I bought the van, it already had the Rampage front splitter on, which combined with the B14’s at around 70mm+ drop gives me very little ground clearance on the front. It looked absolutely amazing in my eyes, and had I not been using the van for getting my bike into the middle of god knows where, camping off grid and into camp fields etc, then it wouldn’t have been that much of an issue, however, I do and the van has to work for me in this scenario.

First incident was visiting the Wave in Bristol, for anyone that’s been knows that the car park is uneven and has its fair share of holes, which are all but unavoidable in some places. Long story short, I managed to rip the lower section of the rampage splitter off. It‘s held on with brackets that are bonded to the top section of the splitter, so any impact just cracks the bond and the splitter came off. Gutted and facing a bill of 950 for a new one, I removed the bumper rebounded and repaired myself. Local body shops that I visited were reluctant and basically said it was unsalvageable.

All back on and looking as it did prior, solid and not going anyway, I started exploring options to avoid this happening again. Unfortunately, before I got this far, i managed to do the same thing getting on to a campsite in the lake district.

Reassurance for me that I needed to change things up.

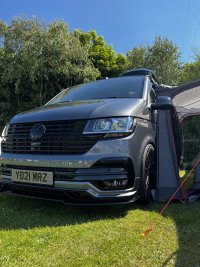
I’ve gone backwards (in majority of the forum eyes I’d imagine) by removing the Full Rampage Splitter, all gloss black Trims and Grilles, and refitted a clean delivery mileage bumper, standard grilles, Chrome centre Badge and then as of yesterday, swapped the wheels over from the 20” Axe EX30s and fitted a set of Navis Gelida 17” with some Cooper AT tyres.

Over the moon with the results, and a few more additions left to come, but for now, should tick off any concerns I had about accessing fields, running forest tracks and gravel tracks etc.

A lot of thee parts I’ve taken of, will be up for sale over the coming weeks, so keep an eye out if you’re interested. The bumper / splitter will be repaired and redone then sold ready to install.

As said, over the moon with the cleaner look and smaller wheels, despite thinking it was going to be a backward step.

IMG_0001.jpeg
 
An update to the thread just to keep this going and relevant.

After running it like that ^ for about 6 months through winter the unavoidable itch came back to change things up again. Whilst I love the clean look, the front end just didn’t look finished and was too close to a standard van.

I rebuilt the original / damaged rampage splitter myself, made up and added some stronger reinforcement brackets, resprayed and then remounted it all to the original bumper I’d taken off previously. Along with the gloss black plastics I’d hung onto.

Picked up a set of THQ trapezoidal side bars and threw those on, quality is a lot better than what was on when I bought the van originally and the coating is a fair bit thicker so hopefully stands up to weathering a little better. I’m going to coat all the mountings with clear wax oil to protect those as well.

THQ rear leads, red / clear have been fitted recently as well and look a lot nicer than the stock items whilst still looking fairly standard.

And that’s about it for now…

I think I’ll be leaving the outside as is for now, although I’d like another set of wheels to swap between and give me a different look, this will likely be one for next summer now

The whole “Swamper low” look is a big marmite subject I know, but at the minute the look and combination of practicality getting onto fields, driving through forests, gravel roads etc whilst still being low ish, is ideal.

IMG_7358.jpeg
 
An update to the thread just to keep this going and relevant.

After running it like that ^ for about 6 months through winter the unavoidable itch came back to change things up again. Whilst I love the clean look, the front end just didn’t look finished and was too close to a standard van.

I rebuilt the original / damaged rampage splitter myself, made up and added some stronger reinforcement brackets, resprayed and then remounted it all to the original bumper I’d taken off previously. Along with the gloss black plastics I’d hung onto.

Picked up a set of THQ trapezoidal side bars and threw those on, quality is a lot better than what was on when I bought the van originally and the coating is a fair bit thicker so hopefully stands up to weathering a little better. I’m going to coat all the mountings with clear wax oil to protect those as well.

THQ rear leads, red / clear have been fitted recently as well and look a lot nicer than the stock items whilst still looking fairly standard.

And that’s about it for now…

I think I’ll be leaving the outside as is for now, although I’d like another set of wheels to swap between and give me a different look, this will likely be one for next summer now

The whole “Swamper low” look is a big marmite subject I know, but at the minute the look and combination of practicality getting onto fields, driving through forests, gravel roads etc whilst still being low ish, is ideal.

View attachment 254322
I think that looks awesome buddy
 
Back
Top