How long until she returns ?ah yeah absolutely, im really excited to see it and enjoy the van.
You are using an out of date browser. It may not display this or other websites correctly.
You should upgrade or use an alternative browser.
You should upgrade or use an alternative browser.
The Sandwich Van. My T6 project
- Thread starter Led Sandwich
- Start date
-
- Tags
- build thread.
I find out tomorrow but it’s looking like either over the weekend or early next week so not long now.
Lots of photos plsI find out tomorrow but it’s looking like either over the weekend or early next week so not long now.
absolutely will do. I've asked them to leave the panels carpeted but not fitted as i wanted to use hidden clips so depending if they arrive before the weekend they may not be fitted just depends on how quick Harrison trim supplies are.Lots of photos pls
Right so i have an exciting update, yesterday i travelled up to Halifax Campervan Conversions to pick up my Van after the fitting of the vanmax pop top. I had this fitted and carpet lining completed at the same time however asked them to keep the panels off as i wanted to fit them with hidden trim clips to enable easy fitment and removal. I am over the moon with the colour match and the profile of the roof. There is also still plenty of headroom inside when sat on my standard kombi seats so ill use that as a basis for when i look to fit a bed in the future.

That's the roof fitted and down with my roof rails re attached.
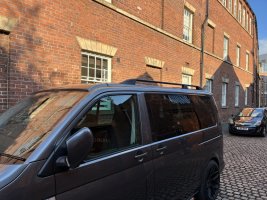
Profile wise its nice and thin keeping a pretty discrete look while still offering plenty of space when up.


I also managed to meet the lovely @Funkhaus on the way back to pick up a sink and gas locker for the conversion so thanks again for the help and the chat it was great to meet you. The plan for this week is to get the interior panels back in and have a look at fitting the leisure battery so i will update with progress, they fitted remote control lights in the back which i could do with setting up. also any tips from people who have wired in LED lights to turn on with the door opening would be handy as i think the loss of this future might be a pain long term.

That's the roof fitted and down with my roof rails re attached.

Profile wise its nice and thin keeping a pretty discrete look while still offering plenty of space when up.


I also managed to meet the lovely @Funkhaus on the way back to pick up a sink and gas locker for the conversion so thanks again for the help and the chat it was great to meet you. The plan for this week is to get the interior panels back in and have a look at fitting the leisure battery so i will update with progress, they fitted remote control lights in the back which i could do with setting up. also any tips from people who have wired in LED lights to turn on with the door opening would be handy as i think the loss of this future might be a pain long term.
ah thanks mate, once we’re all done I’ll see if we can arrange a few days up to see you again and get a guided tour of the north east. You left my dad very excited indeed to get out and enjoy lifeIt was very nice to meet you and your Dad, hear about your family, and to see how excited you are about the transformation of what is a fantastic van (no envy at all). I hope your Dad realises his dream of joint the transporter family soon.
Happy travels.
I’ve managed to get another couple of evenings in the van this week cleaning out the interior and starting to fit the interior panels. So it turns out 6mm is a bit thick for the hidden trim clips which I didn’t know so I’m going to have to try and ream them out at the back a bit to make them fit better which is a pain so I still have the two big panels to do but I’m pretty happy with how it looks. The only thing I want to do is trim the edge between the headlining and the pop top in the front a little better so any tips would be great.

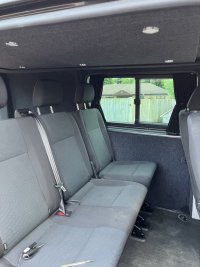


I’ve got to focus on wiring next so will make some more inroads into that this week.


I’ve got to focus on wiring next so will make some more inroads into that this week.
Right so I managed to get a bit further with the electrics and have got the matter, split charge and solar all up and running. It’s all a little OTT at the moment as my only accessory is the rear led lights.
Mocking up the layout.


Clearance once in, this was using the Kirwan’s battery mount but I think a bit of shorter angle may have worked better for this and given me some more room. I had to grind the base a little to smooth out the base and get the battery right over.
I managed to get it all mounted with the fuse box in a position it was easily accessible with the seat in place and retain the stock wiring mount in the base of the picture.
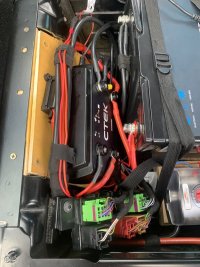
Access through the top when the seat is forward should give plenty of space in emergencies.
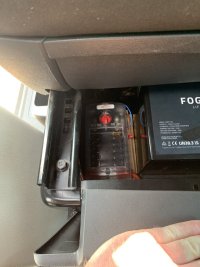
And the lights on, im pretty pleased to have this working

Any tips on other handy things to have while I’m in conversion would be great. My next steps is picking an inverter and fitting the Rib Swivels I have on order to make the space a little more useable in the short term.
Mocking up the layout.


Clearance once in, this was using the Kirwan’s battery mount but I think a bit of shorter angle may have worked better for this and given me some more room. I had to grind the base a little to smooth out the base and get the battery right over.
I managed to get it all mounted with the fuse box in a position it was easily accessible with the seat in place and retain the stock wiring mount in the base of the picture.

Access through the top when the seat is forward should give plenty of space in emergencies.

And the lights on, im pretty pleased to have this working

Any tips on other handy things to have while I’m in conversion would be great. My next steps is picking an inverter and fitting the Rib Swivels I have on order to make the space a little more useable in the short term.
Last edited:
You'll be limited to a 1000w inverter with the max discharge rate of the fogstar of 100a. A good, solid, cheap 1000w inverter is the Renogy.

 uk.renogy.com
It's small enough to fit inside a seat base (obviously not with your battery) or on the rear of the seat base.

1000W 12V to 230V/240V Pure Sine Wave Inverter with English Standard Socket (with UPS Function)
Whether for a van or a cabin, the Renogy 1000W Pure Sine Wave Power Inverter acts as a DC to AC converter that allows you to power your household appliances.
 uk.renogy.com
It's small enough to fit inside a seat base (obviously not with your battery) or on the rear of the seat base.
Thanks for that I was looking at that one. I figured 1000 would be my limit so I guess if that becomes a limiting factor in use I’ll add a second battery under the drivers seat and go for a 2000w although at that point I’d think I’ll need a smart pass as well.You'll be limited to a 1000w inverter with the max discharge rate of the fogstar of 100a. A good, solid, cheap 1000w inverter is the Renogy.

1000W 12V to 230V/240V Pure Sine Wave Inverter with English Standard Socket (with UPS Function)
Whether for a van or a cabin, the Renogy 1000W Pure Sine Wave Power Inverter acts as a DC to AC converter that allows you to power your household appliances.uk.renogy.com
It's small enough to fit inside a seat base (obviously not with your battery) or on the rear of the seat base.
Depends on how often you used it, but a 2000w inverter will be pulling around 200amps on the 12v side (assuming 80% efficiency) and that will take a long while to replace at the 20A the CTEK can charge at. If you get to that point it'd look at one of the 50A chargers, most of the newer ones are smaller than the CTEK.Thanks for that I was looking at that one. I figured 1000 would be my limit so I guess if that becomes a limiting factor in use I’ll add a second battery under the drivers seat and go for a 2000w although at that point I’d think I’ll need a smart pass as well.
The stock way of running the courtesy lights is with a +12v feed on a timer (cuts off after 20mins to save battery) and the a permanent ground and a ground switched by the BCM when the doors are open.also any tips from people who have wired in LED lights to turn on with the door opening would be handy as i think the loss of this future might be a pain long term
A three way switch then connects the lights to ground. One way connects to nothing and they are permanently off, the second connects to the permanent ground so they are always on (until the timer cuts them off) and the third connects to the ground that is switched by the doors being open for "normal" courtesy lights.
If you have plain LED lights you can just move the wiring for the +12v feed from the BCM timed feed to an always on from the leisure battery. If you have lights with any kind of dimmer or controller this can be more difficult as the "door ground" isn't a real switch and the BCM does a fancy fade out using PWM that can cause controllers to reset.
If you still have the factory courtesy light wiring behind the headlining a potential simple option is to just fit a small discreet LED light to it over the seats. All you really need is enough light to see to get in and out or to find the switch to your main lights?
The last was going to be my plan, so an additional led linked to the original switched wiring. I will have to see if I can locate the wiring as it will have been tucked up when the pop top went in so i may need to cut back to the b pillar or wherever it runs.The stock way of running the courtesy lights is with a +12v feed on a timer (cuts off after 20mins to save battery) and the a permanent ground and a ground switched by the BCM when the doors are open.
A three way switch then connects the lights to ground. One way connects to nothing and they are permanently off, the second connects to the permanent ground so they are always on (until the timer cuts them off) and the third connects to the ground that is switched by the doors being open for "normal" courtesy lights.
If you have plain LED lights you can just move the wiring for the +12v feed from the BCM timed feed to an always on from the leisure battery. If you have lights with any kind of dimmer or controller this can be more difficult as the "door ground" isn't a real switch and the BCM does a fancy fade out using PWM that can cause controllers to reset.
If you still have the factory courtesy light wiring behind the headlining a potential simple option is to just fit a small discreet LED light to it over the seats. All you really need is enough light to see to get in and out or to find the switch to your main lights?
The lights I have are programmable and I’m not clear where the wiring runs so I think additional will be easier. I guess the footstep lights would be a place I may be able to take that feed from.
The footsteps feed was going to be my next suggestion - you may even be able to just wire in an additional low level light (maybe some LED tape?) linked to it to spill a bit more light across the floor?
yeah ill have a look into that, ill try for high level as i have a new born so being able to get him in his baby seat without switches etc is the main priority. im sure there is a way the switching comment is super handy.The footsteps feed was going to be my next suggestion - you may even be able to just wire in an additional low level light (maybe some LED tape?) linked to it to spill a bit more light across the floor?
So I thought I’d post a cheeky mid week update. I spent some time last night fitting the rib swivels. I opted not to use the raising shims as I wanted the seat as low as possible to coupled them with a transporter ha lowering bracket.
That’s the rib shim it raises the seat another 18mm which given the swivel itself is quite thick felt high even in the lowest position.
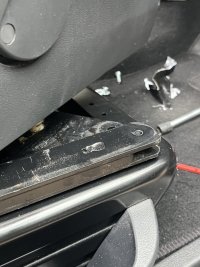

Once the bases were in I trimmed the stock panels to fit. They have to be removed to operate but give a nice tidy look for now which is ideal until I get a full camper conversion.
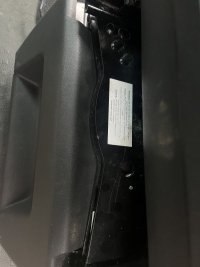
that’s the THQ handbrake lowering kit fitted. It needs the stock handle trim cutting back to work but fits nicely once in.

And then the seats all spun round. Space wise I think still a little tight with a kombi but much more usable.

That’s the rib shim it raises the seat another 18mm which given the swivel itself is quite thick felt high even in the lowest position.


Once the bases were in I trimmed the stock panels to fit. They have to be removed to operate but give a nice tidy look for now which is ideal until I get a full camper conversion.

that’s the THQ handbrake lowering kit fitted. It needs the stock handle trim cutting back to work but fits nicely once in.

And then the seats all spun round. Space wise I think still a little tight with a kombi but much more usable.

Last edited:
Sadly i have had very limited time in the last week or so to work on the van but i did find time to finally fit the trimmed out panels to the back.
Having made them out of 6mm ply standard hidden trim clips wouldn't fit which was a bit of an error. i ended up having to reduce the thickness with a router behind the holes and then fit the clips. Sadly the pictures i got were awful but its pretty self explanatory. I was really pleased i ran the ducting through the van pre lining as it was a doddle to get the cables from the b pillar to the back so well worth doing if anyone else is in a similar position.
routed out section around hole.

power cables drawn from the front through the ducting i had installed.

Then finally the panels in.

Sadly i ran out of time to connect the socket up but i have a few other bits to do at the same time so ill probably wait for now. One thing that does stand out are the seat belt brackets being cream. Is anyone aware if they can be replaced with a black one?
Having made them out of 6mm ply standard hidden trim clips wouldn't fit which was a bit of an error. i ended up having to reduce the thickness with a router behind the holes and then fit the clips. Sadly the pictures i got were awful but its pretty self explanatory. I was really pleased i ran the ducting through the van pre lining as it was a doddle to get the cables from the b pillar to the back so well worth doing if anyone else is in a similar position.
routed out section around hole.

power cables drawn from the front through the ducting i had installed.

Then finally the panels in.

Sadly i ran out of time to connect the socket up but i have a few other bits to do at the same time so ill probably wait for now. One thing that does stand out are the seat belt brackets being cream. Is anyone aware if they can be replaced with a black one?
Last edited:
Yes you can buy black seat belt buckles, I have them. Got them off ebay, pics in my threadSadly i have had very limited time in the last week or so to work on the van but i did find time to finally fit the trimmed out panels to the back.
Having made them out of 6mm ply standard hidden trim clips wouldn't fit which was a bit of an error. i ended up having to reduce the thickness with a router behind the holes and then fit the clips. Sadly the pictures i got were awful but its pretty self explanatory. I was really pleased i ran the ducting through the van pre lining as it was a doddle to get the cables from the b pillar to the back so well worth doing if anyone else is in a similar position.
routed out section around hole.
View attachment 249726
power cables drawn from the front through the ducting i had installed.
View attachment 249727
Then finally the panels in.
View attachment 249728
Sadly i ran out of time to connect the socket up but i have a few other bits to do at the same time so ill probably wait for now. One thing that does stand out are the seat belt brackets being cream. Is anyone aware if they can be replaced with a black one?
One thing that does stand out are the seat belt brackets being cream. Is anyone aware if they can be replaced with a black one?
Could it be as simple as rattle can of satin/matt black paint for the brackets?
