The Sandwich Van. My T6 project

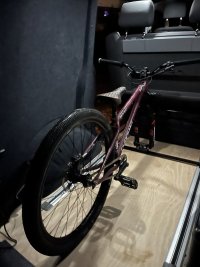
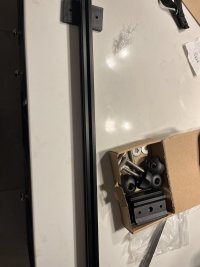
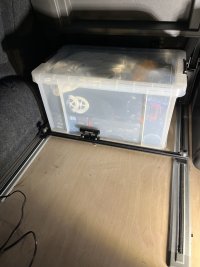
So another cheeky little update on this, I spent some time this week making up a bike rack to fit into the caravelle rails and I'm pretty pleased with the results. For a bigger bike I may need both wheels off but its a pretty neat solution and doubles as a bump stop for the bed to prevent it hitting the wheel arch when not in use or to stop my storage box sliding about.


I ordered rail clamps and brackets from Steve free and then some aliminium extrusion and a simple fork Mount.
IMG_2069.jpeg
I may make up some longer threaded T pieces as these are a little awkward to twist and fit but I’m happy overall.
IMG_2105.jpeg
That’s it holding my box in place

IMG_2108.jpeg
Then holding the bike, the bed has to be pretty far forward to fit even a small bike in a Swb so I’m going to see if I can 3d print a stand for the back so that I can take both wheels off if need be
 
Jesus Christ, it gave me kittens looking at that picture… I hope there was big cushion on the floor!
Ha Ha yeah he isnt mobile yet luckily and was only really their for the photo. I certainly didn't step anywhere out of reach just in case he tried to escape.
 
So i managed a little more progress over the weekend fitting the Altro flooring. I ended up ordering it on the roll rather than pre cut and id say im still not sure if that was worth the saving. Im pretty happy with the outcome but would say its a pain to cut especially around contours and finding the rails through the floor so it was a whole Saturday by the time i had stripped and re built the car.

I first lifted out the wood and roughly traced the ply floor before re fitting and then trimming, glue wise I used proper viny floor glue which is trowelled on easily and I did half the van at a time.


Here was the floor rough cut.
IMG_2134.jpegBD57F822-C4A7-4651-B8E8-3526E3665ED9.jpeg
IMG_2135.jpegIMG_2137.jpeg
then all in and fitted. i have a few bits to tidy up but overall im really happy with it.
IMG_2139.jpeg
 
Last edited:
So another cheeky little update on this, I spent some time this week making up a bike rack to fit into the caravelle rails and I'm pretty pleased with the results. For a bigger bike I may need both wheels off but its a pretty neat solution and doubles as a bump stop for the bed to prevent it hitting the wheel arch when not in use or to stop my storage box sliding about.


I ordered rail clamps and brackets from Steve free and then some aliminium extrusion and a simple fork Mount.

View attachment 264772
I may make up some longer threaded T pieces as these are a little awkward to twist and fit but I’m happy overall.

View attachment 264774
That’s it holding my box in place

View attachment 264775
Then holding the bike, the bed has to be pretty far forward to fit even a small bike in a Swb so I’m going to see if I can 3d print a stand for the back so that I can take both wheels off if need be
Thats class to be fair... But could you not put some sort of bolt between the top and bottom parts of the bracket? Such that the bracket can spin? Just thought you could rotate the bike 45deg so you're not having to take a back wheel off for bigger bikes.
 
I did think that and will have a play. I’m not sure if spinning the bars would mean it would hit the seat too soon. as it’s fixed I can just swing the rear end over but once the kitchen goes in I’ll only have 3/4 width and my big bike is a geometron so on the long side.
 
So I managed to get a bit more done this week, I’ve finally ordered a kitchen after popping down to the great people at evo designs. It wasn’t cheap but the quality was exceptional and they had plenty of options even with twin sliders and a sliding bed.
I went for the 5.4 pro with a bamboo top. Couloir wise I’ll let that be a surprised but it’s these units. The curved front should help me spin my drivers seat.


IMG_2156.jpeg

IMG_2155.jpeg
Then last night I managed to tackle my lack of rear courtesy lights. Annoyingly I lost the stock ones when the pop top went it so I did some reading and managed to find some remake plugs to fit the original loom.

Here are the plugs and loom if anyone needs them, not the cheapest but it’s nice not to cut the main harness.

Then I fitted some small spots from thq to the surround of my pop top, cloth taped it and it works perfectly. I will do the back door as well but wait until the the kitchen is in so I don’t do it twice.

IMG_2183.jpeg

b1c53a5d-c7c3-41cb-bad3-2615e5eda7c0.jpeg

IMG_2178.jpeg

IMG_2182.jpeg

76a7a806-fca8-4758-9144-e49cc23f36e0.jpeg
 
So its time for an exciting update, My kitchen arrived last week and i have been working through slowly edge banding and assembling all of the pieces. I have to say the evo instructions were limited to say the least and not helped by the fact mine is a twin slider so modified from the drawings. it all came packed together so i had an awful lot of pieces to work through.

Here is the jigsaw i was delivered.
1.jpeg

2.jpeg
Then i had to go about edge banding which was a mammoth task
3.5.jpeg


Then it was on to assembly i have finished the front and mocked up the layout and am currently working on the rear piece and top boxes. the quality is really impressive so the next job is waiting for black Friday deals to order my sink, fridge, electrics etc.

4.jpeg5.jpeg6.jpeg
 
Back
Top