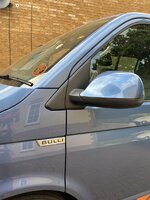
Mirrors With Dynamic Indicators

1. What glue did you use to fix the indicator module into the lower casing please?
2. Do I need to cut the lugs off the indicator module or will it fit in the upper casing with those intact?
3. Can someone point me to a post or video or something that shows me how to get the mirror and the covers etc. off.
1) I used Q-Bond plastic weld alongside those small oblong plastic things you use to join cupboard carcasses, building up the gaps with the Q-bond before screwing the indicator to the case.
2) No, the lugs stay. See above.
3) Cant think of where I’ve seen one. A video would help with removing the casing and keeping all tabs in place, but as you end up cutting them all out, don’t worry about breaking them.

Don’t forget that you’ll have to trim the inside of the upper casing too (that’ll become obvious).
 
Looking really good so far, perfect in fact!
I had a look at this and it looks like to fit the indicator in like you have you need to remove nearly all the tabs off the lower case. I always intended to glue the indicator in but will you need to glue the upper and lower cases together also?
 
Looking really good so far, perfect in fact!
I had a look at this and it looks like to fit the indicator in like you have you need to remove nearly all the tabs off the lower case. I always intended to glue the indicator in but will you need to glue the upper and lower cases together also?
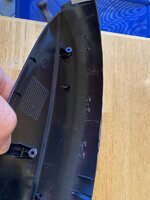
You have to remove all the tabs on the back of the lower casing. I thought I’d be able to leave one in place (as in the photo) but once i tried to fit the indicator module in, realised that one had to go as well. I was going to glue the module straight to the lower casing but @Ads_Essex has me thinking about whether i should glue some mounts in and screw it to those instead. Anyone else who has done this able to comment please?

I don’t think it is necessary to glue the upper and lower casing together, I’m certainly not planning to do so.

64A01A65-A8CE-4977-9014-074FA0134F6C.jpeg
 
My idea was to do everything in the lower case off the van before I went near the mirror but I think I need to dismantle it to get a better idea how this will work, I just can’t picture how you can remove all those tabs on the front edge, add weight and the thing still stay together
 
My idea was to do everything in the lower case off the van before I went near the mirror but I think I need to dismantle it to get a better idea how this will work, I just can’t picture how you can remove all those tabs on the front edge, add weight and the thing still stay together
I’m doing exactly what you had in mind. I bought a set of lower casings and am busy modifying those in preparation for the next bit. I’ll take pictures as I go and share them here. I doubt I’ll get to removing the ones on the van for at least a couple more weeks just because I have other commitments in the coming weekends. I hope to get the second lower casing cut later today so I’ll then just need to glue the LED modules in place and I’ll be almost ready to fit them. Need to check I’ve got enough wiring and connectors.
 
I am putting this on hold until after the holidays so any tips, tricks and photos would be greatly appreciated
 
I am putting this on hold until after the holidays so any tips, tricks and photos would be greatly appreciated
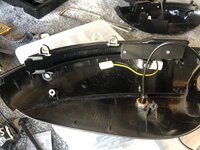
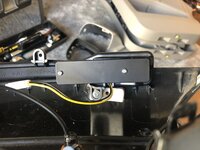
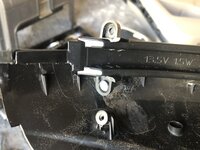
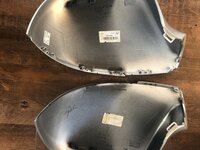
Here’s the indicator affixed to the lower casing:
EB521FBA-AB6D-4BC3-9C7C-CFEAE6D4E8D3.jpeg46EE7B97-9243-4598-984D-6D789C0DED49.jpegE6CCE181-25BE-48CB-82B1-2D6D5277D48B.jpeg
Q-Bond plastic weld was used to affix the cabinet fittings, meaning I had something to screw into.
 
I just can’t picture how you can remove all those tabs on the front edge, add weight
and the thing still stay together

The edge of the casing (as in, the section that you look at / catch first if you reverse in to bushes) holds the uppers and lowers together, along with the neck where the mirror rotates.
 
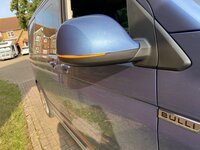
Admittedly, the mirror indicators don’t show much to anyone in your blind spot as the LEDs don’t reach right right to the edge of the mirror casing. To get past this (I’m thinking of drivers who are concerned about cyclists coming up the nearside, for example) you can either leave your side repeater in place on the wing, or fit the mirror-lens indicators like @Pauly has.
 
Looks like you have puddle lights in there too. I’ve fitted those in the new cases already. I’ve been linking jobs together, now have the puddle lights, the indicators, the door pocket ambient lights and hopefully door handle courtesy lights all to go in in one hit while the door cards are off, oh yeah and some sounds proofing. I just need to get some speaker upgrades and folding mirror upgrade sorted and I think I’ll have the full set!
 
Looks like you have puddle lights in there too. I’ve fitted those in the new cases already. I’ve been linking jobs together, now have the puddle lights, the indicators, the door pocket ambient lights and hopefully door handle courtesy lights all to go in in one hit while the door cards are off, oh yeah and some sounds proofing. I just need to get some speaker upgrades and folding mirror upgrade sorted and I think I’ll have the full set!
yes mate. One of the first set of puddle lights stopped working - it looked like the lens came away and allowed water in - so be mindful when washing (it’s manufactured in such a way that you can’t add extra sealant).
 
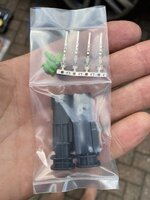
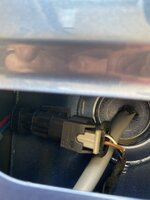
Finally finished this little job and chuffed with the outcome. I followed all the tips from on here which were incredibly helpful. Perhaps the only thing I did slightly differently from most was that I managed to get a male connector that fits directly onto the existing cable that normally attaches to the side repeater. That way the original van wiring is completely untouched so if i need to undo the mod at any time I can. I attached this to the inside of the panel with a small bit of double sided tape.

8849BBED-B78B-45B3-AED8-830F05ECE9AF.jpeg

36124F15-49EF-4B73-BE1F-567E35F2594C.jpeg

25EDDF0D-6D1A-4A0F-8B9D-ACF4898C9256.jpeg

4EA52A3C-AE8F-495F-B2F9-475CA25C7951.jpeg
 
Hi everyone,

Has anyone managed to find a wing mirror sequential led that works with the t6.1?

I bought these Q7 - 4L Facelift: Dynamic Mirror Indicator Lights 10-15.

They work when the engine is not on but when the engine is turned on they gradual blink less and less (ie fewer leds on the strip light up) until stopping altogether.

I tried attaching this resistor flexzon 2 x 12V LED LOAD IN-LINE RESISTORS 50W 6 OHM FOR LED REAR TAIL LIGHTS INDICATORS flexzon 2 x 12V LED LOAD IN-LINE RESISTORS 50W 6 OHM FOR LED REAR TAIL LIGHTS INDICATORS : Amazon.co.uk: Automotive

It didn’t work, I even tried attaching two to one light.

While the light worked slightly longer after the engine was turned on with two resistors attached, it still eventually stopped flashing.

Now I’ve managed to break one of the wires on one of the lights not leaving enough wire left to reconnect it so that’s pretty useless now.

Any help much appreciated!

Mark
 
Mark, see post #129 on page 7 of this thread and then the various conversations that fixed the problem with a coding change.
 
Thanks Rod,

I had read the full thread but wasn’t sure coding is needed in every case and I as hoping to avoid it.

I might have to get someone in who knows what they are doing on that front ha

Mark
 
Back
Top