So having fitted the rails yesterday I thought I’d make the best of the incessant rain to see if i was indeed leak free. I didn’t really have a clue where the holes in the roof would appear inside the van other than a rough idea but as I already had the rear roof lining out to run some cables, I just poked around and had a look. I figured if it was leaking I’d see it given the amount of rain.
In the rear of the van there are three of what you see in the picture below on each side of the van, this is the captive nut that the bars bolt down into. They are very obvious once the roof lining is out. The fourth one, the one at the front, is under the cab roof lining. I didn’t go to the bother of taking that out to have a look. The four in the rear of the van that the rails attach to are lovely and dry.
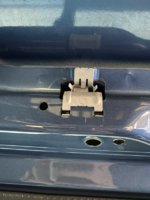
D87E75DF-8071-464B-A167-5FCB1AC30DFA.jpeg
 
Got some ebay roof rails and did not want to gorm silicone into and around the fixing holes.

Instead I got some M6 threaded bar cut a little longer than the bolts supplied with the rails. I then used the rubber washers that came off the blanking bolts together with a washer and M6 nyloc nut.
This then fixes into the holes on the roof and seals it the same as the original blanking bolt.
I then simply used a washer and nyloc nut to fix the roof rails to the threaded studs.
View attachment 18747 View attachment 18746 View attachment 18745 View attachment 18744 View attachment 18743


Screenshot 2020-07-08 at 11.08.36.png

I was just going to refit my roof rails and do this mod.

However on examining the underside of the 'feet' that the rails sit on I can see that they wont fit over that nut and washer. Am I to assume my rails are non genuine VW? Ir just an earlier version?
This is what the underside of the rail plastic looks like. The hole in the centre is where the nut/bolt n that pic above should go.


Screenshot 2020-07-08 at 11.15.36.png
 
View attachment 76599

I was just going to refit my roof rails and do this mod.

However on examining the underside of the 'feet' that the rails sit on I can see that they wont fit over that nut and washer. Am I to assume my rails are non genuine VW? Ir just an earlier version?
This is what the underside of the rail plastic looks like. The hole in the centre is where the nut/bolt n that pic above should go.


View attachment 76601
Mine were very similar, i simply made the hole bigger so the nut would sit inside it
 
I did this last summer and found it quite straightforward. Once you have the threaded bar in place in all three holes the rails just drop on. I put a bit of silicone in the socket to hold the nyloc nut, then lightly tightened each one down allowing me to move the plastic spacer feet they sit on, once I was happy everything was set I just tightened them all up. They have been on a year so far and no leaks. I did find the threaded bar needs to be cut a lot longer as when you put the spacers and rails on there is not a lot of threaded bar sticking through for the nyloc nut to go on. And its a pain moving step ladders up and down the van, if you have two sets of step ladders the better. The key is working out how much threaded bar is needed too little and there is not enough sticking through to get the nut. Definitely works ...
Hi, I'm a newbie to the site. Have just purchased a 19 plate Highline. I would like to know did you put loctite on the threads when you fitted the stud iron? I'm going to have to do this as I've got a leak!!!
 
Hi, I'm a newbie to the site. Have just purchased a 19 plate Highline. I would like to know did you put loctite on the threads when you fitted the stud iron? I'm going to have to do this as I've got a leak!!!
I didn't.
 
Hi, I'm a newbie to the site. Have just purchased a 19 plate Highline. I would like to know did you put loctite on the threads when you fitted the stud iron? I'm going to have to do this as I've got a leak!!!
I didn’t no. I used a unlock nut which in my mind seals the threads and the rubber washer seals against the roof. I’ve had zero issues since doing it.
 
Many thanks for this top thread... I followed this through and all great... made up for the shit qualtiy roof bar! had to get the big drill bit out as suggested to wideon the plastic holes up.. One thing I did do was add a washer in... I got a technique fromt he suggestion of using a long socket set... I cut another piece of threaded bar and slid the socket onto to that.. no handle / wrench... put the nut on the end but only by a turn of thread so when you turn it all over the socket drops down and over the nut.. offer it up .. fews turns for it to engage.... unscrew the bar connect the wrench handle bingo... it really helped after putting my bars on back to front! what a cock...
 
Ok. So I've replaced the manufacturers bolts with what is suggested on here.
What I had to do Vanzilla, was to cut each length of stud bar down by 10mm each as they protruded through the roof bars opening and the black cap wouldn't fit.
Maybe it's different designs of bars?:rolleyes:
But all is good now!
Thanks for a great tip
 
Hi all, just fitting my Omtec bars using the threaded bar method and have come unstuck as the bars come with these plastic plates which slot into the channels and the the bars sit on top. Doesn’t seem to me that the threaded bar method works with these so do you guys not bother with the mounting plates?

328CE2F3-6084-4D52-AFC1-AA7C3CE48F96.jpeg

213CE1DA-433F-4D73-9BC3-D5C39587BC5B.jpeg
 
Hi all, just fitting my Omtec bars using the threaded bar method and have come unstuck as the bars come with these plastic plates which slot into the channels and the the bars sit on top. Doesn’t seem to me that the threaded bar method works with these so do you guys not bother with the mounting plates?

View attachment 79776

View attachment 79777
You have to use the mounting plates. I just drilled the holes in them bigger so the nut on the threaded bar would sit inside the hole.
 
  • Like
Reactions: .50
Like @Big.mac has just said, make the holes a couple of mm larger than the nyloc nuts. I did this and it worked a treat.
After the heavy rain we had last night, there was no welcome puddle in the cab waiting for me this morning :mexican wave:
 
Yes... I stick a drill in the hoel and waglle it around... Mine had a raised hole on the other side... I drilled and chipped it all down so just a large hole.. God knows how these were going to made watertight using the non Threaded bar route! The bonus also is that in about 5 mins you can remove them and refit the original stoppers if required.
 
  • Like
Reactions: .50
Do you drill the hole big enough to get the plate to sit over the underlying washer aswell?
Yes. I drilled it slightly larger so it would sit over the nut and then countersunk the bottom face so it would sit flat to the roof.
 
Got it done - thanks for all the help! - and have a tip of my own to add to the thread. I used roofing washers which are metal on top but rubber underneath and they are slightly raised so that as you screw the nut on top the metal part of the washer pushes down and splays out the rubber base to create and even better seal.

D7AF42E7-4D3D-48FE-9FB1-1D0165A2753F.jpeg

70B94666-F4BE-4DDB-B010-1EBECF305464.jpeg
 
Back
Top