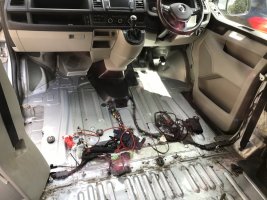
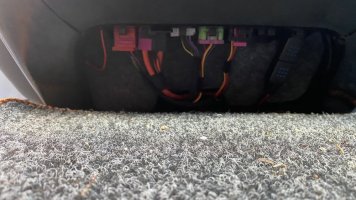
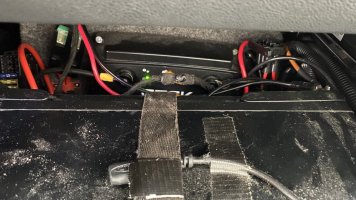
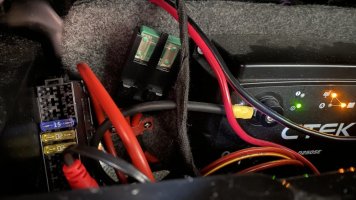
Single seat-base LB install with looms and connectors

Zave

Senior Member
VIP Member
T6 Guru
So, after 5 years I've replaced my AGM leisure battery with a shiny Roamer.

During lockdown I added solar and a CTEK 250 SE charger.

When new I got fitted professionally a Victron mains charger.

I've got factory heated seats and the original leisure battery and split charge relay.

It all works fine. However, the Roamer wasn't the drop in replacement I was expecting as it's taller and needs to be fitted on its side.

This weekend I want to tidy up the install and rats nest of cables. Yes, I have temporarily used old battery terminals as bus bars, protected by plastic sandwich bags. Yes, the Roamer isn't fastened down. I do have ratchet straps, proper bus bars, cabling, terminals etc to sort that this weekend.

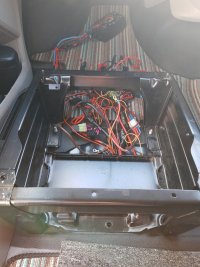
Now, I've seen some of those sick seat base installs on the other thread. They don't seem to be messed up with the OEM wiring for what I assume is the heated seats and split charge relay like mine. See attached pic. So, my question is can I remove any of this to create more room?
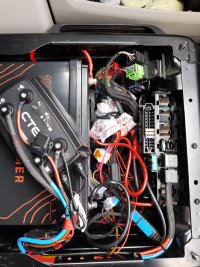
IMG_20221007_074441797.jpg

By the way, I wish to keep the heated seats
 
Nice.

Where did you get the relay link cable that feeds the CTEK d250?. (The one that picks up the OEM split charge battery feed)
 
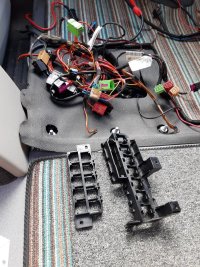
Some of the plastic mountings can be removed, the coupling points (coloured plugs at top right of your pic) can all be unplugged, removing form the black plastic mounting strip, then reconnected and tucked partially or totally under the flooring (making sure none of it is crushed by your equipment)
 
Potentially could do the same to the relay/fuse mounting strip across the front of the seat base also either totally or partially ?

travelvolts has retired now and left the forum
 
Some of the plastic mountings can be removed, the coupling points (coloured plugs at top right of your pic) can all be unplugged, removing form the black plastic mounting strip, then reconnected and tucked partially or totally under the flooring (making sure none of it is crushed by your equipment)
Thanks, what do these ones actually feed?

Potentially could do the same to the relay/fuse mounting strip across the front of the seat base also either totally or partially ?

travelvolts has retired now and left the forum
And what do these ones feed?
 
Thanks, what do these ones actually feed?
The coloured plugs are coupling points, its where the front wiring loom meets the rear wiring loom, in those plugs you have all the cabling for various lights/doors/locking etc

And what do these ones feed?
Hard to say, i would guess the single fuse with the coupling points is a cig socket supply, the 3 fuses in the addon strip will prob be a towbar, not sure about the big single fuse beside them but its not standard fit so probably a factory extra option related to second battery or aux heater or something like that ?
 
Hard to say, i would guess the single fuse with the coupling points is a cig socket supply, the 3 fuses in the addon strip will prob be a towbar, not sure about the big single fuse beside them but its not standard fit so probably a factory extra option related to second battery or aux heater or something like that ?
That makes sense. I'm aware the factory leisure battery powers one of the dash cig sockets. I have a factory tow bar. I'm pretty sure I replaced the big fuse when I fitted the CTEK
 
Everything out; seat, the lot.
Coloured link plugs into the recessed channels under the floor, be neat and tape in place and ensure they are not crushed when everything else goes back (put them under passenger side if you can) then bin the plastic mount that they were in.
Seperate the fuse holder from the relay mount at the front and fit the fuse holder where the link plugs were on the left side.
Make a ply panel to go across the seat base between the battery and the relays, carpet it and fit the ctek to it. That should fit in front of the battery with space to keep cool and you can also see the ctek lights from the back of the van with the seat sled forwards if you have any issues.
You can then also screw any extra fuses and relays to the panel as you need.
I’m sure there are much neater installs, but that’s how I’ve done mine and it’s pretty straightforward and fits in nicely.
Don’t forget to strap the battery to the seat frame.
I’ve also got the Victron connector routed so it’s accessible at the front of the seat so I can change connector without having to take the seat out. Same for a couple of the fuses too.
that will work . . . lol.

very comprehensive Si,
 
that will work . . . lol.

very comprehensive Si,
I removed it all and re did it when I installed my solar. After 12 months of being installed I wanted to make sure all grommets were still intact and that there was no damage to any cables or connections.
So I took the chance to redo stuff, like turn the ctek to the rear so you can see the lights, and make essential fuses accessible without taking the seat out, before my 5 week road trip.
 
Everything out; seat, the lot.
Coloured link plugs into the recessed channels under the floor

I can't see how those link plugs are going to fit in the recesses?

Or do I need to take out both seat bases and lift up the whole floor to find a recess somewhere?
 
I can't see how those link plugs are going to fit in the recesses?

Or do I need to take out both seat bases and lift up the whole floor to find a recess somewhere?
It definitely fits under there it just takes a little bit of finessing along the way. It is slightly easier to do with the floor out of the way, however you can just pull it back a bit to get access if that makes sense. You've actually reminded me that I never got round to posting my finished enclosure might have to do that now.
 
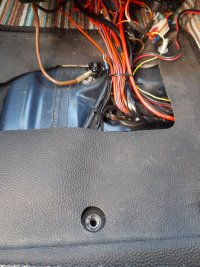
I think we should point out theres no huge hidden recess that your looking for its more a case of flattening it out under the floor and making the best of it, any bulges should be positioned away from any spots the battery (or anything else heavy) will press down on
 
Good point Pauly, my slightly less helpful version of this is also dependant on your heating arrangements. I installed under the driver's seat instead, avoiding issues of cabling being in the way (in my vans case)
 
it's easier to loose the stuff under the floor once the seatbase is fully removed:
81FC4984-F95F-4ACA-A0B7-842C83FC4660.jpeg
 
I can't see how those link plugs are going to fit in the recesses?

Or do I need to take out both seat bases and lift up the whole floor to find a recess somewhere?
[/QUOTE

I’ve just found some photos of my original conversion and I might have to apologise. It was the connectors under the passenger seat that I placed under the passenger seat in the floor grooves.
I’ve a feeling that the drivers side ones are still intact in the plastic holder, I’ll go and check first thing in the morning. My memory is rubbish.
However, looking at the attached pic you can see the grooves and I fitted all that stuff in the left into the groove under the passenger seat, so it is doable.28934396-3584-4822-BABD-1E5973B7150B.jpeg
 
It is the passenger side where I'm installing everything. I'll have another attempt tomorrow
 
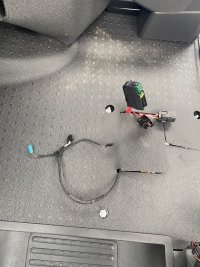
@Zave I’ve had a look this morning and I hid the connecting blocks and screwed the relay holder to the front of the carpeted divider so they are all accessible at the front along with the Victron connector.
84927EF9-D9B2-4940-AF96-507E04386686.jpeg
Fuses moved to the left and the ctek on the carpeted board.
Various other fuses etc screwed at jaunty angles on the board also.
2464F842-6B9A-4B42-AD10-9280211FE12B.jpegB2EC4B92-5808-4063-B187-9BA15273F694.jpeg
Not great photos but it shows that you can separate them and move stuff slightly to create plenty of space for the battery and ctek. My ctek has never got hot. I do check from time to time when it’s being used.
 
Back
Top