You are using an out of date browser. It may not display this or other websites correctly.
You should upgrade or use an alternative browser.
You should upgrade or use an alternative browser.
T6 Midroof LWB Wheelchair Campervan Build
- Thread starter Bryn23
- Start date
Got stuck into the bottom skylight plate today.
Scribed and then planed the timber mount, had to remove quite a fair bit of material.
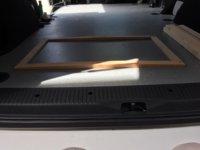
I made up three supports to hold the mount hard up in place to ensure a good hold while it cures, i did a trial run, all good
So i scuffed up the roof with scotchbrite, cleaned it with isopropyl and then 3/4 of a tube of Sikaflex 11FC.
I'll let it cure over the next 2-3 days and then ill take the support off, so i can cut the skylight hole and then scribe, fit and clamp the top HDPE mount with Sikaflex 221, before fitting the Skylight.
I'll most likely jig saw it out first then router it from below to get a clean edge, its a pain doing it from wheelchair, but it beats finding a way onto the roof and doing it from above.
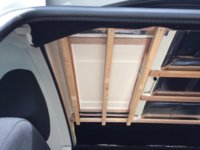
Scribed and then planed the timber mount, had to remove quite a fair bit of material.

I made up three supports to hold the mount hard up in place to ensure a good hold while it cures, i did a trial run, all good
So i scuffed up the roof with scotchbrite, cleaned it with isopropyl and then 3/4 of a tube of Sikaflex 11FC.
I'll let it cure over the next 2-3 days and then ill take the support off, so i can cut the skylight hole and then scribe, fit and clamp the top HDPE mount with Sikaflex 221, before fitting the Skylight.
I'll most likely jig saw it out first then router it from below to get a clean edge, its a pain doing it from wheelchair, but it beats finding a way onto the roof and doing it from above.

Well, i haven't installed the Heki.
I finally decided that i'd rather have a Deluxe Maxx fan, its just that i had the Heki sitting here since Feb
Bonuses over the Heki..
* Cant't be easily broken into, unlike the Heki
* Don't have to worry about the rain while away from the van
* 10 speed reversable fan, to help remove the heat in summer
* Remote control
* less heat from the Aussie sun through the Heki glazing
So, i ordered it yesterday, and i have already adapted the roof to the 356mm x 356mm opening.
The only other issue i have, is that i dropped into MB and checked out the new Sprinter...
The MWB 3.88 ton low roof is quite a nice van, you really notice the extra space.
That V6 Diesel with 140kw and 440Nm and 100 litre diesel tank would be a cracker.
Got around to routing out the slots for the factory interior lights, also refitted the panel and router out the new Maxx Fan hole while it was in place.
Had to add an extra pair of light holes as the 6 didn't look right with the new smaller hatch, ill look at wiring them up in two sets of 4.
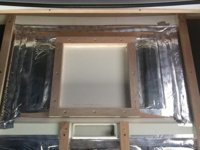
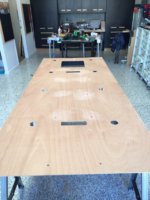
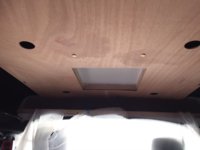
just waiting on the courier for fan and the extra lights, hopefully it arrives monday
In the mean time, I've got to line the rear of the panel with 4mm closed cell reflective foam and then carpet it, and finish of the 10mm closed cell foam around the hatch opening, so I can get the roof lining up and fitted this weekend
Had to add an extra pair of light holes as the 6 didn't look right with the new smaller hatch, ill look at wiring them up in two sets of 4.


just waiting on the courier for fan and the extra lights, hopefully it arrives monday
In the mean time, I've got to line the rear of the panel with 4mm closed cell reflective foam and then carpet it, and finish of the 10mm closed cell foam around the hatch opening, so I can get the roof lining up and fitted this weekend

Finally got the Maxx Fan this arvo, looks like a nice bit of kit, tomorrow i cut the hole
My extra lights got lost, so Hafele are sending out some more, so ill have those tomorrow.
Insulated the roof panel and carpeted and did a test fit over the weekend, its good to go, just need the extra lights, so i can connect them all up before i install it.
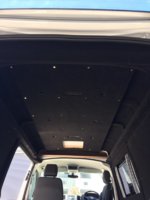
Ignore the brass bolt heads in the lining, the black painted bolts will be used.
While i was waiting for the postie today, i started to run the cabin wires.
* 6 mm2 tinned for the Solar
* 1.84 mm2 for the Maxx Fan
* 1.84 mm2 for the LED Interior roof lights
* 1.13 mm2 for the LED Awning Light
* 1.13mm2 for the LED reading lights
* 25mm2 for the Earth
All the resistance levels should be under 0.10 from my calculations
I ran them all through nylon sheath to the entry in the cabin from the rear, from the roof onwards, then i ran them individually through flexible conduit and secured with zippy ties and tape.
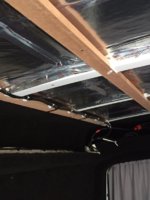
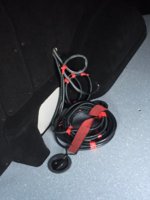
I need to get some more black electrical tape, as i ran out and had to use red to finish the job.
Ordered the new VW interior light connections from my dealer at $6 bucks each, tried to tell me that the pins (N10335807) were around $20 each
I ordered some on eBay from China for $6 for a set of 10.
Also wanted over $100 for the black VW interior light (6Q0947291A82V) , and that is each...
RRP in UK in 27 pound each
Need to get it semi finished and in a liveable state as we are heading away on Xmas eve for a road trip.
So the bed will be going back in on Saturday, hopefully some interior lights, and power for the Waeco fridge.
My extra lights got lost, so Hafele are sending out some more, so ill have those tomorrow.
Insulated the roof panel and carpeted and did a test fit over the weekend, its good to go, just need the extra lights, so i can connect them all up before i install it.

Ignore the brass bolt heads in the lining, the black painted bolts will be used.
While i was waiting for the postie today, i started to run the cabin wires.
* 6 mm2 tinned for the Solar
* 1.84 mm2 for the Maxx Fan
* 1.84 mm2 for the LED Interior roof lights
* 1.13 mm2 for the LED Awning Light
* 1.13mm2 for the LED reading lights
* 25mm2 for the Earth
All the resistance levels should be under 0.10 from my calculations

I ran them all through nylon sheath to the entry in the cabin from the rear, from the roof onwards, then i ran them individually through flexible conduit and secured with zippy ties and tape.


I need to get some more black electrical tape, as i ran out and had to use red to finish the job.
Ordered the new VW interior light connections from my dealer at $6 bucks each, tried to tell me that the pins (N10335807) were around $20 each

I ordered some on eBay from China for $6 for a set of 10.
Also wanted over $100 for the black VW interior light (6Q0947291A82V)
 , and that is each...
RRP in UK in 27 pound each
Need to get it semi finished and in a liveable state as we are heading away on Xmas eve for a road trip.
So the bed will be going back in on Saturday, hopefully some interior lights, and power for the Waeco fridge.
Great work as ever, but talk about cutting it fineFinally got the Maxx Fan this arvo, looks like a nice bit of kit, tomorrow i cut the hole
My extra lights got lost, so Hafele are sending out some more, so ill have those tomorrow.
Insulated the roof panel and carpeted and did a test fit over the weekend, its good to go, just need the extra lights, so i can connect them all up before i install it.
View attachment 16343
Ignore the brass bolt heads in the lining, the black painted bolts will be used.
While i was waiting for the postie today, i started to run the cabin wires.
* 6 mm2 tinned for the Solar
* 1.84 mm2 for the Maxx Fan
* 1.84 mm2 for the LED Interior roof lights
* 1.13 mm2 for the LED Awning Light
* 1.13mm2 for the LED reading lights
* 25mm2 for the Earth
All the resistance levels should be under 0.10 from my calculations
I ran them all through nylon sheath to the entry in the cabin from the rear, from the roof onwards, then i ran them individually through flexible conduit and secured with zippy ties and tape.
View attachment 16344
View attachment 16345
I need to get some more black electrical tape, as i ran out and had to use red to finish the job.
Ordered the new VW interior light connections from my dealer at $6 bucks each, tried to tell me that the pins (N10335807) were around $20 each
I ordered some on eBay from China for $6 for a set of 10.
Also wanted over $100 for the black VW interior light (6Q0947291A82V), and that is each...
RRP in UK in 27 pound each
Need to get it semi finished and in a liveable state as we are heading away on Xmas eve for a road trip.
So the bed will be going back in on Saturday, hopefully some interior lights, and power for the Waeco fridge.
Thanks Andy,
It will be cutting it fine, thats the fun.
I attacked the Mid roof today, that FRP/Plastic roof is tough its 6mm thick if anyone needs this info.
No photos as i left my phone at home.
Gave up on the Jigsaw and attacked it with a bearing guide router bit, tough work and it was 33 degrees in the shed..
it was a lot hotter in the van as i was surrounded my plastic sheets to hold of the dust, the vac connected to the router didn't do a great job in stopping me and my wheelchair getting covered in router roof dust while i was routing above my head
I was going to make a spacer, but i decided to take 8mm of each side of the plastic trim with the plunge saw, as a flush fit would work after measuring up the space and measuring the mount height and rail heights.
Redrilled the side mounting holes, then my wife predrilled the Midroof for the mounting holes
Yup i left the hard part for my wife , i couldn't reach it to fix it into place, so she taped it up, prepped the mounting area with a heavy scotchbrite pad and then isopropyl and we were good to go.
I covered the mount with white Sikaflex 221 and mounted it from inside the van
Then my little very capable wife screwed it down through the hole and cleaned up the Sikaflex, then added a little more for coverage, over the mounting holes and then contoured it.
It'll be interesting to see if it lets in water, once it cures and when fan unit is installed on the mount this Friday, ill water test it
I'll look at a self levelling lapping sealant on top of the Sika if it does, but I'm keeping my fingers crossed.
Hopefully i'll get the roof lining panel up and wired up tomorrow as the remaining lights arrived late arvo
Then i should be able to fit my template rear cupboard, now i have a fixed ceiling height.
It will be cutting it fine, thats the fun.
I attacked the Mid roof today, that FRP/Plastic roof is tough
No photos as i left my phone at home.
Gave up on the Jigsaw and attacked it with a bearing guide router bit, tough work and it was 33 degrees in the shed..
it was a lot hotter in the van as i was surrounded my plastic sheets to hold of the dust, the vac connected to the router didn't do a great job in stopping me and my wheelchair getting covered in router roof dust while i was routing above my head

I was going to make a spacer, but i decided to take 8mm of each side of the plastic trim with the plunge saw, as a flush fit would work after measuring up the space and measuring the mount height and rail heights.
Redrilled the side mounting holes, then my wife predrilled the Midroof for the mounting holes
Yup i left the hard part for my wife
I covered the mount with white Sikaflex 221 and mounted it from inside the van
Then my little very capable wife screwed it down through the hole and cleaned up the Sikaflex, then added a little more for coverage, over the mounting holes and then contoured it.
It'll be interesting to see if it lets in water, once it cures and when fan unit is installed on the mount this Friday, ill water test it
I'll look at a self levelling lapping sealant on top of the Sika if it does, but I'm keeping my fingers crossed.
Hopefully i'll get the roof lining panel up and wired up tomorrow as the remaining lights arrived late arvo
Then i should be able to fit my template rear cupboard, now i have a fixed ceiling height.
Thanks Andy,
It will be cutting it fine, thats the fun.
I attacked the Mid roof today, that FRP/Plastic roof is toughits 6mm thick if anyone needs this info.
No photos as i left my phone at home.
Gave up on the Jigsaw and attacked it with a bearing guide router bit, tough work and it was 33 degrees in the shed..
it was a lot hotter in the van as i was surrounded my plastic sheets to hold of the dust, the vac connected to the router didn't do a great job in stopping me and my wheelchair getting covered in router roof dust while i was routing above my head
I was going to make a spacer, but i decided to take 8mm of each side of the plastic trim with the plunge saw, as a flush fit would work after measuring up the space and measuring the mount height and rail heights.
Redrilled the side mounting holes, then my wife predrilled the Midroof for the mounting holes
Yup i left the hard part for my wife, i couldn't reach it to fix it into place, so she taped it up, prepped the mounting area with a heavy scotchbrite pad and then isopropyl and we were good to go.
I covered the mount with white Sikaflex 221 and mounted it from inside the van
Then my little very capable wife screwed it down through the hole and cleaned up the Sikaflex, then added a little more for coverage, over the mounting holes and then contoured it.
It'll be interesting to see if it lets in water, once it cures and when fan unit is installed on the mount this Friday, ill water test it
I'll look at a self levelling lapping sealant on top of the Sika if it does, but I'm keeping my fingers crossed.
Hopefully i'll get the roof lining panel up and wired up tomorrow as the remaining lights arrived late arvo
Then i should be able to fit my template rear cupboard, now i have a fixed ceiling height.
You’re a very lucky man, like me who has a wife who just gets stuck in alongside you in what you do
Sounds like some pretty extreme bondage you Aussies are in to!!!Yup i left the hard part for my wife, i couldn't reach it to fix it into place, so she taped it up, prepped the mounting area with a heavy scotchbrite pad and then isopropyl and we were good to go.

Thanks guys,
Im lucky my wife doesn't mind doing some hard yards, although she hates Sikaflex just as much as i hate it.
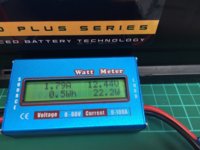
I cracked on this morning and wired up the LED lights, and let them run for 5 hours to see how much heat is produced with these lights.
Not as cool as i'd like, but a lot better than halogens, i also planned the roof lining and batten placement to vent into the rear and into the cubby above the headlining
Around the heatsink area, i removed 10mm around the hole when i installed the closed cell insulation, as i'd rather have a bit of distance than foam up against the heatsink.
The lights pulled a total of 1.79-1.84 amps or 22.2watts during use, i can live with that so ill leave them on one circuit.
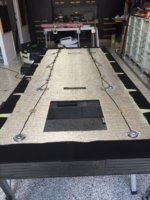
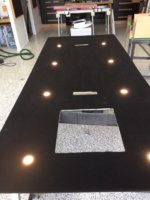
I'd like to throw it back in tomorrow, but I'm just waiting on VW parts for the interior light wiring extension.
My wife gave me a hand this arvo to fix the Maxx fan into place, as technically the sikaflex had cured
Quick water test and it appears at this point in time is not leaking
I measured the draw on the fan and it is as follows
Fan Speed Amps
30% 0.13
40% 0.49
50% 0.62
60% 0.80
70% 1.16
80% 1.55
90% 1.79
It looks like it'll do the job, it blew a fair bit of air into the van, above 50% it starts to get loud.
here is a pic with it down, i've got a Heki wind deflector, that i might install infront of the Maxx Fan for highway driving.
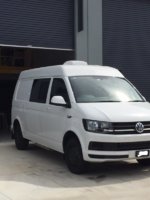
I installed the cabin curtains, while my wife installed the Fiamma rain guard, i will have to look at running some sealant along the rain guard, as the Fiamma fibreglass mounts hinder the seal and water fall right onto the side entry and into the van , nothing a bit of sealant can't fix
Thats all for today, my Aluminium turned up, so ill look at seeing if i have time tomorrow to start on the aluminium low roof mount for the semi flex panel i have.
Im lucky my wife doesn't mind doing some hard yards, although she hates Sikaflex just as much as i hate it.
I cracked on this morning and wired up the LED lights, and let them run for 5 hours to see how much heat is produced with these lights.
Not as cool as i'd like, but a lot better than halogens, i also planned the roof lining and batten placement to vent into the rear and into the cubby above the headlining
Around the heatsink area, i removed 10mm around the hole when i installed the closed cell insulation, as i'd rather have a bit of distance than foam up against the heatsink.
The lights pulled a total of 1.79-1.84 amps or 22.2watts during use, i can live with that so ill leave them on one circuit.


I'd like to throw it back in tomorrow, but I'm just waiting on VW parts for the interior light wiring extension.
My wife gave me a hand this arvo to fix the Maxx fan into place, as technically the sikaflex had cured
Quick water test and it appears at this point in time is not leaking

I measured the draw on the fan and it is as follows
Fan Speed Amps
30% 0.13
40% 0.49
50% 0.62
60% 0.80
70% 1.16
80% 1.55
90% 1.79
It looks like it'll do the job, it blew a fair bit of air into the van, above 50% it starts to get loud.
here is a pic with it down, i've got a Heki wind deflector, that i might install infront of the Maxx Fan for highway driving.

I installed the cabin curtains, while my wife installed the Fiamma rain guard, i will have to look at running some sealant along the rain guard, as the Fiamma fibreglass mounts hinder the seal and water fall right onto the side entry and into the van
Thats all for today, my Aluminium turned up, so ill look at seeing if i have time tomorrow to start on the aluminium low roof mount for the semi flex panel i have.
Started on my solar panel mount for my semi rigid panel this morning while waiting for VW interior light parts.
Its all 1.6mm thick, as its just support and also to allow an air gap above the panel and i needed to keep the weight down.
The 50mm x 25mm beams will be attached to the raised ribs on the van roof with Sikaflex 252
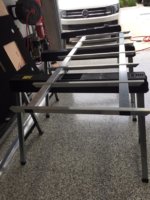
This as far as got on the mount as the parts i ordered arrived at the dealership.
I extended the interior light wiring loom, wired up the Maxx fan and refitted the roof lining.
The VW grey interior lights looks ok with the black roof, it adds a light contrast and it ties in with the grey curtains.
I'll take some pics tomorrow
Its all 1.6mm thick, as its just support and also to allow an air gap above the panel and i needed to keep the weight down.
The 50mm x 25mm beams will be attached to the raised ribs on the van roof with Sikaflex 252

This as far as got on the mount as the parts i ordered arrived at the dealership.
I extended the interior light wiring loom, wired up the Maxx fan and refitted the roof lining.
The VW grey interior lights looks ok with the black roof, it adds a light contrast and it ties in with the grey curtains.
I'll take some pics tomorrow
I don’t usually go for high tops on T6 vans as I think that they can make the van look pretty bulbous but that one seems to blend in really well. 
Looking forward to seeing the new solar panel mounted, from the size of the rack and the placement of the vent, it looks like the panel will fit around the vent?
Keep up the good work Bryn
Looking forward to seeing the new solar panel mounted, from the size of the rack and the placement of the vent, it looks like the panel will fit around the vent?
Keep up the good work Bryn

The panel is 1730mm long x 690mm wide , it'll be close to the rear edge of the maxx fan and It'll be pretty close the rear of the roof
I brought this panel with the Heki in mind, but as the Maxx Fan is a little longer it'll be tight.
I've got around 1800mm length of roof space left behind the Maxx fan from memory.
I brought this panel with the Heki in mind, but as the Maxx Fan is a little longer it'll be tight.
I've got around 1800mm length of roof space left behind the Maxx fan from memory.
The solar panel will fit without the rear solar spoiler 
Although i've have to move the solar cable gland, up front as there is not enough room now at the rear, not a big issue.
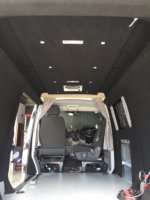
got stuff all done today, took a photo first up and then cut, trimmed and installed the fan cover.
I put the template cupboards back in so i can finish off the wardrobe scribing, then i called it a day, its too bloody hot and humid.
I hate MDF at the best of times, but when it is humid, its awful stuff as the dust sticks on you like shit on a blanket.

Well i didn't get away on xmas, we got a call on Xmas day that the old man had passed, RIP Dad
So we repacked our bags for air travel, found our passports and headed off for the funeral.
Now that i'm back, i've decided to just crack on and finish a few little things, as i'd rather finish fitting it out than go camping in 35 + degree heat.
Removed the ceiling, as i have to install the solar gland beside the Maxxfan and i also need to remove the cab roof lining to sound deaden and insulate.
Well what a pain, the plywood shelf was screwed and they used sealant instead of screws at the front, which was hard going, to release without breaking the support.
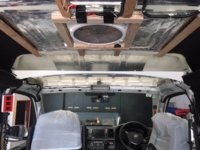
Gave it a clean down, prepped the surface with course scotch brite, cleaned and then lined the whole area with Resomat.
Half finished photo, it was 41 degrees inside the van, so i called it a day.
Finished the Resomat sound deadening and then installed a reflective 10mm close cell foam on top, then taped the joints with aluminium tape.
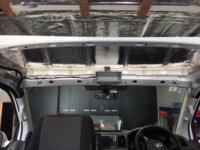
Tomorrow, ill look at the other areas i can insulate while the cab roof area is exposed.
hopefully, while i'm there tomorrow, i'll carpet the cab roof and support bar, then contact a 4mm closed cell insulation on the plywood and then carpet it.
So we repacked our bags for air travel, found our passports and headed off for the funeral.
Now that i'm back, i've decided to just crack on and finish a few little things, as i'd rather finish fitting it out than go camping in 35 + degree heat.
Removed the ceiling, as i have to install the solar gland beside the Maxxfan and i also need to remove the cab roof lining to sound deaden and insulate.
Well what a pain, the plywood shelf was screwed and they used sealant instead of screws at the front, which was hard going, to release without breaking the support.
Gave it a clean down, prepped the surface with course scotch brite, cleaned and then lined the whole area with Resomat.
Half finished photo, it was 41 degrees inside the van, so i called it a day.

Finished the Resomat sound deadening and then installed a reflective 10mm close cell foam on top, then taped the joints with aluminium tape.

Tomorrow, ill look at the other areas i can insulate while the cab roof area is exposed.
hopefully, while i'm there tomorrow, i'll carpet the cab roof and support bar, then contact a 4mm closed cell insulation on the plywood and then carpet it.
Well the cab roof is lined and reinstalled, took a pic yesterday, but its just all black... and hard to see anything, it looks good though.
I've been working on the aluminium solar panel mount, i ended up riveting it with a bit of sika 221 i had left over.
I added angle brackets to the arms to give them more strength and primed and expoy coated the visible areas in Matt Black.
I left the alum unpainted on the top and bottom of the mount as i'll get a better adhesion without paint.
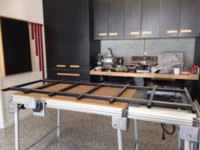
I then used 2.3mm thick VHB double sided tape to hold the panel in place, sorry i forgot to take pics of this stage.
The 2.3mm tape gave the panel clearance over the rivets, and the tape is flexible.
I then riveted the panel at the front and back, as well as into each overhanging support, at least i can just drill out the rivets and run fishing line down the panel to remove it, if i ever have issues.
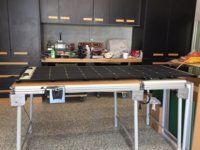
all up, its quite a low profile mount, and it should give a little air flow under the panel
I've been working on the aluminium solar panel mount, i ended up riveting it with a bit of sika 221 i had left over.
I added angle brackets to the arms to give them more strength and primed and expoy coated the visible areas in Matt Black.
I left the alum unpainted on the top and bottom of the mount as i'll get a better adhesion without paint.

I then used 2.3mm thick VHB double sided tape to hold the panel in place, sorry i forgot to take pics of this stage.
The 2.3mm tape gave the panel clearance over the rivets, and the tape is flexible.
I then riveted the panel at the front and back, as well as into each overhanging support, at least i can just drill out the rivets and run fishing line down the panel to remove it, if i ever have issues.

all up, its quite a low profile mount, and it should give a little air flow under the panel

Not much done this week, worked on the template cupboards, and looking at getting a custom made food grade water tank instead of getting another CAK tank.
From my calculations, i should be able to get around 70-80 litres in the wheel arch area... i might have to make up a plywood mock up to confirm.
These rocked up today.
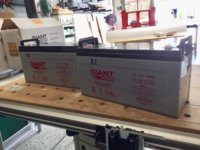
I wanted to go lithium for weight, but these new 140 ah AGM were only $250 each with a 5 year warranty (pro rata)... so i'll run these in parallel as they are from the same batch.
I'll have 140 ah at 50% DOD, and if they last even just 2 years i'll be happy, as i'm sure there will be better lithium battery with integrated BMS in the near future.
although the weight penalty is 73kg (140ah usable @ 50% DOD) vs a assembled 180ah CALB cell lithium battery pack 22.5 kg (144 ah @ 80%DOD)
That extra weight of 50.5 kg over the Lithium is a far bit, but the cost difference was over 4 times the price.
I just couldn't justify it at this point in time...
From my calculations, i should be able to get around 70-80 litres in the wheel arch area... i might have to make up a plywood mock up to confirm.
These rocked up today.

I wanted to go lithium for weight, but these new 140 ah AGM were only $250 each with a 5 year warranty (pro rata)... so i'll run these in parallel as they are from the same batch.
I'll have 140 ah at 50% DOD, and if they last even just 2 years i'll be happy, as i'm sure there will be better lithium battery with integrated BMS in the near future.
although the weight penalty is 73kg (140ah usable @ 50% DOD) vs a assembled 180ah CALB cell lithium battery pack 22.5 kg (144 ah @ 80%DOD)
That extra weight of 50.5 kg over the Lithium is a far bit, but the cost difference was over 4 times the price.
I just couldn't justify it at this point in time...
Similar threads
- Replies
- 3
- Views
- 3K
- Replies
- 40
- Views
- 7K
- Replies
- 13
- Views
- 2K

