Table ideas

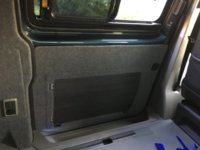
Well here we go. I think I'm happy with my 1st attempt so time to cover in carpet next.
Card made of 3.6mm external ply
A 4mm wide strip of ply applied around the table aperture to strengthen and provide additional width / space to enable the table to fit flush.
Finally, securing lips fitted top and bottom.
Just need a tidy up before carpeting.
May add a little storage at the top too..

View attachment 25912

View attachment 25913

View attachment 25914

View attachment 25915
Great job :thumbsup:
 
That
Well here we go. I think I'm happy with my 1st attempt so time to cover in carpet next.
Card made of 3.6mm external ply
A 4mm wide strip of ply applied around the table aperture to strengthen and provide additional width / space to enable the table to fit flush.
Finally, securing lips fitted top and bottom.
Just need a tidy up before carpeting.
May add a little storage at the top too..

View attachment 25912

View attachment 25913

View attachment 25914

View attachment 25915
That looks spot on.
 
Thanks guys, I'll take a few more pics once the carpet lining is complete.
 
Thanks guys, I'll take a few more pics once the carpet lining is complete.
It cost me 399 to have it done inc a new table and leg so you could start a nice little earner if it looks good.
 
'Kin 'ell, that's an expensive option!! I'm using my Evo supplied table but most existing tables should fit. I'll include some foam under the carpet to ensure there's no rattles!!
 
'Kin 'ell, that's an expensive option!! I'm using my Evo supplied table but most existing tables should fit. I'll include some foam under the carpet to ensure there's no rattles!!
It was but I hadn’t seen another like to work out how to do it so just decided to pay them. On hindsight i could have probably done it myself.
 
It was but I hadn’t seen another like to work out how to do it so just decided to pay them. On hindsight i could have probably done it myself.
Need to remake the front of my rear pod as the company that converted the van rushed at the end and made a bit of a pigs ear of it. I need to match the wood but also will need to cut it then edge band it to match the existing units. First pic is the good cupboards I want it to look like the rest are the pod. As you can see it is uneven at each side, hinges on show. And the grain on the door is opposite way to the sides. I want to remove both sides and the door and remake the hole front. Can anyone help with where to match up the timber and also how to edge band it. Thanks

249DE10A-886B-4C0F-B718-7B294EE01741.jpeg

B3A2D2F9-BFBC-43B7-8FEB-5DBDB06E9E3D.jpeg

5AD663CD-0679-4CFE-9694-2F7649D71394.jpeg

A7B43211-D076-4CE7-8424-62FE34982438.jpeg
 
Fuzzy felt applied to the door card but run out of spray adhesive to complete it all!!

IMG_2138.JPG
 
We had a reimo table that fixed on to an internal arm but we swapped it out for the loc8 one. Having a freestanding table is much more flexible, you can happily use it inside and out and you don’t need to store the arm.
 
That’s great. I’m just wanting some guidance on the best way to screw the bracket into the B pillar.
This video makes it look very easy and uses 18mm self drilling screws. Just wanting reassurance or info on how other people have done it?
Thanks again
 
Back
Top