You are using an out of date browser. It may not display this or other websites correctly.
You should upgrade or use an alternative browser.
You should upgrade or use an alternative browser.
Traction Control - ESC/ASR & HDA switch retrofit
- Thread starter Chickybumps
- Start date
Thanks - the listing helps a bit. Actually I meant more "technical" buildsheet which describes very detailed van's configuration - e.g. transmission type (yes, there are quite a few different DSGs on T6 & T6.1). Also, I believe your van is equipped with Cross wind assist... the buildsheet would tell that.Here’s the equipment list. I have the brake module coding on the earlier post, I will try to get the full coding for all models out of my ODB11 (it will give me 1 module at a time, but hangs when trying to share full backup).
This is the coding for module 03 Brakes
31 55 67 52 48 48 EE 85 8C 57 E6 AC 12 69 77 26 39 23 24 B8
My Volkswagen vehicle details
Selected vehicle equipment
Fuel tank with a volume of 80 l
Information kit in English
Gross vehicle weight rating: 3 200 kg
Suspension system and shock absorption for vehicles with a gross vehicle weight rating of 3.2 t
Trailer hitch preparation (incl. trailer stabilization)
Labels for country group 13
Hub caps for alloy wheels
Lockable wheel bolts
Tool kit and jack, heavy-duty, for vehicles with 3.2 t gross vehicle weight rating
Mechanical rear differential lock
Leather-wrapped multi-function steering wheel (3-spoke)
Bumpers in body color for standard paint finishes or as per color description for special paint finishes
Additional sound deadening measures in cab
Without partition
Tailgate with window aperture
Special interior noise suppression measures
4 alloy wheels "Devonport" 7J x 17, Silver, for vehicles with 3.2 t GVWR
Seat heater for seats in cab, left and right, separately controllable
Tailgate closing with unlatching from the inside
Laminated-glass windshield made of heat-reflecting glass, heated
Power-operated child safety lock
Rear window with heat-insulating glass, heated, rear window wiper and washer system
Central locking system with radio remote control, system controls inside and SAFELOCK
Auto-dimming breakaway interior rearview mirror
Glove compartment with illumination
Folding grab handle on the roof frame on the front passenger side and storage compartments on cab seats, reading light
Sliding door on the left in load/passenger compartment with power latching
Sun visors with mirror and airbag label on front passenger sun visor
Lashing rings for load restraint system
Body-colored exterior mirror housings and door handles (ext. mirror housings in Deep Black for Edition models)
Front Assist, w/ Autonomous Emergency Braking (for Adaptive Cruise Control ACC)
Radiator grille with 2 chrome trims
Grab handles on A-pillar for access, on driver and front passenger side
Exterior mirrors, power-adjustable, heated and power-folding, folding possible via vehicle key
Anti-theft alarm system with interior monitoring in cab, backup horn and towing protection
Park Distance Control in front and rear
Sep. daytime running light w/ automatic headlight control, Leaving Home feature and manual Coming Home feature
Windshield wiper intermittent control with rain sensor for windshield wipers
Adaptive Cruise Control ACC with speed limiter
Heated washer nozzles in front and washer fluid level indicator
Front fog lamps with cornering light
Type approval country GB/Northern Ireland
Part set, complying with vehicle type for Great Britain, various parts
Preparation for online services
2 12-V outlets in dashboard
All-season tires 215/60 R17 C 109/107T 104H, super-low rolling resistance
Rear view camera system (static lines)
Air conditioning system with manual control in cab
Seat trim covers in fabric "Bricks"
Lights & Vision
Adapt. Cruise Control ACC up to 210km/h and Forward Collision Warning Front Assist w/ Autonomous Emergency Braking
3 200 kg gross vehicle weight rating with 17-inch alloy wheels "Devonport"
Exterior package
Without partition
1 waste bin in door storage compartment of the cab
Digital radio reception (DAB+)
Preparation for We Connect and We Connect Plus
Highline T32
Great Britain
Towing capacity of at least 2 350 kg
Anti-theft alarm system with interior monitoring in cab, backup horn and towing protection
Comfort package
Tailgate with heated window
See the thread below - one of the VIP member benefits
03 01 00 34 4F 05 6A 04 00 00 00 58 00 0F 00 01 00 01 07 00 00 00 00 00 00 00 00 00 00 00
This is for 19 Gateway
This is for 19 Gateway
I’ve pulled out the rest now, module by module
01 Engine
00 19 00 34 03 46 05 08 00 00 00 00 00 00 00 00 00 00 00 00 00 00 00 00
17 Dashboard
27 A4 09 02 24 A0 26 00 01 88 2A 01 04 01 00 00 00 00 00 00
19 Gateway
03 01 00 34 4F 05 6A 04 00 00 00 58 00 0F 00 01 00 01 07 00 00 00 00 00 00 00 00 00 00 00
75 Telematics
06 46 20 00 19 68 18 20 80 05 46 01 60 00 06 07
03 Brakes
31 55 67 52 48 48 EE 85 8C 57 E6 AC 12 69 77 26 39 23 24 B8
08 Air conditioning
A0 31 10 00 08 10 03 00 01 00 08 40 50 40 01 05 00 00 00 00 00 01 10 00 80 00 00 00 00 00
09 Central Electrics
Codes not extracted, not sure why
13 Adaptive Cruise Control
28 00 60 0A 00 FF 87 48 94 9C 81 55 60 50 87 00 00 00 00 00 00 00 00 00 04
15 Airbag
88 00 C0 00 00 00 00 00 7C 00 01 CF 00 8C 40 03 00 65
22 All Wheel Drive
01 05
44 Steering Assistance
01 06
5F Multimedia
06 64 01 00 BE 00 00 00 41 11 01 01 00 80 00 00 1F 00 00 D6 00 00 01 00 00
69 Trailer Control
01 00 00 02 02 00 13 00
76 Parking Assistant
84 51 15 18 01
If you are reading this, you have probably read the posts above, but there is no simple all-in-one guide for a numpty like myself to follow. Which is probably why I have had the parts for over a year, but have only just got around to fitting them. So after careful reading of all posts (for the umpteenth time) it was time to lift the bonnet.
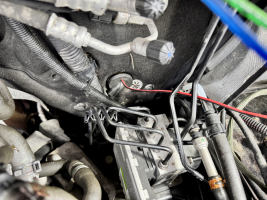
Unfortunately in my case, there is a lot of gubbins in the battery compartment from the LPG ECU to the towbar electrics module so even getting the battery out was challenging. This task will likely be different for most people depending on what they have connected to their starter battery. On the plus side, it seems as if there is a bit more room around the ABS unit on a petrol TSI.
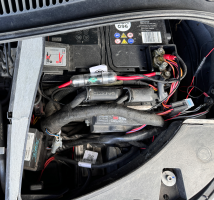

So, after the battery was removed, and space cleared for access to the ABS unit, the next step was to remove the electrical connector. I could see that there is a light grey lever that lifts up to release the plug, but that appeared to be held in my a red latch. It looked as if that latch should lift up to free the lever, but I couldn’t get it to do that. Maybe someone can advise the correct way to do this for others, as I think I eventually broke or bent something. Not a good start.


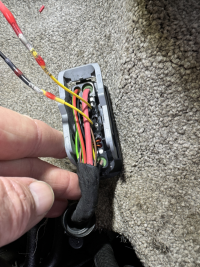
Anyway, I now had the plug free with some space to work, so the next part is to take the cover off the plug to reveal the pin entries. There was no obvious way to take the cover off, but someone had posted that there are some clips down the sides. By rotating the grey latch lever approx 90 degrees, two clips are revealed and the cover at that end can be pulled apart over the clips and wriggled off. The cable is also held onto the cover by a tie-wrap that needs to be snipped off first.

With the cover off, the individual wires are exposed and the unused locations in the plug which are filled with white plugs that can be prised out with a pick, so I removed the plugs from pin locations 4 (for the TCS) and 8 (for the HDA). Then I went and read through the thread again to reassure myself that these were the correct locations!
Unfortunately in my case, there is a lot of gubbins in the battery compartment from the LPG ECU to the towbar electrics module so even getting the battery out was challenging. This task will likely be different for most people depending on what they have connected to their starter battery. On the plus side, it seems as if there is a bit more room around the ABS unit on a petrol TSI.


So, after the battery was removed, and space cleared for access to the ABS unit, the next step was to remove the electrical connector. I could see that there is a light grey lever that lifts up to release the plug, but that appeared to be held in my a red latch. It looked as if that latch should lift up to free the lever, but I couldn’t get it to do that. Maybe someone can advise the correct way to do this for others, as I think I eventually broke or bent something. Not a good start.


Anyway, I now had the plug free with some space to work, so the next part is to take the cover off the plug to reveal the pin entries. There was no obvious way to take the cover off, but someone had posted that there are some clips down the sides. By rotating the grey latch lever approx 90 degrees, two clips are revealed and the cover at that end can be pulled apart over the clips and wriggled off. The cable is also held onto the cover by a tie-wrap that needs to be snipped off first.

With the cover off, the individual wires are exposed and the unused locations in the plug which are filled with white plugs that can be prised out with a pick, so I removed the plugs from pin locations 4 (for the TCS) and 8 (for the HDA). Then I went and read through the thread again to reassure myself that these were the correct locations!


Satisfied that pins 4 and 8 are correct, I then grabbed the repair wires (part number 000979025E for the ABS plug). Pushing the connectors in was not possible without using an insert tool (a watchmakers screwdriver would do) to push them in.

These yellow wires were trimmed to length and I used in-line heat shrink solder connections to join these to the black/red wire I had available to run into the van (the bit of carpet was there to protect the other wires from the heat gun).
Because the repair wires I had did not have the waterproof plugs, I eased some silicone sealant in around the wire.
Now to feed a wire through the bulkhead. Others have said that they have used the a/c drain, which is a large rubber grommet through the bulkhead behind the ABS unit. After removing the glove box (two rows of torx screws a long the bottom and top behind the door and the side panel with the airbag switch in) and the lower panel that is just clipped in along the front edge, I could see the rubber pipe leading to the drain. This detached quite easily and pushed through the bulkhead so I could easily work a small hole in the surround by hand with a sharp drill bit. I kept this as small as possible to try to minimise any path for water.

I then pushed the wire through and refit the drain.
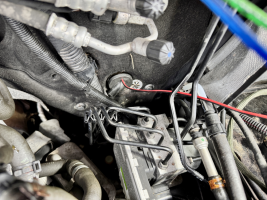
Then it was a matter of refitting the plug to the ABS module and tidying up the wiring with a few tie-wraps.
Last edited:
Once the battery and all the other gubbins attached to it was refitted, that was the engine bay work completed. Time to pull the dash apart.

I wasn’t sure how much needed to be removed in order to get the relevant trim panel out, and it turns out that the infotainment surround was the only thing.
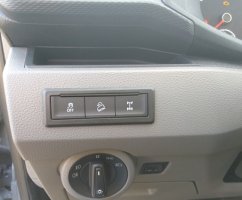
With that removed carefully using trim removal tools, I was able to prise the panel containing the button blanks off, and the blanks came out easily - apart from the one that has my LPG interface inserted in it. Unfortunately that doesn’t appear to have a plug and is rather a tight cable.
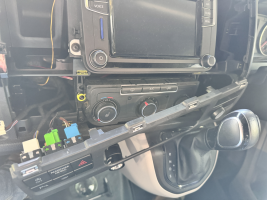

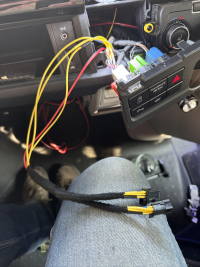
Once I could see behind the buttons, I could get an idea of how I wanted to arrange the wiring and, as mentioned in an earlier post, I thought to take the generic wires from the start/stop cable. The signal to the ABS module goes out on pin 5 (for both buttons) while the 12v feed to the button comes in on pin 4 and the illumination signal goes through pins 3 and 6. All these signals are replicated on the start/stop button and although I intended to double check with a meter, in the end I forgot and just ploughed ahead tapping into the wires to that plug. But first I made some short cable looms to merge the generic wires for the two new buttons and take them across to the start/stop button.
I then took these looms to the van so I could connect the two wires from the ABS module and pin them into location 4 on the button plugs. Once I wrapped soon loom fabric to tidy up, I fed the two new plugs through to the correct side and after inserting the buttons in place of the blanks I could refit the trim.
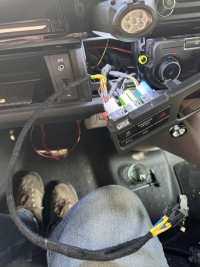

Then it was just a case of digging out the old laptop I use for VCDS, waiting for the inevitable updates (its been about a year since I used VCDS), and changing the appropriate codes as detailed earlier in this thread.
A quick check that it all seems to work (at least the indications) and all seems OK. I did have a moment of concern that the TCS button wasn’t working, but read the handbook and realised that the engine needs to be running.
I then took these looms to the van so I could connect the two wires from the ABS module and pin them into location 4 on the button plugs. Once I wrapped soon loom fabric to tidy up, I fed the two new plugs through to the correct side and after inserting the buttons in place of the blanks I could refit the trim.


Then it was just a case of digging out the old laptop I use for VCDS, waiting for the inevitable updates (its been about a year since I used VCDS), and changing the appropriate codes as detailed earlier in this thread.
A quick check that it all seems to work (at least the indications) and all seems OK. I did have a moment of concern that the TCS button wasn’t working, but read the handbook and realised that the engine needs to be running.
@mmi I have the build sheet now, to help track down how to code a T6.1 for HDC.Thanks - the listing helps a bit. Actually I meant more "technical" buildsheet which describes very detailed van's configuration - e.g. transmission type (yes, there are quite a few different DSGs on T6 & T6.1). Also, I believe your van is equipped with Cross wind assist... the buildsheet would tell that.
(Redacted the VIN)
Attachments
Ok, so here we go again. I know now that for HDA I need to hit pin 9 on the ABS for my T6.1, not pin 8. Which makes me question if the coding is the same or different to the T6. Any suggestions?
T6.1 4Motion with diff lock, traction control, and trailer prep.
This is the coding for module 03 Brakes
31 55 67 52 48 48 EE 85 8C 57 E6 AC 12 69 77 26 39 23 24 B8
Whilst the codes I have in bytes 6 and 14 don’t match earlier discussions, I do have Byte 6 Bit 1 and Byte 14 Bit 6 both = 1.
The both changes above need to be made before actually saving the coding. The ABS coding has checksums and is coded to the vehicle VIN, thus all the changes need to be done in one go.
Over to you 

Last edited:
That's a good question! Would be nice to know which coding byte/bit it relates.Fantastic! Thanks for this @mmi and @Bundy88 . I will get the spanners out in some daylight and give it a try.
Do I need to do anything on channel 19 with this button?
Should scan with OBDeleven a vehicle with a HDC .
Anyways, I would try one step at a time - first the ABS coding, then check for the faults. Possible faults would probably give some ideas.
Or possibly the other way round - try that change - to see what faults surface (missing message from ABS perhaps?).
Then it would be nice to have the Gateway coding - to see where the change is. I could then run that change againt VCDS scans to see any correlation.
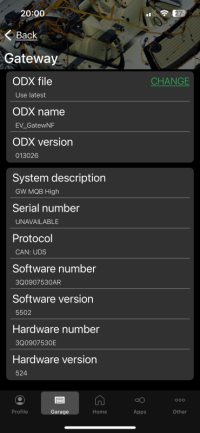
What's the software number & software version of the gateway? Something like 3Q0 907 530 AR & 5502Do I need to do anything on channel 19 with this button?
It's under Gateway - Info.
Toggling on Hdc in Gateway changed long coding in Gateway, no change on brakes.Over to you
Before
03 01 00 34 4F 05 6A 04 00 00 00 58 00 0F 00 01 00 01 07 00 00 00 00 00 00 00 00 00 00 00
After
03 01 00 34 4F 05 6A 04 00 00 20 58 00 0F 00 01 00 01 07 00 00 00 00 00 00 00 00 00 00 00
Making the change in the brakes module gave Brake Servo Failure on dashboard, and fault C10A301 Vacuum Sensor Electrical error, so I set those back and cleared the fault.
Thanks for experimenting. Indeed, in byte 10 bit 5 did change to "1". However, the T6.1 having Hill Descent Assist has "0" there - so must assume it's probably not related.Toggling on Hdc in Gateway changed long coding in Gateway,
My guess is that "FPA_Funktion_HDC" possibly relates to functions which can be switched on/off via Infotainment screens.
FPA Fahrprofilauswahl = Driving profile selection.
Function description - Gateway module | OBDeleven
Hi, I'd like to understand the real functionality of the following parameters : VO]_AGW_Function [LO]_Sollverbau_Generator: [VN]_installed [LO]_Sollverbau_BDM: [VN]_installed [LO]_S
Making the change in the brakes module gave Brake Servo Failure on dashboard, and fault C10A301 Vacuum Sensor Electrical error, so I set those back and cleared the fault.
Did the failure/fault appear immediately after changing the coding? It's not unusual to see strange effects when coding is changed "in flight".
Did you cycle the ignition after coding change - clear the code - cycle the ignition again - does the fault come back?
Obviously you didn't read the coding after the changes - just to double-check ?
Some similarities here -
ABS Fault / Vacuum Sensor
Hi All Thank you for letting me join, I'm no mechanic so please be gentle as this is my first post, I had to do an emergency stop the other week and my ABS did not kick in and my wheels locked and skidded. I purchased an HEX-V2 and scanned the car, Audi A1 2015, 1.6 TDI , The autoscan...
YesDid the failure/fault appear immediately after changing the coding? It's not unusual to see strange effects when coding is changed "in flight".
Yes, unfortunately it did.Did you cycle the ignition after coding change - clear the code - cycle the ignition again - does the fault come back?
I didn’t get a scan of the brake full coding after the changes. I used the byte selector to make sure I picked the correct byte, and the bits are numbered, so I’m pretty sure I put in the values suggested.
I’ll reset the Gateway back to original tomorrow.
But ODB11 has it in the history. This shows me setting the value and returning it original.I didn’t get a scan of the brake full coding after the changes.
OBDeleven vehicle history log
Date: 2024-10-23 20:09:16
VIN: WV1ZZZ7HZPH
Car: CandyVan
Year:
Body type: UNKNOWN
Engine: DNAA kW ( hp) l
Mileage: 22964 km
---------------------------------------------------------------
03 Brakes
System description: ESC_base
Software number: 7LB614517B
Software version: 0800
Hardware number: 7LB614517
Hardware version: H01
Faults:
No trouble codes found
---------------------------------------------------------------
03 Brakes
System description: ESC_base
Software number: 7LB614517B
Software version: 0800
Hardware number: 7LB614517
Hardware version: H01
Faults:
C10A301 - Vacuum sensor
Electrical error
Intermittent
Priority - 3
Malfunction frequency counter - 1
Unlearning counter - 86
km-Mileage - 22964 km
Unknown ambient data - 0004000200A6000000FD0000
date - 2024-10-23 18:35:47
---------------------------------------------------------------
Long coding
Control unit: 03 Brakes
Old value:
315567524A48EE858C57E6AC52697726392324B8
New value:
315567524848EE858C57E6AC12697726392324B8
Mileage: 22964 km
Date: 2024-10-23 18:36:50
---------------------------------------------------------------
03 Brakes
System description: ESC_base
Software number: 7LB614517B
Software version: 0800
Hardware number: 7LB614517
Hardware version: H01
Faults:
C10A301 - Vacuum sensor
Electrical error
static
Priority - 3
Malfunction frequency counter - 1
Unlearning counter - 46
km-Mileage - 22964 km
Unknown ambient data - 0004000200A6000000FD0000
date - 2024-10-23 18:35:47
---------------------------------------------------------------
03 Brakes
System description: ESC_base
Software number: 7LB614517B
Software version: 0800
Hardware number: 7LB614517
Hardware version: H01
Faults:
C10A301 - Vacuum sensor
Electrical error
static
Priority - 3
Malfunction frequency counter - 1
Unlearning counter - 46
km-Mileage - 22964 km
Unknown ambient data - 0000000200AA000000FD0000
date - 2024-10-23 18:32:08
---------------------------------------------------------------
Long coding
Control unit: 03 Brakes
Old value:
315567524848EE858C57E6AC12697726392324B8
New value:
315567524A48EE858C57E6AC52697726392324B8
Mileage: 22964 km
Date: 2024-10-23 18:32:29
---------------------------------------------------------------
Long coding
Control unit: 19 Gateway
Values:
FPA_Funktion_HDC:
Old value: not active
New value: active
Mileage: 22964 km
Date: 2024-10-23 18:20:41
---------------------------------------------------------------
Also the ABS coding has checksums so a typo most likely would have caused the coding itself to fail.I used the byte selector to make sure I picked the correct byte, and the bits are numbered, so I’m pretty sure I put in the values suggested.
Excellent! Yes, the coding changes were correct.But ODB11 has it in the history. This shows me setting the value and returning it original.
So back to drawing board then....
Just got another confirmed scan of a T6.1 with Hill descent control... which has a coding which conflicts with the theory above.
At the moment it seems that the common denominator with three confirmed HDC scans - AND is different to yours (and almost all other scans)
ABS
byte 18 bit 0 ==> "1"
byte 18 bit 1 ==> "1"
Similar threads
- Replies
- 11
- Views
- 4K
- Replies
- 2
- Views
- 154
- Replies
- 6
- Views
- 834
- Replies
- 12
- Views
- 2K
- Replies
- 7
- Views
- 975


