You are using an out of date browser. It may not display this or other websites correctly.
You should upgrade or use an alternative browser.
You should upgrade or use an alternative browser.
CandyVan conversion journey
- Thread starter drinfinity
- Start date
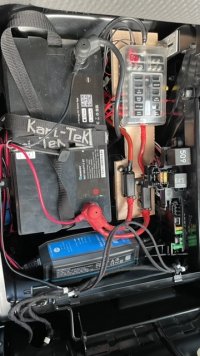
Very excited to hook up the solar. Lights came on the charger, so I’ve got the polarity right there, and managed not to drill into any cables. Connected up to the leisure battery and added some fuses, and it is starting to come to life. Had to swap the LED plugs round - turns out the +ve on these units is the black lead! Here follows a video which is very exciting to me at least.
Let there be light
Let there be light

Yes, I’ve got the ABS trim for D pillar and wheel arch cover, as I’ll have mucky MTBs and riders in there. The D pillar trim fits well under the tailgate seal, and is held on with double sided tape on the front edge. The top edge traps the carpet down neatly. I will need to put a fastener in the top right hand corner, as it won’t stick down over the carpet at the top 10mm (onto metal of D pillar below). If you go for the full height trims that wouldn’t be a problem, but then you have plastic instead of carpet in the sleeping space.
The wheel arch trim had a cutout for the jack mount, but I had to trim that a bit more to fit.

The wheel arch trim had a cutout for the jack mount, but I had to trim that a bit more to fit.

thank you, much appreciated.Yes, I’ve got the ABS trim for D pillar and wheel arch cover, as I’ll have mucky MTBs and riders in there. The D pillar trim fits well under the tailgate seal, and is held on with double sided tape on the front edge. The top edge traps the carpet down neatly. I will need to put a fastener in the top right hand corner, as it won’t stick down over the carpet at the top 10mm (onto metal of D pillar below). If you go for the full height trims that wouldn’t be a problem, but then you have plastic instead of carpet in the sleeping space.
The wheel arch trim had a cutout for the jack mount, but I had to trim that a bit more to fit.
View attachment 180125
i will be to fit these over carpet so thanks for suggesting it works!
I’ve only got carpet under the top edge, so if you have carpet all the way down, then they will need a few fasteners on the edge at the front.thank you, much appreciated.
i will be to fit these over carpet so thanks for suggesting it works!
ah following now cheers
I’ve only got carpet under the top edge, so if you have carpet all the way down, then they will need a few fasteners on the edge at the front
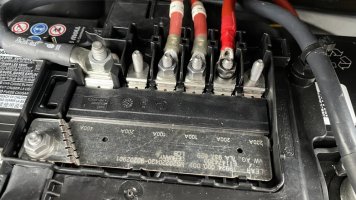
Hooked up the vehicle battery to DCDC charger feed, with the cable I had earlier run through the bulkhead under the glovebox.
The cover on the connectors on top of the battery has two clips at the back that squeeze in towards each other, then some little pins at the front which are more tricky to push in. Then just bolted to an existing connection on the fuse panel with M6 nut.
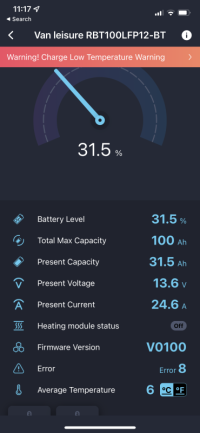
Now charging off the engine (reduced current as the battery is cold).


Never thought of putting the consumer unit under the bonnet?
Had a Reimo Variotech 1150 seat fitted, at Volksleisure It was a surprising choice, as it is the most expensive and has a very thick floor. However, they are available in LWB, fit easily to a 4motion, have 3 belted seats in the back (meaning ultimately we don’t need to replace the big car when its time comes), and is very well engineered.


Love the storage slot cut out…wishing I’d done something similar when I trimmed my van!Rear Fusebox in, with a circular access panel that doubles as a slam vent. There’s a pocket cut into the void space with a USB port for the passengers. Plastic wheel arch covers are intended to be easier to clean than carpet in this area.
View attachment 179421
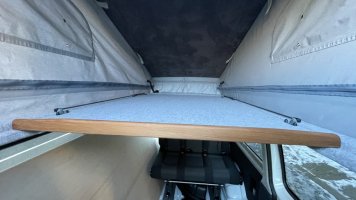
First part of bifold lifting bed built. The calculations got me to roughly the right place, but the final placement was by trials.
Bed now carpet trimmed, and a leading edge added. The front edge is Western Red Cedar, chosen because it is light, strong, looks good, and mainly because I had a big chunk of it left over from a kayak paddle. Rebated, shaped with a spokeshave, finished with Danish Oil. Loads of headroom when raised, and I think I will get both upstairs mattress and downstairs bed topper stored up there.



Next job was one of those that needed some tech, but turned out to be easier than I expected.
I’d already adjusted the wheel arch so the sliding bed would clear it, but the bed fitters reckoned there was no way the plastic arch cover was going back on.
I got a cheap heatgun, and raided the kitchen for a Teflon sheet and the pizza oven thermometer. I warmed the area to 100C, pressed a Teflon wrapped stick onto the plastic, and it set with a neat channel to clear the bed. Job jobbed!
Similar threads
- Replies
- 9
- Views
- 959
- Replies
- 26
- Views
- 3K
- Replies
- 51
- Views
- 4K


