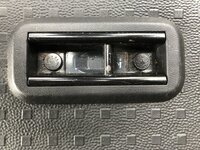
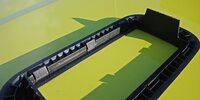
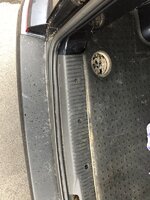
I found that they have a little plastic cover that is at the base of where the placement pin secures When shut has come loose.

got some cheeky tiger seal and seal it up with the window in place as to not push the pin out of position and all sorted for now (touch wood)
 
Both of my windows have been leaking! I am ready to fit my units and have decided to tackle the problem myself. So here is what I’ve worked out.
There is a seal on the sliding window, if you clean it and remove all the dust that has been washed in over time the window leaks less. But water will still pass. The second issue is there is a very small seal between the bottom rail that the window runs in. This seal is against the inside of the window surround, it has a very small taper collecting any water that passes the main window seal. Basically this seal allows water to run along until it reaches the drain point ( one at each side of the window opening). Now if this seal is dirty with dust etc water dosnt readily flow to the the drain points. You need a wire tie or similar to push down the drain points and prove water can run away. (Will up load a video to show you!).
So if you don’t keep the two seals clean like previously mentioned, there is a final Chanel. This is the one you can easily see and it is where the window pin slides up and down. You will have seen a very small hole at the front of this Chanel. This is where I could usually see water building up. Now this hole is where any water that passes the first to seals end up. This hole passes into a very small chamber under the window guide. This chamber directs the water out over the top of the door frame where the water can escape from under the glass. Be careful if trying to clean this hole out. Under the hole is the chamber, and the chamber is just a small piece of plastic sealed against the frame with a non drying kind of bedding sealant. I tried to clear mine out with compressed air and a bit of old fuse wire. The fuse wire managed to push through the sealant and make my leak worse! I now need to re seal this chamber. The other door however cleared fine with compressed air.

So now both windows don’t leak in!! Well that is to say the do leak, but they leak to the areas that vw wanted them too, and I now don’t have water running down the inside of my door cards. Hope this is of help guys. If you can understand my ramblings
Hi did you ever upload a video on this at all? I have a drippy side window which I am trying to sort
 
I've had a leak on my side window and its seeped under the rubber floor. Anyone had experience of removing the floor ie. what tools are required and is it a job you can do at home?
 
Had my kombi serviced this week and when I dropped it off I mentioned the drivers side leaking window, when I collected it later that day they said they've ordered the parts and will be replacing both sides under warranty. Had the same issues on my T5.1.
 
I've had a leak on my side window and its seeped under the rubber floor. Anyone had experience of removing the floor ie. what tools are required and is it a job you can do at home?
You'll need a star bit to take the tie down's out, then some allen keys and trim removal tools to take the rear door trim, seat mount trims and side door step covers off, the rubber floor will pull out fairly easily afterwards. just be careful removing it around the seat mounts.
 
I fixed my leaking side window by sticking a reinforcing piece in the front of the window, when I looked at the issue I could see the window shuts against a plastic form than helps it locate against the rubber, this is stuck to the door with double sided tape and any force applied it just flexes so is not pushing the glass against the seal, I put a piece of wood wedged against it held in place with some Velcro, now the window when closed pushes against the seal and doesn’t leak
 
I bought my kombi last year, the windows have never leaked.
But they've never opened either, after I got it home I tried to open them, no luck. Then I tried a bit of brute force, no, they're not opening.
I suspect somebody got fed up with leaking windows and probably got a tube of clear silicon out, (I can't see any evidence of this but I can't see any other explanation).
I'm not too bothered, I'd rather have them sealed closed than leaking.
I honestly thought buying a T6, it would be superior to the Ford Transits that a friend on mine uses. In so many ways, it's not.
 
I use a feeler gauge and spray window cleaner to clean the grooves and drain holes. If you wait until it’s blocked it’s a bit harder, best done on a regular basis.
Alternatively you can install some of these.
FEE6105A-9791-4D4E-B14A-48DFC2AC2C6B.jpeg
 
You'll need a star bit to take the tie down's out, then some allen keys and trim removal tools to take the rear door trim, seat mount trims and side door step covers off, the rubber floor will pull out fairly easily afterwards. just be careful removing it around the seat mounts.
Thanks for this - what are the trim removal tools you need for the seat mount trims. Presumably you don't remove the seat mounts themsleves, just the surrounding plastic trim? Do they clip out somehow?

Looks like the rear door trim are very small star sockets again - I tried an allen key but it wouldn't fit until I got my glasses out and realised it was a star shape!

IMG_1328.jpeg
 
Sorry, duff info re the rear door step cover, the bolts/screws down the holes are Torx, but the bolts that hold the tie downs to the floor are a star bit or 12 point star.
Torx.jpg star.pngs-l640.jpg
I'd suggest anyone with a modern car, VW/BMW etc buy a set of Torx screwdrivers and bits, and a set of Star bits along with a select addition for things like the ARB brackets.
I have this set of Torx drivers and This set of 3/8" bits, and a lifetime Spline Bit Set plus a couple of M14 bits for the ARB bolts
 
Last edited:
Sorry, duff info re the rear door step cover, the bolts/screws down the holes are Torx, but the bolts that hold the tie downs to the floor are a star bit or 12 point star.
View attachment 76416 View attachment 76417View attachment 76418
I'd suggest anyone with a modern car, VW/BMW etc buy a set of Torx screwdrivers and bits, and a set of Star bits along with a select addition for things like the ARB brackets.
I have this set of Torx drivers and This set of 3/8" bits, and a lifetime Spline Bit Set plus a couple of M14 bits for the ARB bolts
Thanks for this - really helpful. Whats the difference between the I have this set of Torx drivers and the This set of 3/8" bits - this look like they are both for Torx bolts - just ones scredrivers and the other for ratchet? Also what are the ARB bolts?
Many thanks
 
The 3/8” are for the really tight ones where you would not be able to crack them with the screwdrivers, break the seal with a socket set first then use the drivers for the rest of the work, final tighten with the socket set again if required.
The bolts that hold the Anti-Roll Bar brackets onto the van chassis are M14 spline, if you are not planning on suspension upgrades then these will not be required.
Thanks!
 
Hi Folks, here's another one of those posts about leaking sliding windows, except this one surely, has a unique twist? I have to share this, as I can't quite believe this has happened from a VW dealer...

I bought a 66 plate Shuttle from a VW Van Centre 150 miles away from my home (I won't name drop, for reasons that will become apparent) at the beginning of June. The dealers had just opened following Lockdown. Over the course of the next few days after getting it home, and following a wash I noticed the blinds were wet. To cut to the chase, the windows leaked. I had the van in with another local VW Van Centre for a couple of unrelated issues, so added the leaking windows to the list to investigate. They confirmed the problem and subsequently sent details to the selling VW Van Centre along with some costs to repair, rather than me taking it back another 150 miles. We're talking £2k for new windows and blinds - the blinds we're rusted up, and full of white marks.

The selling VW Van Centre wanted to rectify the problem themselves, as clearly it would be more cost-effective them doing it, than paying another dealer to fix the issue. I totally get that, so took the van back, and was loaned another vehicle whilst the repairs took place. They wanted the van for 7 days to do the fixes (a couple of other warranty things). This ended up being a few days more due to a wrong part being delivered. No biggy.

The day comes to collect the finished/repaired van - great! So 150 miles back to the dealer to be presented with a complete dog's dinner of a repair - lets bullet these out:
  • OEM sliding windows replaced with aftermarket ones - totally different profile and none standard fitment
  • Blinds didn't fully retract
  • OEM vehicle glass tinted green, aftermarket glass is clear
  • Internal trim missing from windows with gaping holes into the door card
After a 30 minute dance around potential solutions to the problem, initially with a 'we'll fix the blind', through to fully understanding my total disappointment with the experience, and agreeing to replace the windows with OEM glass and drop the vehicle back at my home with a tank of fuel.

The selling dealer has clearly looked to do this on the cheap, and it really hasn't worked! I can't imagine they would have thought it was acceptable, could they? really? I'd be interested to know if anyone else would be equally annoyed at this. It's not much to ask to have it returned in the same OEM state it was dropped off, surely? In retrospect, they'd have been better paying the local dealer to do the work - cutting corners has saved them nothing, and cost me time, money, and hassle

Here's a couple of pix to accompany the chatter.
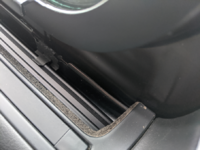
Screenshot 2020-07-07 at 21.27.58.png Screenshot 2020-07-07 at 21.27.43.png Screenshot 2020-07-07 at 21.40.07.png Screenshot 2020-07-07 at 21.27.08.png
 
Sorry more questions. I can see how the rear door sill trim is removed but how do you remove the side door sill trim?

IMG_1330.JPEG

IMG_1331.JPEG
 
If I remember correctly, it is held on with those white push fit fasteners so will pop out upwards, go round the edge with a trim tool and lever upwards.
 
Just been out to do some photos
View attachment 68929
Tool for the job.
View attachment 68930
Inserted in 1st drain hole, it takes a bit of time but it does eventually go through.

View attachment 68931

The end of the blade through the hole. I taped a bit of card in the gap to stop the blade marking the paint.

View attachment 68932

The 2nd hole is a bit more of a challenge, a video online took the opening half out, but I managed without doing that.


I finally got round to doing this and was full of hope but just washed the van and there is still water coming in, maybe I need to give it another go, glad I didn't take the whole window out to do it at least :thumbsup:

oh well, next!
 
Last edited:
I finally got round to doing this and was full of hope but just washed the van and there is still water coming in, maybe I need to give it another go, glad I didn't take the whole window out to do it at least :thumbsup:

oh well, next!
Those drains lead into a plastic 'reservoir' within the plastic trim below the window. The other drain hole (where the spring loaded pins sit when the window is closed) also drain water into the same small reservoir. The base of the reservoir is stuck on with some form of non-setting sealant and can be dislodged if anything is pushed down the hole, or the drain to the outside of the van can become blocked. Use something suitable to squirt a bit of water into the circular, inner drain hole and see where it comes out - should be outside the van. Pop the lower section of trim off and you'll see the reservoir. I'm going to seal the cover on with silicone sealant, although since I pushed them up tightly the window hasn't leaked. I also used a craft knife/stanley blade to widen the 'entrance' at the top of those slot shaped drains you've been working on. Next step for me is remove sliding sections, clean and treat rubber seals with Krytox and perhaps feed some streamer cable into the seals to plump them up a bit.
Another useful thread here
I still had a problem & found that water was getting in between the plastic slide & the glass. I cured it with a very fine bead of silicone sealant.
 
Back
Top