Is there a frame for the panel to fix onto the rails or did you make it, please.Solar panel is bolted to roof rail with tamper proof bolts
I've not noticed the curly cable bounce about,
Solar Camper Solutions - VW California (T5 & T6) Solar Panel Kit
You are using an out of date browser. It may not display this or other websites correctly.
You should upgrade or use an alternative browser.
You should upgrade or use an alternative browser.
Sorry, just opened the link....excellent, thank you very much.Is there a frame for the panel to fix onto the rails or did you make it, please.
The Panel/s are in, i got a 160W Renogy one and a 150W Photonic Universe one.
I've decided i like the PU one best, (will use the other on the shed)
12V solar panels charging kits for caravans, motorhomes, boats, yachts, marine
Solar panel specifications:
Simple, professional installation:
This particular model features the junction box and cable on the rear side of the panel to create a completely level surface and professional finish after installation. Unlike other solar panels, the junction box on this solar panel is a circular shape with only one dual core cable (3m length) attached, allowing for simpified installation. Please note: in order for this panel to be flush-mounted, a recess must be cut in to the roof/surface.
http://www.photonicuniverse.com/upl...r-Panels-Handling-And-Installation-Manual.pdf
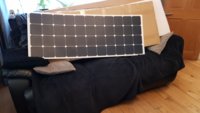


it comes like this with a 30mm rear cable gland.
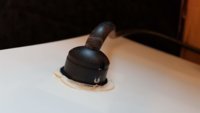
now offering it up to the van i was going to stick it down at the back and cut a hole in the roof at the rear in the middle and seal the gland in the hole. . . . . .
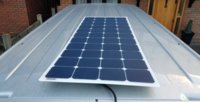

but now im thinking ill be able to fit two side by side as they are only just over 3 roof ribs wide . . . . . two would fit perfectly (150w+ 150W = 300W max)
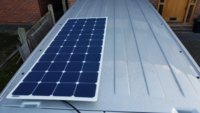
so the question now is, do i stick with one in the middle or get a second one and go side by side.
also.
if i have to drill the roof anyway, why not put them up-front so the cable entry's will be by the B pillars/roof line and can run straight down to the battery kit under the passenger bench. instead of running cable from the back to the front.
and whats the best method with the adhesive, just on the raised ribs leaving a gap? there is about 20mm over hange off each rib.
also was thinking about the suggestion of fitting clear vinyl wrap on the roof first to save the paintwork? incase they had to be removed or got ripped off.
.
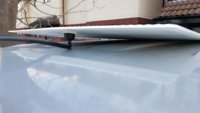
I've decided i like the PU one best, (will use the other on the shed)
12V solar panels charging kits for caravans, motorhomes, boats, yachts, marine
Solar panel specifications:
- Peak power: 150W
- Maximum power voltage: 25.5V
- Maximum power current: 5.88A
- Open circuit voltage: 30.1V
- Short circuit current: 6.35A
- Power allowance range: +/- 5%
- Solar panel dimensions: 1445 x 540 x 3 mm
- Junction box diameter: 30mm
- Weight: 3.15 kg
- 1 x 3m high quality dual core solar cable attached (4mm cross section)
Simple, professional installation:
This particular model features the junction box and cable on the rear side of the panel to create a completely level surface and professional finish after installation. Unlike other solar panels, the junction box on this solar panel is a circular shape with only one dual core cable (3m length) attached, allowing for simpified installation. Please note: in order for this panel to be flush-mounted, a recess must be cut in to the roof/surface.
http://www.photonicuniverse.com/upl...r-Panels-Handling-And-Installation-Manual.pdf


it comes like this with a 30mm rear cable gland.

now offering it up to the van i was going to stick it down at the back and cut a hole in the roof at the rear in the middle and seal the gland in the hole. . . . . .


but now im thinking ill be able to fit two side by side as they are only just over 3 roof ribs wide . . . . . two would fit perfectly (150w+ 150W = 300W max)

so the question now is, do i stick with one in the middle or get a second one and go side by side.
also.
if i have to drill the roof anyway, why not put them up-front so the cable entry's will be by the B pillars/roof line and can run straight down to the battery kit under the passenger bench. instead of running cable from the back to the front.
and whats the best method with the adhesive, just on the raised ribs leaving a gap? there is about 20mm over hange off each rib.
also was thinking about the suggestion of fitting clear vinyl wrap on the roof first to save the paintwork? incase they had to be removed or got ripped off.
.

Last edited:
Looks like this install pdf answers some of the questions about the gluing, the consequences look dire!
http://www.photonicuniverse.com/upl...r-Panels-Handling-And-Installation-Manual.pdf
points to note:
One of the most important things to bear in mind when gluing the solar panel using
adhesive is to ensure that there are no pockets of trapped air underneath the solar
panel,
Apply the adhesive to the underside of the solar panel in parallel beads but do
not seal the edges of the solar panel. This will make the solar panel breathable.
Apply thick 8-10mm adhesive beads on the rear of the solar panel, in parallel to each
other
If your solar panel width (and the length of each adhesive line) is greater than 600 mm,
break the adhesive lines in the middle of the solar panel with a gap of 30-40 mm to allow
for additional escape routes for air and rain water
The adhesive lines should be positioned at a distance of 40mm - 150mm between them.
To minimise the wind impact on the solar panel, position the adhesive lines across the
most likely wind direction and make sure that the first and the last line are as close to
the edge of the solar panel as possible
After bonding with adhesive, do not seal the edges of the solar panel. The solar panel
must be kept breathable underneath to allow any air to escape.
.
Last edited:
@Deaky & @DaveyB
looking at your awesome solar panel installs over here>
How've You Installed Your Solar Panel?
have you got any info on how you fixed the panels to the roof, any more pics? or a rough sketch?
did you fill in the ridges?
did you just use adhesive on the higher ridges?
did you seal the front leading edge?
what adhesive did you use?
did you do lines,beads,blobs,front/back,side/side?
any more info that might help?
@Dellmassive .
Exactly what @Deaky says. A certain conversion company near the Redditch area mounted mine whilst doing the Hilo. It is completed sealed all the way around the perimeter, including down into the ridges. Whether it is glued 100% beneath it, to be honest I doubt it because that would be hell of a lot of adhesive.
Exactly what @Deaky says. A certain conversion company near the Redditch area mounted mine whilst doing the Hilo. It is completed sealed all the way around the perimeter, including down into the ridges. Whether it is glued 100% beneath it, to be honest I doubt it because that would be hell of a lot of adhesive.
some interesting pics of installs panel over here > Volkswagen VW T4 or T5 Camping vans/bus install flexible solar panels guide. How many ways to install the flexible solar panels on the camper’s or caravan’s roof? | Lensun Solar Panel – Lensunsolar
Thats great @andys . . . .Mine is stuck only on the ridges and along the length of the outsides. My logic was to allow any trapped water a way out, and to allow a smidgen of airflow underneath to promote cooling. No prob so far inc a period in very hot direct sun abroad.
did you fit any packing in the low sections to fill the gap?
did you seal the front end to stop wind getting underneath when on the motorway?
do you remember what adhesive you used?
did you bond it direct onto the paintwork for put down any vinyl?
any chance you can post some close up pics for a better understanding of how you done it?
I'll go through my photos when I get back from work and try and piece together my memory.Thats great @andys . . . .
did you fit any packing in the low sections to fill the gap?
did you seal the front end to stop wind getting underneath when on the motorway?
do you remember what adhesive you used?
did you bond it direct onto the paintwork for put down any vinyl?
any chance you can post some close up pics for a better understanding of how you done it?
From my eBay history, this is what I used to stick it

Right, I have refreshed my memory using photos I took and reading my thread from when I installed it. First of all, I LIED, there are no ridges on my roof!Thats great @andys . . . .
did you fit any packing in the low sections to fill the gap?
did you seal the front end to stop wind getting underneath when on the motorway?
do you remember what adhesive you used?
did you bond it direct onto the paintwork for put down any vinyl?
any chance you can post some close up pics for a better understanding of how you done it?
It does have a recessed section, looking like a blank for a sunroof but probably a space for a (very small) solar panel, and I was concerned about water making its way in an pooling there.
You can see it in this 2017 pic
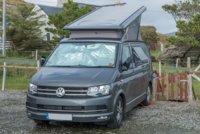
So to avoid this, and try and get some airflow to the underside of the panel, I ran the adhesive in 'stripes' about 75mm apart along the length of the panel and along the outsides of the longitudinal edges. I didn't seal across the front as, as you can see above, the roof is front hinged so needs to be able to drain from the front. The panel is bonded direct to the roof with no vinyl inbetween. I used 2 tubes of the above adhesive.
All the pictures of the install, and my documented ineptness, are in this thread Solar Panel Fitting To Front Hinged Roof
Awsome Thank You.Right, I have refreshed my memory using photos I took and reading my thread from when I installed it. First of all, I LIED, there are no ridges on my roof!
It does have a recessed section, looking like a blank for a sunroof but probably a space for a (very small) solar panel, and I was concerned about water making its way in an pooling there.
You can see it in this 2017 pic
View attachment 36188
So to avoid this, and try and get some airflow to the underside of the panel, I ran the adhesive in 'stripes' about 75mm apart along the length of the panel and along the outsides of the longitudinal edges. I didn't seal across the front as, as you can see above, the roof is front hinged so needs to be able to drain from the front. The panel is bonded direct to the roof with no vinyl inbetween. I used 2 tubes of the above adhesive.
All the pictures of the install, and my documented ineptness, are in this thread Solar Panel Fitting To Front Hinged Roof
I'll have a read through your link.
2nd 150w photonics solar panel is in, plus new Victron smartsolar 100/30 on its way.
thats a 3 seater BTW
these panels are rated:
VOC 30.1v
ISC 6.35amps
with the victron 100/30 or 75/15 they can be connected series or parallel (but need blocking diodes as they dont come with any, so couple on there way too)


thats a 3 seater BTW
these panels are rated:
VOC 30.1v
ISC 6.35amps
with the victron 100/30 or 75/15 they can be connected series or parallel (but need blocking diodes as they dont come with any, so couple on there way too)


Probably the first forum member to install solar to a sofa2nd 150w photonics solar panel is in, plus new Victron smartsolar 100/30 on its way.
thats a 3 seater BTW
these panels are rated:
VOC 30.1v
ISC 6.35amps
with the victron 100/30 or 75/15 they can be connected series or parallel (but need blocking diodes as they dont come with any, so couple on there way too)
View attachment 36229 View attachment 36230 View attachment 36231
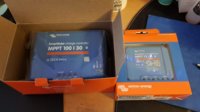
Are you selling your 75/15? I'd be interested if soThe New Victron SMT 100/30 is in . . . . its surprisingly larger than the 75/15 and has no load output.
obviously a more dedicated "solar charger"
View attachment 36285
and now adhesive is in.
View attachment 36286
.
.
No sorry dude. Ill be using that on the shed/garage with the spare panels and few leisure battery's I have.. (basically putting the mobile camping kit to good use)Are you selling your 75/15? I'd be interested if so
Similar threads
- Replies
- 25
- Views
- 784
- Replies
- 15
- Views
- 407
- Replies
- 5
- Views
- 564
- Replies
- 11
- Views
- 1K
- Replies
- 12
- Views
- 1K

