Solar Panel: Cutting Hole in Roof !!!

It’s not just how far it is from the edge, it’s how far the roof canvas is from the back of the roof section to get the hole between the two. If you can get yours in please post up some pics as I’d be very interested, I haven’t braved putting a hole inside the canvas yet.

On my roof there is a decent gap between the chamfer and the lip where the canvas attaches. The first panel I bought the hole for the cable would have come through the lip so this one hopefully will sit just behind it. The back edge of the panel will sit just inside the back of the flat roof section, but I’ll post some pictures.
 
Hi guys, I’d be grateful for some advice because I am a total numpty when it comes to electrics..I’ve just ordered one of these 150w Flexi Solar Panel Kit - black rear exit

I have a 60w panel from the original conversion and feel that it makes sense use more of the roof real estate ( and my kids are obsessed with opening the fridge door).

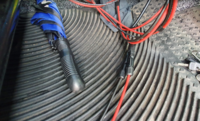
The existing cable is lead through the top hinge gland and through the Reimo roof behind the canvas.

I have a sneaky suspicion that in order to remove this cable I’d need to get behind a bunch of panels and lining. My question is can I use the existing cable if I cut it and connected it to the new one with a junction box? Assuming they are the same size..

View attachment 72017

As an aside, I would be worried about any shadow those roof bars throw onto the solar panel. Shadows over large areas of individual cells can make a big difference to the output. The shaded cells become a higher impedance to the overall panel current flow. :cautious:
 
update for 2021 . . . . .

The

2x photonic universe 2x150w EFLXRJB-150M (shown earlier in thread)

and

1x Renogy Renogy 160W RNG-160DB-H (shown earlier in thread)


were fitted on the Solar Shed project in the end . . .

more on that here:


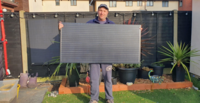
You can see the Renogy 160w at the back and the 2x150w Photonic Universe at the front.

1614700978429.png


i ended up getting the 160w (rear gland) Photonic Universe (again shown earlier in thread), to go on the van.


1614702037100.png


160W Black Reinforced semi-flexible solar panel with round rear junction box and 3m cable, with durable ETFE coating (German solar cells) - £309.99 (july 2019)

EFLXRJB-160M

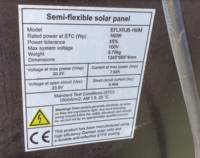
Solar panel specifications:

  • Peak power: 160W
  • Maximum power voltage: 20.2V
  • Maximum power current: 7.92A
  • Open circuit voltage: 23.9V
  • Short circuit current: 8.40A
  • Power allowance range: +/- 5%
  • Solar Panel dimensions: 1345 x 665 x 4 mm
  • Junction Box diameter: 30 mm
  • Weight: 5.70 kg
  • 1 x 3m high quality dual core solar cable attached (4mm cross section)


so far its not made it to the roof. . . .

but I've been using it as part of the Mobile Solar kit i keep around me . . . .

More on that here :


..

For now lets look at that 160w panel . .

EFLXRJB-160M

size wise, its fairly large . .

1614701298403.png1614701326944.png

and spec wise we have this . .

1614701363460.png


....


I've been using it on the van . . . . but not in the conventional sense . . .

Here is it on the roof . . . just stuck there with a couple of magnets holding it in place. (just for static / mobile use)

1614701430987.png


...


and then patched into the Renogy DC-DC & MPPT controller under the Bench seat.

with a couple of PV MC4 Connectors and PV extension lead.


1614701476323.png


1614701497164.png1614701632004.png


...


The idea is to to still fit it on the vans roof at some point . . . . . but for now the DC-DC (when engine running) is ample at keeping the AUX / leisure battery topped up.

and

the Mobile solutions work best for us while camping or Long Parking . . . . . so, for now well keep it like this.

This is the popular panel are fitting on the roof . . . rear junction box makes a nice clean water tight finish.
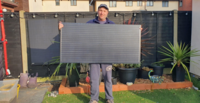
1614701343671.png
 
Last edited:
I have the 180 Watt version of this panel from Photonic Universe. If you want to see some pictures of it installed on the roof see the post linked below. I don’t have as pop top so it is installed with the cable entry at the front. Doing this means the 3m of cable fitted to the panel is long enough to reach my DC-DC which is installed under the drivers seat.

 
Sorry if I missed this somewhere, but is it wise/needed, to put an inline fuse in the cable connecting the solar panel to the solar controller?

Thanks.
 
Hi, fitting my panel next week and could do with a few opinions

Panel is 100W semi flex ETFE, fitting to an austops roof, the panel is pretty light, I'm slightly concerned about the width, the roof has ridges approximately 5mm high, a central ridge which I will get full contact with but the panel will only cover about 10-12mm of the other two ridges

My plan (basically copying off @Dieseldonkey ) is to use 9mm sanoj tape on the ridges, single strips on the outside and 2 or 3 on the middle ridges and use sikaflex between the ridges, fill the leading edge to stop air lifting the panel, leave the back free for airflow

So I'd be looking at about a 6-7mm bead of adhesive in the ridges, Is that too bigger bead? Would it be an option to put something in the gap like a 3 or 4mm plastic strip and sikaflex either side, less flex but two joints instead of one

Assume i am best to key the surface for both tape and adhesive with fine sandpaper and clean with turps/alcohol cleaner before application?

Thanks for any answers, I keep waking up worrying about my panel flying off, it's not even on yet!!
 
Hello @mbee123 ,i fitted a big 300w panel to my roof using the method you mentioned and have had no problems with it. Also,we didn't key any surfaces at all. Both the Sikaflex and the Sanoj tape stick really well and the tape on the edges gives a really neat finish,hope this helps and good luck
 
Yes @mbee123 ,put a zig zag of Sikaflex in the dips,sealed the front and left the gaps in the dips at the back for air,its been on for nearly two years i think,good luck
 
Mine is fitted to the van roof not a pop top but the roof has similar ridges. I haven’t filled the gaps deliberately to allow some air flow under the panel to help with cooling it. I’ve had no issues with it lifting nor with wind noise from it. Just returned from a 500 mile round trip doing 70MPHish on motorway most of the time and it‘s still there ;)

9D608756-C09C-4E8B-9668-DA03019806D8.jpeg12E0AA89-0EE9-463F-B754-6A0CB5A6AD6B.jpeg
 
Mine is fitted to the van roof not a pop top but the roof has similar ridges. I haven’t filled the gaps deliberately to allow some air flow under the panel to help with cooling it. I’ve had no issues with it lifting nor with wind noise from it. Just returned from a 500 mile round trip doing 70MPHish on motorway most of the time and it‘s still there ;)

View attachment 117125View attachment 117126
Could I ask what brand panel that is and what wattage? Looks very low profile. I was looking at the Renogy 175w flexible but there’s no stock anywhere
 
This is a really useful thread. Thanks for all. The input. I’ll be fitting a panel in the next few weeks. Will update on the progress
 
@ekynoxe ok thanks, I’ve decided to go down the route of applying vinyl to the pop top roof first so if/when the panel fails we can remove the wrap rather than fight Sikaflex - well that’s the optimist in me anyways!
@Glenn2605
Quick question: are u happy with decision to apply vinyl first and did you just use Sikaflex or some tape for the top of the ridges? I’m hoping to fit a PU panel very shortly. Thanks for you help
 
Thanks all for the really useful information, I will be attempting my installation whilst the King is getting coronated! I will probably follow the @ekynoxe method. I will be attempting the installation on my so am a bit concerned about getting the alignment correct, I may try the bake bean tin method posted by @Dellmassive but wondered if anyone else had any further tips?

And just to clarify, when using the tape and sikaflex method, when applying the sikaflex within a ridge at the front, completely fill the gap, but leave it more open at the back so that air is not trapped?
 
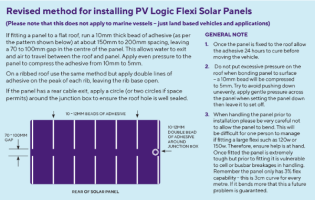
I'm replacing a PV Logic 100w semi flexible on a Reimo roof, no ridges. The old one died after about 2 years and was bonded straight onto the roof (by the firm that fitted my Reimo popup). It too me several hours to remove it and clean the sikaflex off but that's another story. The new advice is to fit the panel with air gaps below, as per this diagram ...

1682509442958.png

It'll be fitted at the back of my van with the "rear of solar panel" near the tailgate. I'm concerned that air entering the panel at the front might cause a lift and tear it off at motorway speeds. I spoke to tech support at Solar Technology and they reassured me this hasn't been a problem, the recommended adhesive (Terison/Henkel MS-939) is strong enough and it shouldn't budge. It'll only have an underside gap of 5mm or so perhaps I'm worrying about nothing. Having had one fail I'm very keen to follow their guidance and keep this one within warranty. Has anyone else done this and can reassure me?
 
I'm replacing a PV Logic 100w semi flexible on a Reimo roof, no ridges. The old one died after about 2 years and was bonded straight onto the roof (by the firm that fitted my Reimo popup). It too me several hours to remove it and clean the sikaflex off but that's another story. The new advice is to fit the panel with air gaps below, as per this diagram ...

View attachment 197226

It'll be fitted at the back of my van with the "rear of solar panel" near the tailgate. I'm concerned that air entering the panel at the front might cause a lift and tear it off at motorway speeds. I spoke to tech support at Solar Technology and they reassured me this hasn't been a problem, the recommended adhesive (Terison/Henkel MS-939) is strong enough and it shouldn't budge. It'll only have an underside gap of 5mm or so perhaps I'm worrying about nothing. Having had one fail I'm very keen to follow their guidance and keep this one within warranty. Has anyone else done this and can reassure me?
Looking at the drawing, there’s only a 3-4” gap at the front, so the wind isn’t going to be a problem imho.
 
No, it's misleading.. the 3-4" gap (the 70-100mm gap on the diagram) is actually the side. The front is the long side and open to the wind. The diagram is wrong, the underside cable junction is actually in the middle at the rear of the panel (the panel is mounted transverse).
I just rang their tech support again and voiced my concerns again, they say they've sold thousands of these and there's not been any reports of a problem. The glue will stick!

Fingers crossed...
 
Back
Top