Swapping my leisure battery to LiFePO4

I read that as it won't currently be connected as it was a 'normal' battery? Do I have that right?
Ah yes, gosh - your battery isn't even AGM is it! o_O

Then the wire is probably just in the same place as wherever the red wire connects to the ignition signal wire, which being only 20cm long can't be that far into the van!
 
Then the wire is probably just in the same place as wherever the red wire connects to the ignition signal wire, which being only 20cm long can't be that far into the van!
Agree totally! Have spent ages poking an endoscope camera in there but just can't get any shot of it.

I think where I'm at is that maybe I could separate the black from the red where it emerges from the d250se, cut it as long as I can manage (likely 5cm) and join it to a new cable to run to the battery positive.
It's possible that I could push this new wire through the cavity and pull it out through the battery hole to hide it.

Anyway, I have pre-ordered the battery so its happening somehow. Nowhere near as easy as I'd hoped but hey ho worse things happen. Now to put it back together for the wife's trip.
 
Is there any way of getting that back panel off - it looks like it has screws along the top?

Only issue I can see in the pics on this thread is it looks like your Victron EHU charger is a bit in the way - can that be unmounted enough to get a bit of room?

Even if you can get the top tilted out an inch or so it might help see what's going on?
 
Is there any way of getting that back panel off - it looks like it has screws along the top?
Well I had tried this previously and it didn't budge but this time I took a chance and undid all the screws fully. Now I haven't removed the victron this time so I don't know how far it will open but I had just enough access to get the endoscope camera down.
20240508_15_04_49.png20240508_15_04_35.png
It looks to me like both red and black are crimped so who knows whether black is already fed near the battery terminal but not pulled through.

Anyway, thanks again. Next time I'll be doing this for real.
 
Jeez, that is a bit tight in there isn't it!

Definitely looks like both have got butt crimps on them, where the back one goes, who knows. Unless it has (mistakenly) been connected to your battery negative, which is a possibility.
 
So, now to the purchase of the other parts with thanks to everyone who has made recommendations/suggestions.

Firstly boxing since it won't fit in the existing wooden arrangement due to the fuse banks.
Rather than modifying the woodwork around the battery you could always use a plastic battery box fixed to the floor (and/or rear wall) with 2 x nylon straps screwed to the floor (one across, one along the box).
Looking at the specs of the smallest of the Durite boxes (bear in mind that I've never seen one of these for real).
  • Internal dims (max. battery size): 270 (L) x 180 (W) x 225 (H) mm
  • Maximum external dims: 360 (L) x 275 (W) x 260 (H) mm
The difference between the internal and external dimensions is worrying (it says "maximum" which I get for internal but surely external is what it is?). The height is a particular concern as, if correct, 260mm would be in front of the fuse banks.

Am I right? If so, is there another solution to basically protect the battery from stuff stored in the adjacent space (primarily a potentially wet awning).
 
It just means the biggest part of the box is that dimension.

1000007716.png


So height of 260mm would be the flat top section, to the base. Which means it's a good bit lower where it'll actually be touching the wall, due to the angled bits. Same for the width - the lid sticks out more.

The height might mean the fuses are obscured a little by the lid, you'd need to measure by how much exactly. If you can get to them from above it might not be an issue.
 
The height is a particular concern as, if correct, 260mm would be in front of the fuse banks.
Is that a real problem? How often do you need to access the fuses - almost never hopefully? My thinking was you can easily undo a strap or two and just slide the battery box to one side on the rare occasion you need to get behind it. The box will protect the battery and connections from anything you put in the cupboard. Any excess cable and the midi fuse can be tucked away in the box too.
 
I think you seasoned campaigners are perhaps a little confused as to my problem here - sorry but I'm trying to keep this simple and within my very limited talents, not wanting to spend as much again, or likely more, employing someone to do it for me. Please bear with me and I'll try to explain.

Originally, I hoped to make this fit in the existing woodwork by just making raising the height and using those (admitedly limited) screw holes in the floor to secure fastenings. So I've had to give up on the woodwork but securing the battery without drilling new holes through the floor is a massive priority - I see this as essential in fact.
As I see it, the new battery has to be butt against the wall to assist with securing it. If the existing holes in the floor can't be made to work for fastenings then screwing onto the wall (panel) and going round the battery horizontally, although far from ideal, is the fallback - again requires battery against the wall.

Now to the battery box. If it sticks out more at the top and the battery is against the wall, it's got nowhere to go. Indeed the fuse banks stick out from the wall by about 12mm plus another 10 if you get to the height of the fuses themselves, so it's got less space. The fuse panels are 225 up from the floor and 80 high. The fuses are about 22 up from the edge of the fuse banks.

So even if I accept losing some access to the fuses (which is less than ideal - so far they have been popped like wine bottle corks), I still can't see how the box works. Am I missing anything?

What are the safety requirements (if any) for boxing a lifep04 battery? Eg air circulation? Only on top or sides as well?

Appreciate you bearing with me on this.
 
Ok what I would suggest, is to put an extra batten on the vertical wall, wide enough to clear the amount that the lid on that battery box sticks out by. Then fix the straps to that (or between the batten and the wall) then push the battery box against this batten and strap it to it. You could even, if there's room, add a couple of bits sticking out horizontally to hold the battery box in place.

Then this will mean there box will be away from the wall slightly, giving better access to the fuses. As it is, the bottom of the fuse panel is only going to be 35mm below the highest point of the battery box lid.

Don't over think it too much, all you're trying to do is secure the battery - just a strap, or some metal brackets secured to the rear wall with terminal covers will be fine.

You could even use that battery box but leave the lid off and just fit terminal covers.

You can seal a LiFePO4 battery in a box so long as it doesn't get super hot.
 
Could always put the battery under the drivers seat too with an isolator fixed to the seat base and a shunt attached to the battery negative post and earthed to the VW ground stud on the floor there then a single red 4 or 0 guage cable to a live busbar or multi way fuse in that existing mains area.
There's umpteen ways of doing this and none of them are particularly right or wrong in fact generally the whole process is ongoing with the electrical demands altering as time goes on.
 
I also think if you put battens screwed/glued into the floor not deep enough to go through the floor that will help restrain the battery.

Like seatbelts it really only has destructive energy if it can move and smash into something during heavy braking.
 
Looking at the busbar suggested above (VTE 250a Large 4 point M8), I was shocked at the size of the thing - is it really this big?
  • Overall dims (inc. cover): 167.37 (L) x 35.19 (W) x 51.17 (H) mm
(I assume height is how far it sticks out from the wall). Looking at the available space and given the assumption the battery will be hard against the wall, there is no room to mount something as long as this where the positive wires emerge. There will only be 64mm between the mains unit and the battery. Mounting vertically is an option but I'm wondering whether busbars which are not strips exist? A square with 2 on top and 2 below for example. I searched for something like this on voltplanet, ebay and amazon without success. I did find this https://www.amazon.co.uk/STANEW-Heavy-Power-Distribution-BusBar/dp/B0C5LV7ZBW (M10 but says also available for M8) which is plus and minus in that configuration but joined together. This did suggest to me that what I'm looking for should exist? Anybody aware of anything?
 
Have you looked at the high power junction boxes @ginkster suggested?


They may fit better for you - depending on how many connections you need to get on you may need the 3 way - stacked ring terminals need a bit of space to splay out to give room for the cable crimp area
 
Looking at the busbar suggested above (VTE 250a Large 4 point M8), I was shocked at the size of the thing - is it really this big?
  • Overall dims (inc. cover): 167.37 (L) x 35.19 (W) x 51.17 (H) mm
(I assume height is how far it sticks out from the wall). Looking at the available space and given the assumption the battery will be hard against the wall, there is no room to mount something as long as this where the positive wires emerge. There will only be 64mm between the mains unit and the battery. Mounting vertically is an option but I'm wondering whether busbars which are not strips exist? A square with 2 on top and 2 below for example. I searched for something like this on voltplanet, ebay and amazon without success. I did find this https://www.amazon.co.uk/STANEW-Heavy-Power-Distribution-BusBar/dp/B0C5LV7ZBW (M10 but says also available for M8) which is plus and minus in that configuration but joined together. This did suggest to me that what I'm looking for should exist? Anybody aware of anything?
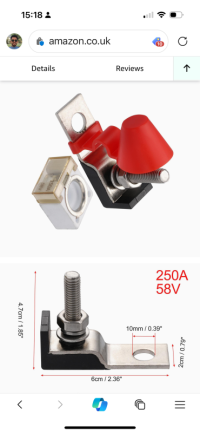
I showed an alternative in post 24 or there are the post mounts mentioned by RT. You don’t need a 250a busbar as the battery is limited to 100a so you could go for a smaller, cheaper 150a busbar which may help with space.
 
Jeepers that bus bar set is expensive, nearly £40 on Amazon.

Might want to look at something smaller, like:

HOIIME 12 V - 48 V Bus Bar Power Distribution Block with 4 x M8 Terminal Studs, High Performance Module BUSBAR with Cover for Cars RVs Ships Yachts (Red & Black, 2 pieces) : Amazon.co.uk: DIY & Tools
(I've got these, the quality is good. Using them with a 200ah batt and 2000w inverter. Although saying that the inverter is straight to the battery so not even using the bus bar.)

or

HOIIME 150A 48V Bus Bar Power Distribution Block with 4 x M5 Terminal Studs, High Performance Module Heavy-duty BusBars with Transparent Cover for Cars RVs Ships Yachts (Black & Red, 2 Pack) : Amazon.co.uk: DIY & Tools
 
I also think if you put battens screwed/glued into the floor not deep enough to go through the floor that will help restrain the battery.
I agree with this. Don't over think it, make your life simpler; screw into the existing wooden floor. It's held down by the bed and cupboards.
If you're in a situation where they're flying around the van you'll already have a lot on your plate!
 
The only place I really worry about battery security is on yachts - 45 degrees over on the heel and regularly dropping a couple of tons off one wave into the next very rapidly finds anything loose in the electrics or indeed anywhere on board!

If your T6 is doing that then... ouch.
 
Back
Top