What Have You Done To Your Van Today?

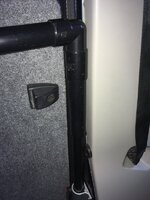
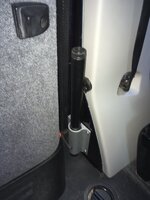
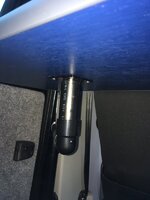
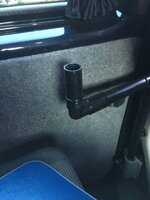
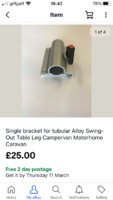
I bought the bottom bracket off ebay which I fixed to the b pillar using rivnuts, this is the same bracket that comes with the reimo table system. I didn't want to pay another 25 quid for a table leg and another 25 quid for a second bracket to fix the leg to the table so decided to make my own.

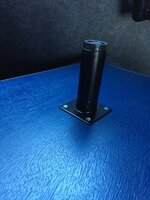
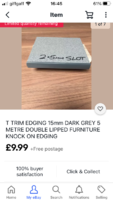
I already had the 15mm ply and the edge trim (also ebay) to make the table (routered the groove for the trim) and bought some table legs from Homebase which are the perfect size to fit inside 32mm floplast pipe which I already had in the garage. The aluminum table legs stiffen up the plastic pipe nicely. The table legs come in various sizes so I used the smallest size to fix to the table, this slots into the floplast bend allowing it to spin to the desired position and a longer one to fix to the bracket. By sliding the floplast pipe onto the leg fixed to the bracket it allows some up and down height adjustment as well. When not is use the leg system just slides off leaving the bracket and table leg in place. Hopefully the photos make sense.
IMG_9908.PNG

IMG_9909.PNG

IMG_9907.PNG

IMG_9919.JPG

IMG_9918.JPG

IMG_9917.JPG

IMG_9911.JPG

IMG_9910.JPG
 
Finished towbar wiring, rerouted my ehu and wired correctly thumbs up to the twonk that fitted that, run feed from e box to under drivers seat to feed towbar and any auxiliaries in future, replaced the silver hinge pop top bolts for black to blend in and then refitted my bumper protector
Not much then?!!
 
I bought the bottom bracket off ebay which I fixed to the b pillar using rivnuts, this is the same bracket that comes with the reimo table system. I didn't want to pay another 25 quid for a table leg and another 25 quid for a second bracket to fix the leg to the table so decided to make my own.

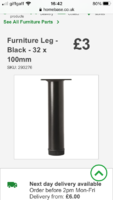
I already had the 15mm ply and the edge trim (also ebay) to make the table (routered the groove for the trim) and bought some table legs from Homebase which are the perfect size to fit inside 32mm floplast pipe which I already had in the garage. The aluminum table legs stiffen up the plastic pipe nicely. The table legs come in various sizes so I used the smallest size to fix to the table, this slots into the floplast bend allowing it to spin to the desired position and a longer one to fix to the bracket. By sliding the floplast pipe onto the leg fixed to the bracket it allows some up and down height adjustment as well. When not is use the leg system just slides off leaving the bracket and table leg in place. Hopefully the photos make sense.
View attachment 107447

View attachment 107448

View attachment 107450

View attachment 107451

View attachment 107452

View attachment 107453

View attachment 107454

View attachment 107455
Great idea! thanks for that, so much detail and photos! Definitely going to give that a try, will let you know the results lol
 
A job that I have been ignoring for probably a year. The dealers acknowledged, but failed to do anything about. 10 minutes each side with the bulb removed and the heat gun gently warming the lens. Let's see if it lasts.

View attachment 107417

View attachment 107418
My near side is exactly the same. Offside no issues.
I swapped the standard H11 Vw fitted bulb with a LED variety.
Lasted approx 8 months before I noticed the same.
There's a thread somewhere on here that suggests some folk have drilled a couple of small holes in the housing. to allow it to "breathe"
Talked to Vw re a replacement under warranty, but they have several secret photos that show what is acceptable or what is not.
Mine was a "not" and yours unfortunately, look the same.
Until you can pour a cup of liquid out there is not much hope of a free swap out

Not everyone's cup of tea, but I have now purchased a pair of Osram H11 yellow fog breaker bulbs to try out - maybe with them running hotter it could help?
 
A job that I have been ignoring for probably a year. The dealers acknowledged, but failed to do anything about. 10 minutes each side with the bulb removed and the heat gun gently warming the lens. Let's see if it lasts.

View attachment 107417

View attachment 107418
If you have LED fogs this is normal, as the heat will evaporate the condensation. If you have normal bulbs, your fogs vent hole is blocked.
 
Its worthwhile checking the sealing o'ring on the bulb too, I've seen some aftermarket fog light bulbs where the seal isn't thick enough.. so lets water in through puddles etc.
 
No LED bulbs in mine, but the heat of halogens has nothing to do with it. They shouldn't mist up full stop whether they are warmed by bulbs or not. Mine are never used, I've even turned the cornering function off, but that shouldn't result in misting. The issue is ventilation and if it continues, there will be a couple of holes going in mine too.
 
Got to the end of a couple of jobs today which have been ongoing for the last 10 days, on and off.

Installed gloss black grills from Travelin lite. Easier than expected and a pretty good fit, with the exception of the badge which I still haven't quite worked out how to get properly attached yet. But pretty good results over all.

Sound deadened exterior wheel arches. Did the back half of the fronts with Silent Coat, then 10mm soundproof foam on the arch liner. Cleaning the wax/gunk off was a bit of a pain, and pretty sore hands at the end of it, but not too bad a job. Got to the rears and discovered they already had a Silent Coat layer (boom!), so just put the 10mm sound deadening foam on the arch liner. Cut loads of it off to try and get the liner to fit back in the arch, and eventually, having run out of time I threw my toys out the pram and ripped it all off again as i just couldn't get it to fit back in the wheel arch properly. May revisit that another day, but probably not!

While I was in the arches I twizzed the coilovers down a bit, and, finally, got round to fitting the new shoes! Hadn't been able to find any pics of a Starlight T6 with matt bronze Judd 311r, but thought it might be the sweet spot ... and very pleased with how it looks! Many thanks to Oli @BognorMotors for sourcing the wheels (and invaluable guidance on widths and offset)

IMG_1157.jpeg
 
Last edited:
Got to the end of a couple of jobs today which have been ongoing for the last 10 days, on and off.

Installed gloss black grills from Travelin lite. Easier than expected and a pretty good fit, with the exception of the badge which I still haven't quite worked out how to get properly attached yet. But pretty good results over all.

Sound deadened exterior wheel arches. Did the back half of the fronts with Silent Coat, then 10mm soundproof foam on the arch liner. Cleaning the wax/gunk off was a bit of a pain, and pretty sore hands at the end of it, but not too bad a job. Got to the rears and discovered they already had a Silent Coat layer (boom!), so just put the 10mm sound deadening foam on the arch liner. Cut loads of it off to try and get the liner to fit back in the arch, and eventually, having run out of time I through my toys out the pram and ripped it all off again as i just couldn't get it to fit back in the wheel arch properly. May revisit that another day, but probably not!

While I was in the arches I twizzed the coilovers down a bit, and, finally, got round to fitting the new shoes! Hadn't been able to find any pics of a Starlight T6 with matt bronze Judd 311r, but thought it might be the sweet spot ... and very pleased with how it looks! Many thanks to Oli @BognorMotors for sourcing the wheels

View attachment 107639

Thats looks 100% perfect - Good work that man

Pleased to have been of assistance
 
Got to the end of a couple of jobs today which have been ongoing for the last 10 days, on and off.

Installed gloss black grills from Travelin lite. Easier than expected and a pretty good fit, with the exception of the badge which I still haven't quite worked out how to get properly attached yet. But pretty good results over all.

Sound deadened exterior wheel arches. Did the back half of the fronts with Silent Coat, then 10mm soundproof foam on the arch liner. Cleaning the wax/gunk off was a bit of a pain, and pretty sore hands at the end of it, but not too bad a job. Got to the rears and discovered they already had a Silent Coat layer (boom!), so just put the 10mm sound deadening foam on the arch liner. Cut loads of it off to try and get the liner to fit back in the arch, and eventually, having run out of time I threw my toys out the pram and ripped it all off again as i just couldn't get it to fit back in the wheel arch properly. May revisit that another day, but probably not!

While I was in the arches I twizzed the coilovers down a bit, and, finally, got round to fitting the new shoes! Hadn't been able to find any pics of a Starlight T6 with matt bronze Judd 311r, but thought it might be the sweet spot ... and very pleased with how it looks! Many thanks to Oli @BognorMotors for sourcing the wheels (and invaluable guidance on widths and offset)

View attachment 107639
@Village Regarding the wheel arch liner foam issues you had. Where the fastener screws pass through the liner the foam needs to be removed, this can be done with approx 2 1/2” holesaw without the pilot drill. Don’t use a machine just turn the hole saw by hand.
Next position the foam covered liner in place and push it up as hard as you can, I found it easiest to lie on my back and use my feet. Remove the arch liner and see where the impression is left in the foam from the body flange, cut out a strip of foam at these points.
Next fit the liner with longer screws, I used Tek screws. The liner won’t go back exactly as high as original but it’s pretty close and does not cause issues.
The rear wheels are easily one of the biggest noise source. Worth doing.
Thanks for this. I did do most of this, in terms of trimming off foam where it appeared to rub, but just couldn't get the lip of the liner back into the lip of the arch itself. I didn't allow long enough to do the job so instead of doing it properly i had a tantrum instead!
 
Thanks for this. I did do most of this, in terms of trimming off foam where it appeared to rub, but just couldn't get the lip of the liner back into the lip of the arch itself. I didn't allow long enough to do the job so instead of doing it properly i had a tantrum instead!
I did it on a hot day but it still takes some careful prying with a trim tool.
 
Victron Energy 110Ah Deep cycle AGM fitted with CTEK D250SE. Not much spare room but it fits no problem. That thing ain’t going nowhere even if I rolled the van. :D The orange straps are just for lifting the battery from its holder, where it sits really snug.
66D5A215-B2B9-4C6B-A6FC-61FECD34BB31.jpegA7D6D3F6-1B39-4A78-9B3C-A73C852453E0.jpeg
 
Got to the end of a couple of jobs today which have been ongoing for the last 10 days, on and off.

Installed gloss black grills from Travelin lite. Easier than expected and a pretty good fit, with the exception of the badge which I still haven't quite worked out how to get properly attached yet. But pretty good results over all.

Sound deadened exterior wheel arches. Did the back half of the fronts with Silent Coat, then 10mm soundproof foam on the arch liner. Cleaning the wax/gunk off was a bit of a pain, and pretty sore hands at the end of it, but not too bad a job. Got to the rears and discovered they already had a Silent Coat layer (boom!), so just put the 10mm sound deadening foam on the arch liner. Cut loads of it off to try and get the liner to fit back in the arch, and eventually, having run out of time I threw my toys out the pram and ripped it all off again as i just couldn't get it to fit back in the wheel arch properly. May revisit that another day, but probably not!

While I was in the arches I twizzed the coilovers down a bit, and, finally, got round to fitting the new shoes! Hadn't been able to find any pics of a Starlight T6 with matt bronze Judd 311r, but thought it might be the sweet spot ... and very pleased with how it looks! Many thanks to Oli @BognorMotors for sourcing the wheels (and invaluable guidance on widths and offset)

View attachment 107639
Nice wheels, suit you van. What windows are they?
 
Back
Top