She’s flying out so it’s just meIf all else fails, you can always demand your missus loses/puts on weight to suit!
What Have You Done To Your Van Today?
- Thread starter Daneeyre
- Start date
-
- Tags
- mod modification mods retrofit
Hope that doesn't throw your calculations out!She’s flying out so it’s just me

Van is now 3 year old, and just passed her first MOT, so treated her to a few cosmetic tweaks. Couldn’t suggest doing this with the missus, that wouldn’t go down well, but on the van it’s ok 
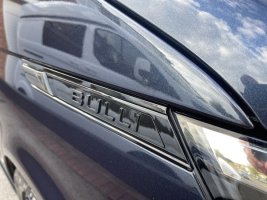
First up, gloss black BULLI badges. Removed the old meh Transporter matt black ones with a hairdryer (to soften the glue pad) and a trim tool, and some white spirit to get the sticky gunk off before applying the new ones. Just pop the side repeaters out with a trim tool first, and it’s a piece of cake job.
Next, swapping out the silver VW rear badge for a gloss back one. Hairdryer, trim tool and white spirit method again.
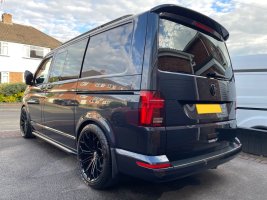
Then, it was time to give the front end a new look. I’ve enjoyed my red stripes for the last 3 years, but fancied a change, so the gloss back theme continued. I’m not massively happy with the fit of the after market upper grille trims (the very top ones, which replaced the chrome strips), so I’m going to have to revisit them - I’ll probably get the OEM chrome ones painted (managed to get them off without snapping any clips). But happy with the new look despite this niggle.
Before:
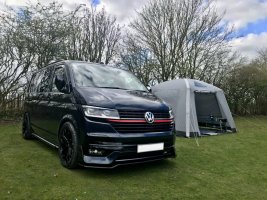
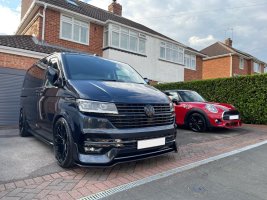
After:
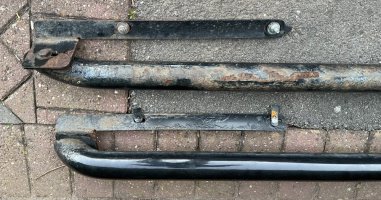
Tomorrow’s job - new trapezoid stainless steel sidebars (powder coated in gloss black) from THQ. The old sidebars have only been on 3 years, but must have been made from Chinese pig iron, as they are scabby as hell, and they’re letting the van down.

First up, gloss black BULLI badges. Removed the old meh Transporter matt black ones with a hairdryer (to soften the glue pad) and a trim tool, and some white spirit to get the sticky gunk off before applying the new ones. Just pop the side repeaters out with a trim tool first, and it’s a piece of cake job.

Next, swapping out the silver VW rear badge for a gloss back one. Hairdryer, trim tool and white spirit method again.

Then, it was time to give the front end a new look. I’ve enjoyed my red stripes for the last 3 years, but fancied a change, so the gloss back theme continued. I’m not massively happy with the fit of the after market upper grille trims (the very top ones, which replaced the chrome strips), so I’m going to have to revisit them - I’ll probably get the OEM chrome ones painted (managed to get them off without snapping any clips). But happy with the new look despite this niggle.
Before:

After:

Tomorrow’s job - new trapezoid stainless steel sidebars (powder coated in gloss black) from THQ. The old sidebars have only been on 3 years, but must have been made from Chinese pig iron, as they are scabby as hell, and they’re letting the van down.
What's your wheel/tyre/suspension setup? Very nice.Van is now 3 year old, and just passed her first MOT, so treated her to a few cosmetic tweaks. Couldn’t suggest doing this with the missus, that wouldn’t go down well, but on the van it’s ok
First up, gloss black BULLI badges. Removed the old meh Transporter matt black ones with a hairdryer (to soften the glue pad) and a trim tool, and some white spirit to get the sticky gunk off before applying the new ones. Just pop the side repeaters out with a trim tool first, and it’s a piece of cake job.
View attachment 247498
Next, swapping out the silver VW rear badge for a gloss back one. Hairdryer, trim tool and white spirit method again.
View attachment 247500
Then, it was time to give the front end a new look. I’ve enjoyed my red stripes for the last 3 years, but fancied a change, so the gloss back theme continued. I’m not massively happy with the fit of the after market upper grille trims (the very top ones, which replaced the chrome strips), so I’m going to have to revisit them - I’ll probably get the OEM chrome ones painted (managed to get them off without snapping any clips). But happy with the new look despite this niggle.
Before:
View attachment 247501
After:
View attachment 247499
Tomorrow’s job - new trapezoid stainless steel sidebars (powder coated in gloss black) from THQ. The old sidebars have only been on 3 years, but must have been made from Chinese pig iron, as they are scabby as hell, and they’re letting the van down.
New trapezoid stainless steel sidebars (powder coated in gloss black), from THQ fitted today. Simple enough driveway job, just raised the van a smidge on some low level ramps, which gave enough room to drop the under trays and remove the old tubular bars.
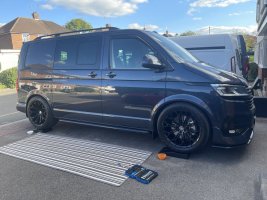
These were pretty scabby after only 3 years, so hoping the new ones, being stainless steel, fair better. Now I’ve fitted OEM front mud flaps, this should help prevent the front of the new bars getting clattered by road filth.
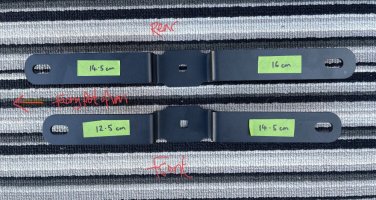
The new THQ sidebars are sided, so you want the longer section of the bar (from the bracket), facing towards the front of the van on each side. AND the fixing brackets themselves also need to be fitted a certain way - there are front and rear brackets, and a front to each bracket as well. If you don’t get this right the bars won’t be centred on the van. The pic below shows which way they should go
The hardest part of the job was refitting the undertray. This does need to be trimmed to fit around the brackets, but can be done neatly with a little care and patience. The real PITA was getting all the undertray fixings back in. As I hadn’t raised the van by much, the screw in fixings had to be ‘felt’ back into their correct locations due to lack of visibility. With more height I dare say it would have been easier, but it can be done. Happy with the end result!
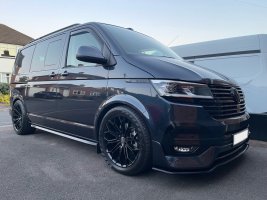

These were pretty scabby after only 3 years, so hoping the new ones, being stainless steel, fair better. Now I’ve fitted OEM front mud flaps, this should help prevent the front of the new bars getting clattered by road filth.

The new THQ sidebars are sided, so you want the longer section of the bar (from the bracket), facing towards the front of the van on each side. AND the fixing brackets themselves also need to be fitted a certain way - there are front and rear brackets, and a front to each bracket as well. If you don’t get this right the bars won’t be centred on the van. The pic below shows which way they should go


The hardest part of the job was refitting the undertray. This does need to be trimmed to fit around the brackets, but can be done neatly with a little care and patience. The real PITA was getting all the undertray fixings back in. As I hadn’t raised the van by much, the screw in fixings had to be ‘felt’ back into their correct locations due to lack of visibility. With more height I dare say it would have been easier, but it can be done. Happy with the end result!

Last edited:
So the van has been into VW for some MORE software updates to fix SOS issues etc. Unfortunately they fecked up my reverse camera. It was a retrofit so obviously they wrote over the coding. After an hour searching on here I've recoded it myself with my OBD11. Never looked into long coding before so was a bit of a worry but quite easy as long as you follow the steps. One very happy camper
What, they let you out in the dark??Finally fitted the LED reversing bulbs - what a difference. Can’t wait to try them out tonight
Last edited:
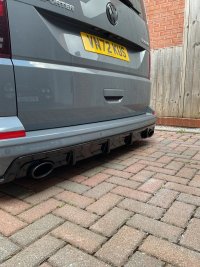
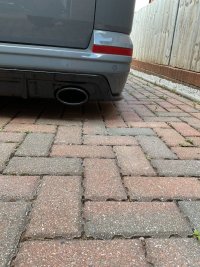
Have you got any underneath pictures? Interested to see how they did it around you air install.Another modification this weekend real exhaust instead of the fake tips this was done by the guys at dku performance in Walsall the guys are top blokes
View attachment 247607
View attachment 247608
BTW looks good

Yeah I’ll take one tomorrow.. I’m not running a Spare wheel I haven’t done for 2 years so pretty straightforward by the looks. Workmanship and attention to detail tho with them calling me to the van and checking how I wanted it etc worth the trip
Will be a factor.....i do as i don't fancy going to South of France without oneYeah I’ll take one tomorrow.. I’m not running a Spare wheel I haven’t done for 2 years so pretty straightforward by the looks. Workmanship and attention to detail tho with them calling me to the van and checking how I wanted it etc worth the trip
Worse, they even let me out on my own!!!!What, they let you out in the dark??
That looks lovely. Do you have a video of the sound, I know it’s hard to capture though would be interested to hear how it sounds on tick over and with a little rev please.Another modification this weekend real exhaust instead of the fake tips this was done by the guys at dku performance in Walsall the guys are top blokes
View attachment 247607
View attachment 247608
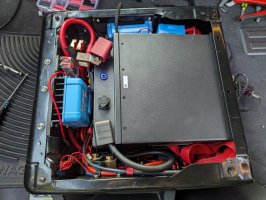
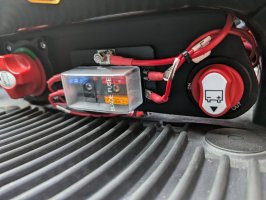
Got my seat base battery installed and working! Just a few small tasks left to finish it off - battery retaining straps, and some fabric cable wrap, and some more labelling.
The inverter install can wait for a little while, I'll need to build a plywood base for it anyway. That'll be a Renogy 2000w inverter mounted to the rear of the passenger seat base.
Oh and I've yet to install a solar panel, but everything is in place for it already - all wiring connected up. I just need to order one and mount it on the roof.
230Ah of LiFePO4 capacity, 50a of DC-DC charger, 20a of solar MPPT, a smart shunt, Cerbo GX, and all associated busbars, wiring, isolator switches, fuse boxes etc.

 www.t6forum.com

The inverter install can wait for a little while, I'll need to build a plywood base for it anyway. That'll be a Renogy 2000w inverter mounted to the rear of the passenger seat base.
Oh and I've yet to install a solar panel, but everything is in place for it already - all wiring connected up. I just need to order one and mount it on the roof.
230Ah of LiFePO4 capacity, 50a of DC-DC charger, 20a of solar MPPT, a smart shunt, Cerbo GX, and all associated busbars, wiring, isolator switches, fuse boxes etc.


TallPaul's Caravelle - MTB wagon!
You are very determined arnt you?! :) I took one look under my Caravelle's seats and just bought a good a powerbank. Sorted my bike rack out though, well part 1 of 2... pictures to follow

Last edited:
Similar threads
- Replies
- 0
- Views
- 616
- Locked
- Replies
- 0
- Views
- 171

