You are using an out of date browser. It may not display this or other websites correctly.
You should upgrade or use an alternative browser.
You should upgrade or use an alternative browser.
Windscreen washer low-level indication
- Thread starter lough90
- Start date
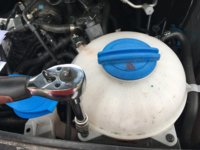
Thought i would have a go at installing washer sensor in mine, as i was doing my front parking sensors today i fitted the new bottle while i had front of van off, havent wired it in yet but was surprised at how large the new bottle is in comparison to old one.
Took 6l to fill from empty, this maybe related to the fact that the new bottle covers all vehicles so has an outlet for headlight wash which i blanked off
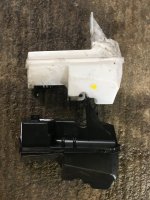
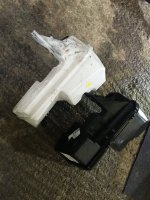
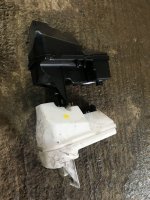
Ouch
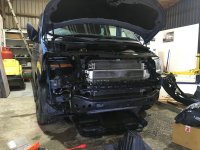
Took 6l to fill from empty, this maybe related to the fact that the new bottle covers all vehicles so has an outlet for headlight wash which i blanked off


Ouch

Last edited:
Jeez Pauly, what a brave chap you are. How many screws do you have left over?Thought i would have a go at installing washer sensor in mine, as i was doing my front parking sensors today i fitted the new bottle while i had front of van off, havent wired it in yet but was surprised at how large the new bottle is in comparison to old one.
Took 6l to fill from empty, this maybe related to the fact that the new bottle covers all vehicles so has an outlet for headlight wash which i blanked off
View attachment 3846 View attachment 3847 View attachment 3848
Ouch
View attachment 3849
Have added this in the shop now as a kit with wiring etc
VW T6 Washer Bottle Screen Wash Level Sensor Upgrade Kit To Activate Dash Warning For Low Screen Wash Level
VW T6 Washer Bottle Screen Wash Level Sensor Upgrade Kit To Activate Dash Warning For Low Screen Wash Level
zebra
T6 Beach 150 DSG
Some photos would be greatTackling this tomorrow hopefully, is there a how too guide for this or shall I take loads of photos?
zebra
T6 Beach 150 DSG
So finally got around the this and the fog light install and thought I'd add a little write up which spells it out as I need it...
Bumper removal
Described many times on the forum and best shown in the frequently mentioned Transporter HQ videos, links below:
Washer bottle replacement
If possible run the reservoir low in the run up to the job using the washers.
Remove the filler pipe from the top. This involves undoing three screws, two secure the coolant expansion reservoir and allow you to move it out of the way, then one on the pipe itself.
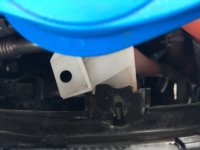
At the reservoir, unclip the electrical connector (1) on top of the washer pump and move it clear.
Unclip the pump from the reservoir (2) and pull it up out of the seal and move it clear. Anything left in the bottle will drain out.
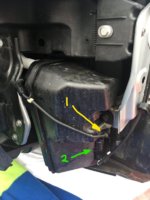
Undo the three bolts holding the bottle, one at the front, one at the back accessed behind the wheel housing liner and one awkward one below where the filler pipe was.
Move the seals for the pump and filler pipe from the old bottle to the new and install in reverse order. There’s a blanking plug in the extender front section of the new bottle where the headlight washer pump would go. (Somehow I forgot a picture of the new reservoir in place... however you get the idea, it's slightly bigger as in @Pauly 's photos, although my old one was also black, they can be white or clear) .
Fitting the level indicator
Engine bay cable routing
Fit the connector to the bottle and route the cable up and along the front of the van where the front harness is. It fits neatly behind the existing harness (3).
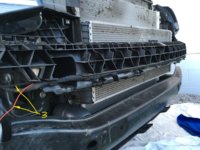
Fit earth connector to front earth bolt below driver’s side headlight.
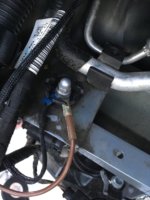
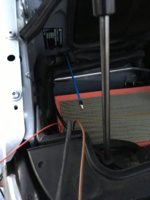
Route sensor cable up the side of the engine bay where the other cables are routed towards the bulkhead. I used some sheathing to protect the cable. Remove the top of the air filter box for access. I ran the blue cable rod in the photo from the inside, see text below.
Removing lower dash
I wrote out a description below, but then found this video…
Use a trim tool to remove dash end panel.
Remove headlight switch by pushing in from 0 and rotating clockwise. It should pull out. Disconnect cable from the rear.
The switch surround is held in place by one Torx T20 bolt and two clips at the top. The two clips can be levered down to allow surround to be pulled out.
Pull off lower dash panel, it comes of quite easily. The headlight level switch needs disconnecting too once the dash is unclipped.
The bottom dash panel then pops off. This has two T20 bolts attaching it to pedal linkage cover. It is possible to remove both together, I separated them.
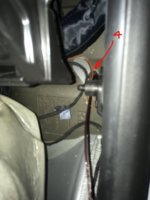
Remove bonnet release lever, it pulls off easily. Peel back carpet to see a grommet (4) where the bonnet release cable goes through the bulkhead. Use a cable rod to pull cable through from engine bay.
Remove upper dash/instrument cluster
Use a trim tool to lever off the stereo surround and vents. Do the same to the vent next to the driver’s door, this one was really stiff to lever off.
(See Dashboard Modifications thread and Van-X video (1:30-2:02))
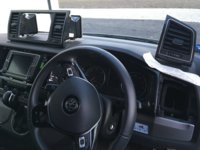
Lower the steering wheel as much as possible and lift off the soft fabric cover from the top of the steering column, it just pops up. It’s permanently attached to the instrument cluster surround so don't try and remove it from that.
Bumper removal
Described many times on the forum and best shown in the frequently mentioned Transporter HQ videos, links below:
Washer bottle replacement
If possible run the reservoir low in the run up to the job using the washers.
Remove the filler pipe from the top. This involves undoing three screws, two secure the coolant expansion reservoir and allow you to move it out of the way, then one on the pipe itself.


At the reservoir, unclip the electrical connector (1) on top of the washer pump and move it clear.
Unclip the pump from the reservoir (2) and pull it up out of the seal and move it clear. Anything left in the bottle will drain out.

Undo the three bolts holding the bottle, one at the front, one at the back accessed behind the wheel housing liner and one awkward one below where the filler pipe was.
Move the seals for the pump and filler pipe from the old bottle to the new and install in reverse order. There’s a blanking plug in the extender front section of the new bottle where the headlight washer pump would go. (Somehow I forgot a picture of the new reservoir in place... however you get the idea, it's slightly bigger as in @Pauly 's photos, although my old one was also black, they can be white or clear) .
Fitting the level indicator
Engine bay cable routing
Fit the connector to the bottle and route the cable up and along the front of the van where the front harness is. It fits neatly behind the existing harness (3).

Fit earth connector to front earth bolt below driver’s side headlight.

Route sensor cable up the side of the engine bay where the other cables are routed towards the bulkhead. I used some sheathing to protect the cable. Remove the top of the air filter box for access. I ran the blue cable rod in the photo from the inside, see text below.

Removing lower dash
I wrote out a description below, but then found this video…
Use a trim tool to remove dash end panel.
Remove headlight switch by pushing in from 0 and rotating clockwise. It should pull out. Disconnect cable from the rear.
The switch surround is held in place by one Torx T20 bolt and two clips at the top. The two clips can be levered down to allow surround to be pulled out.
Pull off lower dash panel, it comes of quite easily. The headlight level switch needs disconnecting too once the dash is unclipped.
The bottom dash panel then pops off. This has two T20 bolts attaching it to pedal linkage cover. It is possible to remove both together, I separated them.
Remove bonnet release lever, it pulls off easily. Peel back carpet to see a grommet (4) where the bonnet release cable goes through the bulkhead. Use a cable rod to pull cable through from engine bay.

Remove upper dash/instrument cluster
Use a trim tool to lever off the stereo surround and vents. Do the same to the vent next to the driver’s door, this one was really stiff to lever off.
(See Dashboard Modifications thread and Van-X video (1:30-2:02))

Lower the steering wheel as much as possible and lift off the soft fabric cover from the top of the steering column, it just pops up. It’s permanently attached to the instrument cluster surround so don't try and remove it from that.
Last edited:
zebra
T6 Beach 150 DSG
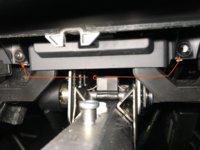
Remove the instrument cluster surround, it pulls off fairly easily. There are some guide pins on the back that have rubber boots on, be aware can drop off (or stay in the instrument cluster, labelled (5) in the photo below).
Now remove the two T20 screws at the bottom of the instrument cluster (6), be careful not to drop them into the dash. The instrument cluster should then pull out with only a little bit of effort.
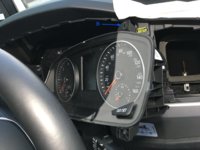
Feed the washer level sensor cable up from the footwell behind the dash to behind the instrument cluster.
Make sure the battery is disconnected if not already done so. Disconnect the blue connector on the back by pushing up the orange lever. Remove the cable tie securing the cable and remove the purple tab by sliding it off the blue plug.
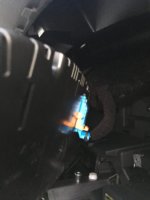
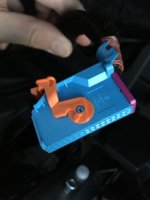
The internal white connector should just slide out of the blue housing. This is a 32pin connector and the end slot numbers are stamped on the white connector. Luckily the slot we need is number 17 and is marked, no counting needed! Slide the cable in until it clicks into place and is solid.
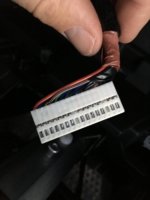
Secure the cable to the existing cables and reinsert the white connector into the blue housing. Replace the purple tab and cable tie. Reconnect the blue connector by inserting and pushing down the orange lever.
Replace everything in reverse order and reconnect the battery.
Code Module 17-01-2
Should get the warning light and message as shown below.

Day to day once the light comes on it’s just under 5l to fill if you do it straight away, about 6l from empty.
Good sense of achievement doing this but I’m not going to lie, it seems like a lot of effort for such a small thing which frankly should just be standard!
Thanks to @Pauly and the forum for the help.
Now remove the two T20 screws at the bottom of the instrument cluster (6), be careful not to drop them into the dash. The instrument cluster should then pull out with only a little bit of effort.


Feed the washer level sensor cable up from the footwell behind the dash to behind the instrument cluster.
Make sure the battery is disconnected if not already done so. Disconnect the blue connector on the back by pushing up the orange lever. Remove the cable tie securing the cable and remove the purple tab by sliding it off the blue plug.


The internal white connector should just slide out of the blue housing. This is a 32pin connector and the end slot numbers are stamped on the white connector. Luckily the slot we need is number 17 and is marked, no counting needed! Slide the cable in until it clicks into place and is solid.

Secure the cable to the existing cables and reinsert the white connector into the blue housing. Replace the purple tab and cable tie. Reconnect the blue connector by inserting and pushing down the orange lever.
Replace everything in reverse order and reconnect the battery.
Code Module 17-01-2
Should get the warning light and message as shown below.

Day to day once the light comes on it’s just under 5l to fill if you do it straight away, about 6l from empty.
Good sense of achievement doing this but I’m not going to lie, it seems like a lot of effort for such a small thing which frankly should just be standard!
Thanks to @Pauly and the forum for the help.
Reopening an old thread.
As part of my tailgate conversion, I need to run another washer pipe line to the rear washwipe. I brought a cheap replacement bottle only to see I could just change the pump without doing any wiring. Anyway, when changing the pump I'll be doing other jobs at the same time. ie fitting front PDC, TC and HDC buttons, EHU and B2B charging cable.
So my thoughts were to add this extra wire at the same time and activate the screen wash level sensor at the same time. Does anyone know the plug (and pin) part numbers or where I can get the connector now the shop is closed. Its the same plug size that fits the low level sensor on the header tank. I'll also need the pin to connect to the instrument cluster but I may have one already.
Thanks in advance .. Duncan.
Similar threads
- Replies
- 4
- Views
- 1K
- Replies
- 10
- Views
- 3K
- Replies
- 2
- Views
- 1K
- Replies
- 102
- Views
- 12K

