You are using an out of date browser. It may not display this or other websites correctly.
You should upgrade or use an alternative browser.
You should upgrade or use an alternative browser.
12v Lithium Leisure Battery Box 138Ah 1766Wh -- How I Done It --
- Thread starter Dellmassive
- Start date
This is an epic thread and big thanks to @Dellmassive for providing so much useful info.
I ended buying a lot of the kit from your first thread including 2x Valence batteries etc etc.
I dabbled with a basic Solar setup before Covid and got the bug! Now hoping to get out to Devon for a couple of weeks and really need to get my box built and not a load of unopened Amazon packages
@Dellmassive are you able to provide a wiring diagram to help me build it all
Here is a list of my parts
Thanks,
Pete
I ended buying a lot of the kit from your first thread including 2x Valence batteries etc etc.
I dabbled with a basic Solar setup before Covid and got the bug! Now hoping to get out to Devon for a couple of weeks and really need to get my box built and not a load of unopened Amazon packages
@Dellmassive are you able to provide a wiring diagram to help me build it all
Here is a list of my parts
- 2x Valence 138ah batteries
- DollaTek DC Ammeter,Digital DC... https://www.amazon.co.uk/dp/B07KW2GMS1?ref=ppx_pop_mob_ap_share
- All Trade Direct 1 X Strip Link &... https://www.amazon.co.uk/dp/B00904N8RE?ref=ppx_pop_mob_ap_share
- Victron Energy - ASS000100000 -... https://www.amazon.co.uk/dp/B073PD4BNP?ref=ppx_pop_mob_ap_share
- Victron Energy Smart Battery Monitor https://www.amazon.co.uk/dp/B075RTSTKS?ref=ppx_pop_mob_ap_share
- Victron Energy BPR110022000 Deep... https://www.amazon.co.uk/dp/B07MXGZ7H8?ref=ppx_pop_mob_ap_share
- Gloaso 100 Amp Common Busbar 4... https://www.amazon.co.uk/dp/B08Y56ZZK9?ref=ppx_pop_mob_ap_share
- Red & Black... https://www.amazon.co.uk/dp/B07KLW9VVX?ref=ppx_pop_mob_ap_share
- Red & Black... https://www.amazon.co.uk/dp/B07KM3HWBY?ref=ppx_pop_mob_ap_share
- Red & Black... https://www.amazon.co.uk/dp/B07QWLPDYC?ref=ppx_pop_mob_ap_share
- Red & Black... https://www.amazon.co.uk/dp/B07QWLQJGM?ref=ppx_pop_mob_ap_share
- Victron Energy SHU050150050... https://www.amazon.co.uk/dp/B0856PHNLX?ref=ppx_pop_mob_ap_share
- ARCELI 200A High Precision Watt... https://www.amazon.co.uk/dp/B07TCG84P6?ref=ppx_pop_mob_ap_share
- KIMISS Car Audio Stereo ANL Blade... https://www.amazon.co.uk/dp/B07FLPYK67?ref=ppx_pop_mob_ap_share
Thanks,
Pete
@Discobadger
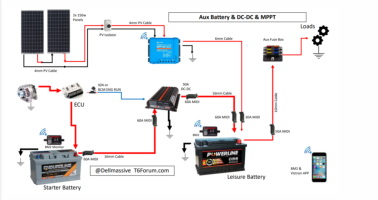
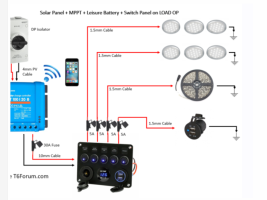
you might find these a help. . . .

 www.t6forum.com
.

.
.

.....
so in a nutshell . . .
battery POS --> master Fuse --> fuse box --> loads pos
battery NEG --> SHUNT --> battery NEG BUSBAR --> Loads negs
.
you might find these a help. . . .

Diagrams, Schematics & Wires -- How I Done It --
Diagrams, Schematics & Wires -- How I Done It -- ************************************************** Dellmassive`s -- "how I Done It" -- Thread ************************************************** Kit List And Stuff -- How I Done It & What I Use --...

.

.

.

.....
so in a nutshell . . .
battery POS --> master Fuse --> fuse box --> loads pos
battery NEG --> SHUNT --> battery NEG BUSBAR --> Loads negs
.
Perfect! I forgot to add my Victron MPPT and Victron inverter. Thanks! Hopefully it’ll all go to plan
Battery Box #3
its time for another battery box . . . well two actually. ( so 3 and 4 )
..................
this one will be made out of the standard Stanley tool box,
plus the second Poweroad 100ah lifepo4,
a 4way panel,
MIDI fuse bock,
and twin Andersons.
and a few switched USB and volt meter.
lets go.
+++++
these are the two batterys we will be using.

.
starting with a new box. . .

.
market out for the 4way panel. . .
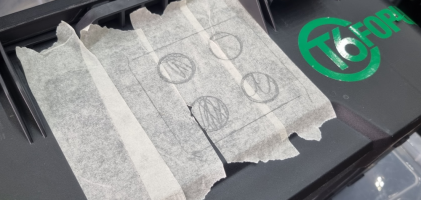
i just cut the 4 round holes out . . .

so the lock nuts hold it all together . . .
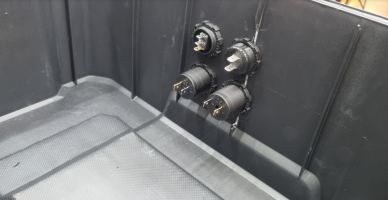
next i added 10mm dense foam to the bottom for the battery to sit on . . .

im using these 3way MIDI fuse blocks as ill be using 50A anderson connecors, and need 50A current . . . . so beefy fuses are needed.

using 8AWG/10AWG silicone cable . . and crimping the Anderson ends on . . .

then heatshrink . .
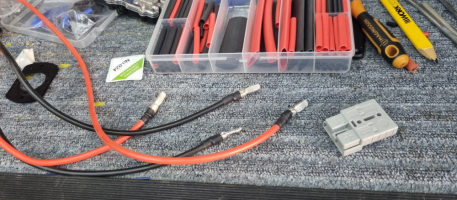
then wired to the fuse block.

i wired the switch panel in 2.5mm singles . . .
i had the 12v socket direct to the fuse block. . . . and the other bits via the switch . .

a quick test everything powers up.

,
it looks like this . . .
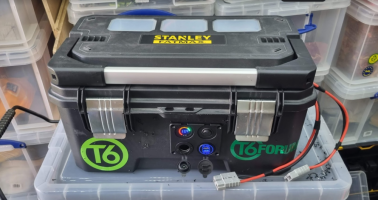
.++++
testing:
adding the box to the stack . . .
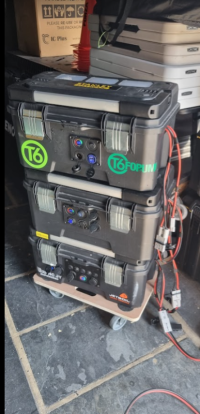

with the Anderson connected.... we can see the box pulling just under 20A from the stack . .

the stack is connected to a victron 100/30 solar controller. . . with 300w (2x150w) panels. . .

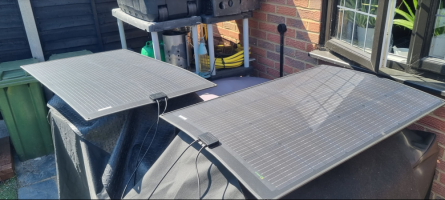
.
...
solar charge controller . . .

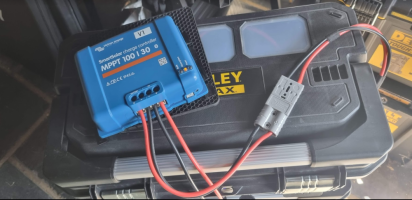
and stack boxes 1,2 & 3
its time for another battery box . . . well two actually. ( so 3 and 4 )
..................
this one will be made out of the standard Stanley tool box,
plus the second Poweroad 100ah lifepo4,
a 4way panel,
MIDI fuse bock,
and twin Andersons.
and a few switched USB and volt meter.
lets go.
+++++
these are the two batterys we will be using.

.
starting with a new box. . .

.
market out for the 4way panel. . .

i just cut the 4 round holes out . . .

so the lock nuts hold it all together . . .

next i added 10mm dense foam to the bottom for the battery to sit on . . .

im using these 3way MIDI fuse blocks as ill be using 50A anderson connecors, and need 50A current . . . . so beefy fuses are needed.

using 8AWG/10AWG silicone cable . . and crimping the Anderson ends on . . .

then heatshrink . .

then wired to the fuse block.

i wired the switch panel in 2.5mm singles . . .
i had the 12v socket direct to the fuse block. . . . and the other bits via the switch . .

a quick test everything powers up.

,
it looks like this . . .

.++++
testing:
adding the box to the stack . . .


with the Anderson connected.... we can see the box pulling just under 20A from the stack . .

the stack is connected to a victron 100/30 solar controller. . . with 300w (2x150w) panels. . .


.
...
solar charge controller . . .


and stack boxes 1,2 & 3
Battery Box #4
here's the next one,
same box and fuse panel, but different battery. . .
start with a new box...

mark out . . . .

drill out holes . . .

screw in panel . . . .

make up main fuse supply cable . . . ( ill be adding a main master MIDI inline fuse to this cable when they arrive - for now ill be cautious of tghe main cable is unfused, though circuits from the fuse box onwards are fused)

from panel wired in 2.5.. singles . . .
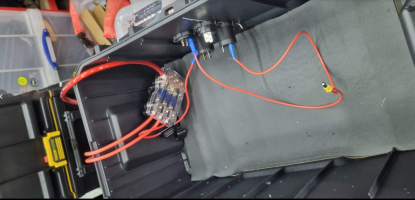

10mm foam at bottom,
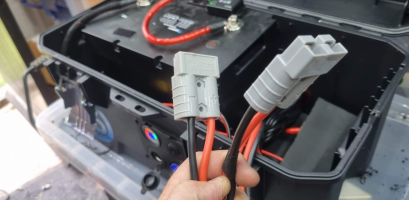
battery in,
quick test.
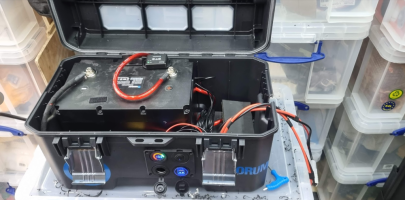
.....
all done . . . .
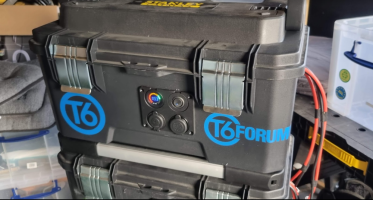
.....
testing:
adding the box to the top of the stack . . . .
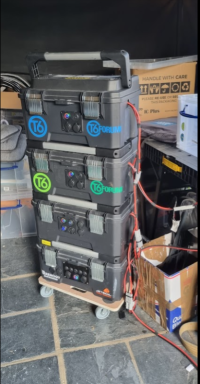
we can see its drawing 13.5A from the stack at the battery's equalize . . .
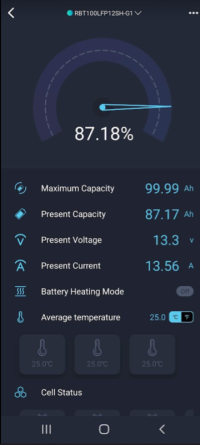
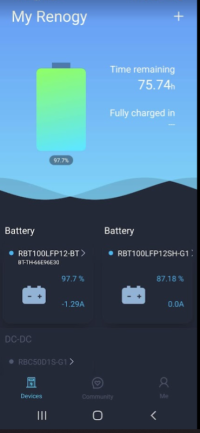
so there we have it . . .
another battery box.
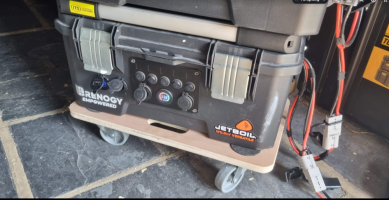
100Ah lifepo4 Renogy.
1200Wh . . .
with 12v outlet,
with USB charger,
with Volt meter,
With twin Anderson SB50 50A connectors.
..
here's the next one,
same box and fuse panel, but different battery. . .
start with a new box...

mark out . . . .

drill out holes . . .

screw in panel . . . .

make up main fuse supply cable . . . ( ill be adding a main master MIDI inline fuse to this cable when they arrive - for now ill be cautious of tghe main cable is unfused, though circuits from the fuse box onwards are fused)

from panel wired in 2.5.. singles . . .


10mm foam at bottom,
battery in,
quick test.


.....
all done . . . .

.....
testing:
adding the box to the top of the stack . . . .

we can see its drawing 13.5A from the stack at the battery's equalize . . .


so there we have it . . .
another battery box.
100Ah lifepo4 Renogy.
1200Wh . . .
with 12v outlet,
with USB charger,
with Volt meter,
With twin Anderson SB50 50A connectors.
..
Last edited:
this is the full stack. . . . .

we have four 100ah Lithiums.
they are around 1200wh each . . . .
thats 1200+1200+1200+1200= 4800wh worth of stored energy.
the stack works like this.
each box has two anderson links, one for power in - one for power out.
....
the plan is to feed the bottom box with the solar controller from the Victron.
then each connects to the one above.
the very top box will have the mains inverter connected to it.
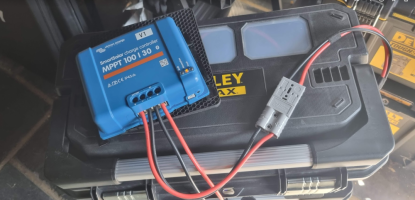

...

we have four 100ah Lithiums.
they are around 1200wh each . . . .
thats 1200+1200+1200+1200= 4800wh worth of stored energy.
the stack works like this.
each box has two anderson links, one for power in - one for power out.
....
the plan is to feed the bottom box with the solar controller from the Victron.
then each connects to the one above.
the very top box will have the mains inverter connected to it.


...
-- Upgrade Time --
after building battery box 3 & 4 I've decided that the Victron Smart shunt is too valuable to do without. . .
i already got one in each battery box 1 & 2. . .
as seen here:

so I'm adding another two, for the newer battery boxes. . .

the other battery's have there own APPS , ,
ie Renogy DC Hone and the POWEROAD APP. .
but its a pain opening up different apps to see what the four battery boxes are doing. . . and following the current flow when im charging all four boxes at once.
were using these two 30A chargers. . . . so charging with 60A combined.

i would like to see the whole picture at once. . .
so ill add these two . .
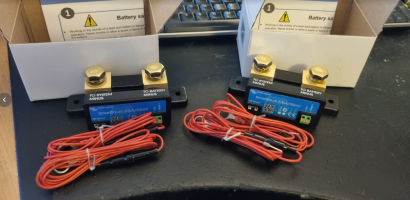
+++++++++++++
this is what i got:


++++++++++++++

after building battery box 3 & 4 I've decided that the Victron Smart shunt is too valuable to do without. . .
i already got one in each battery box 1 & 2. . .
as seen here:

so I'm adding another two, for the newer battery boxes. . .

the other battery's have there own APPS , ,
ie Renogy DC Hone and the POWEROAD APP. .
but its a pain opening up different apps to see what the four battery boxes are doing. . . and following the current flow when im charging all four boxes at once.
were using these two 30A chargers. . . . so charging with 60A combined.

i would like to see the whole picture at once. . .
so ill add these two . .

+++++++++++++
this is what i got:


++++++++++++++

Last edited:
-- Thats BETTER --
I've added the Victron Shunts into the battery boxes. . .

using these 10x10 battery 10mm lugs and a new piece of cable . . .
so the shunt now sits between the NEG battery post and the NEG busbar . .

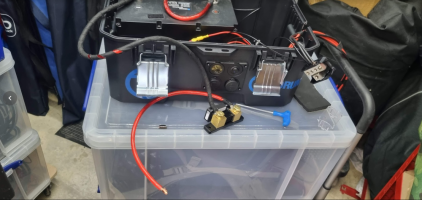
then adding in the supplied 1A fused link to the battery POS. . . .

the shunt sits nicely down the front of the battery . . .
ill Velcro in place once I'm happy with the testing . . .
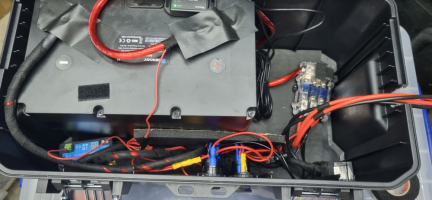
this is the 2nd Poweroad box. . . .

and the second Renogy box . . .

after powering up we needed to do the latest FW update. . . . and password change. .

here is the final result with all four boxes back in a stack . . .

and interconnected with 50A Andersons . . .

and on charge with the 30A charger to start . . .

..
we can now see all four boxes SOC / volts / amps on one screen . . ( charger off )

'''
and now with the charger ON . .
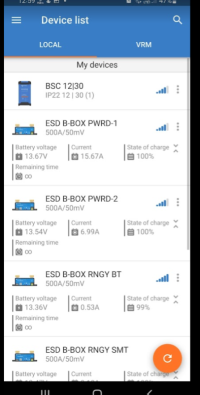

+++++++++++++++++++++++++++++++++++++++++
the keen eyed of you may have noticed that the Poweroad battery's are nicking most of the charge current. . .
leaving next to none for the Renogy`s . .
even though they are all 12v Lifpo4 battery's.
the reason for this is the slight difference in cell chemistry and internal resistance and and cell voltages. .
and another reason why mixing battery's isn't a great idea.
++++++++++
we can see they Poweroad must have lower internal resistance than the renogy.
so they will grab all the charge current untill 100% full, at which point the Renogys will start to feed off the current and reach 100% soc
eventually all four will reach 100% SOC.
++++++++++
it looks like that i you have the time for the effective sequential charging, then all four together will work.
but if time is important . . . then the four boxes should be split down into two matching pairs,
Renogy and Poweroad - then use the two chargers to charge each bank separately. . .
++++++++++
I've added the Victron Shunts into the battery boxes. . .

using these 10x10 battery 10mm lugs and a new piece of cable . . .
so the shunt now sits between the NEG battery post and the NEG busbar . .


then adding in the supplied 1A fused link to the battery POS. . . .

the shunt sits nicely down the front of the battery . . .
ill Velcro in place once I'm happy with the testing . . .

this is the 2nd Poweroad box. . . .

and the second Renogy box . . .

after powering up we needed to do the latest FW update. . . . and password change. .

here is the final result with all four boxes back in a stack . . .

and interconnected with 50A Andersons . . .

and on charge with the 30A charger to start . . .

..
we can now see all four boxes SOC / volts / amps on one screen . . ( charger off )

'''
and now with the charger ON . .


+++++++++++++++++++++++++++++++++++++++++
the keen eyed of you may have noticed that the Poweroad battery's are nicking most of the charge current. . .
leaving next to none for the Renogy`s . .
even though they are all 12v Lifpo4 battery's.
the reason for this is the slight difference in cell chemistry and internal resistance and and cell voltages. .
and another reason why mixing battery's isn't a great idea.
++++++++++
we can see they Poweroad must have lower internal resistance than the renogy.
so they will grab all the charge current untill 100% full, at which point the Renogys will start to feed off the current and reach 100% soc
eventually all four will reach 100% SOC.
++++++++++
it looks like that i you have the time for the effective sequential charging, then all four together will work.
but if time is important . . . then the four boxes should be split down into two matching pairs,
Renogy and Poweroad - then use the two chargers to charge each bank separately. . .
++++++++++
setting for the Victron Shunt . . .
In VictronConnect see: Settings > Battery > Tail current.
Some lithium battery chargers stop charging when the current drops below a set threshold. The tail current must be set higher in this case.
Peukert exponent
In VictronConnect see: Settings > Battery > Peukert exponent.
When subjected to high discharge rates, lithium batteries perform much better than lead acid batteries. Set the Peukert exponent at 1.05, unless the battery supplier advises otherwise.
Charge efficiency
In VictronConnect see: Settings > Battery > Charge efficiency factor.
The charge efficiency of lithium batteries is much higher than that of lead acid batteries. We recommend setting the charge efficiency at 99%.
Discharge floor
In VictronConnect see: Setting > Battery > Discharge floor
This setting is used in “the time to go” calculation and is set at 50% by default for lead acid batteries. However, lithium batteries usually can be discharged significantly deeper than 50%. The discharge floor can be set to a value between 10 and 20%, unless the battery supplier advises otherwise.
Important warning
Lithium batteries are expensive and can be irreparably damaged due to very deep discharge or overcharge. Damage due to deep discharge can occur if small loads slowly discharge the battery when the system is not in use. Some examples of these loads are alarm systems, standby currents of DC loads and back current drain of battery chargers or charge regulators.
A residual discharge current is especially dangerous if the system has been discharged all the way until a low cell voltage shutdown has occurred. At this moment the state of charge can be as low as 1%. The lithium battery will get damaged if any remaining current is drawn from the battery. This damage can be irreversible.
A residual current of 1mA for example can damage a 100Ah battery if the battery has been left in discharged state during more than 40 days (1mA x 24h x 40 days = 0.96Ah).
The battery monitor draws <12mA from the battery. The positive supply must therefore be interrupted if a system with Li-ion batteries is left unattended during a period long enough for the battery monitor power consumption to completely discharge the battery.
In case of any doubt about possible residual current draw, isolate the battery by opening the battery switch, by pulling the battery fuse(s) or by disconnecting the battery positive when the system is not in use.
 www.victronenergy.com
4.5. Make Lithium settings (if needed)
LiFePO4 (Lithium Iron Phosphate or LFP) is the most used Li-ion battery chemistry. The factory defaults are in general also applicable to LFP batteries with exception of these settings:- Tail current.
- Peukert exponent.
- Charge efficiency.
- Discharge floor.
In VictronConnect see: Settings > Battery > Tail current.
Some lithium battery chargers stop charging when the current drops below a set threshold. The tail current must be set higher in this case.
Peukert exponent
In VictronConnect see: Settings > Battery > Peukert exponent.
When subjected to high discharge rates, lithium batteries perform much better than lead acid batteries. Set the Peukert exponent at 1.05, unless the battery supplier advises otherwise.
Charge efficiency
In VictronConnect see: Settings > Battery > Charge efficiency factor.
The charge efficiency of lithium batteries is much higher than that of lead acid batteries. We recommend setting the charge efficiency at 99%.
Discharge floor
In VictronConnect see: Setting > Battery > Discharge floor
This setting is used in “the time to go” calculation and is set at 50% by default for lead acid batteries. However, lithium batteries usually can be discharged significantly deeper than 50%. The discharge floor can be set to a value between 10 and 20%, unless the battery supplier advises otherwise.
Important warning
Lithium batteries are expensive and can be irreparably damaged due to very deep discharge or overcharge. Damage due to deep discharge can occur if small loads slowly discharge the battery when the system is not in use. Some examples of these loads are alarm systems, standby currents of DC loads and back current drain of battery chargers or charge regulators.
A residual discharge current is especially dangerous if the system has been discharged all the way until a low cell voltage shutdown has occurred. At this moment the state of charge can be as low as 1%. The lithium battery will get damaged if any remaining current is drawn from the battery. This damage can be irreversible.
A residual current of 1mA for example can damage a 100Ah battery if the battery has been left in discharged state during more than 40 days (1mA x 24h x 40 days = 0.96Ah).
The battery monitor draws <12mA from the battery. The positive supply must therefore be interrupted if a system with Li-ion batteries is left unattended during a period long enough for the battery monitor power consumption to completely discharge the battery.
In case of any doubt about possible residual current draw, isolate the battery by opening the battery switch, by pulling the battery fuse(s) or by disconnecting the battery positive when the system is not in use.
4. Configuration
I am thinking on building the same using a Leisure battery I have. What would you advise as the bare minimum I would need?
Obv the box, cables and fittings.
Panel with various outlets as you have shown
Fused distribution for outlets
Same for main inputs
I am get the point of the shunt with bluetooth connectivity, but the other Victron products ie the smart battery monitor, do I need this?
I have a Ecoflow River Pro that I have charged with my Renogy 100W Suitcase Solar Panel when camping. I bought the leisure battery a few years ago and bought one of these Bison boxes but its been pants. It trips out all the time when using a powered cool box, now replaced with a Apticool TAW35 coolbox/fridge. I quite fancy making something better and then stumbled across this thread. Any advice would be appreciated.
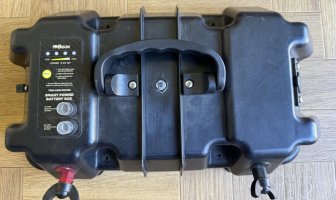


your list look good.I am thinking on building the same using a Leisure battery I have. What would you advise as the bare minimum I would need?
Obv the box, cables and fittings.
Panel with various outlets as you have shown
Fused distribution for outlets
Same for main inputs
I am get the point of the shunt with bluetooth connectivity, but the other Victron products ie the smart battery monitor, do I need this?
I have a Ecoflow River Pro that I have charged with my Renogy 100W Suitcase Solar Panel when camping. I bought the leisure battery a few years ago and bought one of these Bison boxes but its been pants. It trips out all the time when using a powered cool box, now replaced with a Apticool TAW35 coolbox/fridge. I quite fancy making something better and then stumbled across this thread. Any advice would be appreciated.
View attachment 277222
View attachment 277223
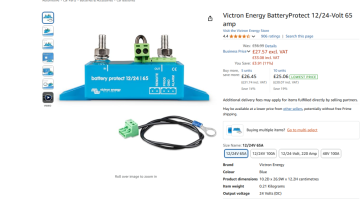
but seeing as you are using a AGM / SLA battery, i would recomend a LOW BATTERY DISCONECT,
which will disconect the loads whan the battery drops too low,
if you run those batterys low, they will end up knackered.
apart from that, id look at swapping out that battery for a lithium . . but that can wait till later.
+++++++++++++
look at getting one of these.
...
...
Similar threads
- Replies
- 2
- Views
- 372
- Replies
- 25
- Views
- 1K
- Replies
- 13
- Views
- 2K
- Replies
- 90
- Views
- 6K


