Fault code P0299 Boost - 2019 Crafter

Hi folks, looking at the soot measures vs calculated amounts, the minus figures is puzzling me?
Should I have rest the dpf in any way after completion of the forced regen?

Or would this munis fugue suggest :

A) a sensor is at fault
B) previous ownswer has changed dpf settings to try and hide the faukt ?

Is there a way to reset it?
 
Not sure if this gives any indication to what is causing the po299..but….
When I tested the n75, it was getting a good 25mmhg on the inlet tube at tick over.
When I swapped the gauge onto the outlet side, which goes to the turbo waste gate, I increased the engine RPM, I expected to see the vac drop off and then return when I stopped revving, but what the vac guage needle did was flicker on and off , not go off then back on in a solid kind of way, instead it kind of flickered around, on and off….the needle
Jumping up and down. it did return to 20+mmhg when I stopped revving.

I replaced the n75 and drive the van, I thought it had cured it, but shortly after the fault came back on.

It seems that replacing the n75 valve did improve it, but not cure it.

Any thoughts on this ?

If I waggle the turbo a waste gate actuator there is the tiniest bit of play, where it feels like either the rod or the gate itself has about a mm of play. You can physically hear a tiny bit of play as if the gate just has a mm of “flop” …..

Could that be doing it ?

Edit-* I just went out to check the play on that waste gate actuator, it deffo has about a mm of play , I can hear the gate just about open and close in the tiny amount of free play. Shouldnt this be a tight solid shut gate with zero play? It’s closed yes, but sealed I’m not so sure?
Could be the rod linkage itself I guess but it does feel like the gate is just opening and closing a tiny amount ?
 
Last edited:
Hi folks…
Hope you can stereo me in the right direction….

I’m still trying to sort out my 2019 crafter (2.0 daua fwd)

As part of the ongoing saga trying to solve of my po299 underboost issue I’ve looked at the dpf figures and it’s agreed that it has a large volume of ash that really isn’t helping. 85g ash present With a 110g limit.
So, whilst I don’t think it’s the cause of my issue directly , I’d like to eliminate that from at least have the potential of being in anyway a contributing factor to my issue , namely through potential back pressure.
I don’t think it is, but I don’t want to leave it as it will only get worse…
And at this stage, I don’t want to delete it, I just want to clean it….

So After watching a stack of videos on how best to clean a dpf through back flushing, I got the van up in the ramps and went underneath to remove the dpf.
And then Shortly after I came straight back out from underneath slightly overwhelmed By what I found under there…..
The dog didn’t look at all like what I’d seen most people fettling with on utube, but instead looked like Part of the lunar module attached to the turbo and exhaust……,
I’m guessing this strange looking front part is a cat, and then the back half that looks a little more like an exhaust is the dpf….? Right?

So , my questions ….
Should I leave the cat in place and just remove the dpf part? Or are they one unit?

Is cleaning to cat just as important as cleaning the dpf, or is it unlikely ash would accumulate in the cat?

is it likely that the cat is just as filthy as the dpf? And so Also best cleaned …

The soot level after a forced regen was like 17g but the ash was high at 85g

In terms of cleaning, is the 85g of ash vcds tells me I have likely to be located in the dpf only ? Or does it also lurk in the cat?

If that’s the case, do I need to remove the cat and flush that too , or just the dpf?

I saw that alloy wheel Cleaner was a good product for cleaning ash from the dpf, but I imagine would destroy a cat insides quite easily? So is there anything that can be used in both?

What chemical Is advised for cleaning the cat?

Also , is is safe to use a hose pipe to flush each? Or am I best leaving the cat part alone?

Can I use a pressure washer on the dpf part?I expect I can’t for the cat….

I appreciate this is unlikely to solve my under boost issue in any way, but I want to eliminate anything identified that isn’t quite right along the way….. which for Now is a potentially smelly dpf….some glow Plugs to Renew, and a turbo /dpf clamp which is leaking fumes….
All in the hope of getting my crafter in a better condition….

Any advise is welcomed
 
Last edited:
Hi folks,

I appreciate I’ve already asked a heap
Of questions and to those who have tried to help me I appreciate your advice and guidance.
I am truly greatful and appreciate your patience…

My van is booked in at a bag specialist but like all good places there is a long wait. And so I’m continuing to try and work out the problem.

So
E of you have asked me for data from Vcds but I’m just not skilled enough with it to give the info requested , though I’ve tried a lot of times :(

The fault code I have in po299, underboost.
I’ve checked all the vac lines and tested that they hold vac, and get vac etc when running, all seem ok.
I did replace the n75 as allthough the line to turbo actuator held a good vaccum and the actuator seemed to be working correctly, the vac gauge seemed to flicker when I revved the engine rather than just go off then back on. (That’s seemed a little strange to me).

I’ve checked the turbo inlet and outlet, both are clean, the spindle has no play and moves freely.

The charge air cooler big elbows are also clean inside.
The egr was clear and clean, the solenoid and valve seems to work ok. I did change the egr inlet hose and gaskets.

I then moved onto the possibility that the cat or dpf may be blocked and causing a back pressure.
I removed and cleaned both and they seemed to run clear and freely .

Now that I’ve refitted the dog and cat, the underboost seems less frequent but last night in a test drive the cat got really really hot.

The exhaust tail pipe seems to have a low temp and not much pressure blowing out of it .

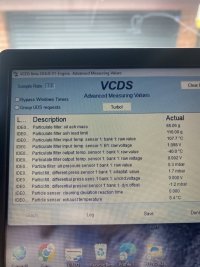
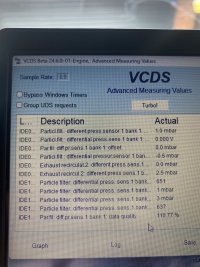
I took some readings on Vcds and the inlet and outlet temp don’t look right to me.
I let is 107° but outlet temp says -40° ? Which can’t be right.
I’ll try and post the pics below of what reading I manged to get.

My question is, first this suggest my dof is blocked (even more after flushing with wynnes fluid) or does it mean the sensors are duff.

If it is the sensors, now would that an effect the running of the van, the exhaust flow , and the temp at the cat? Would it? It would it just throw an engine light faukt up?

I haven’t got any fault
Codes come up, none in relation to dpf or cat?

I appreciate you guys have given me advice but I’m stuck in the place of not knowing how to use Vcds well, I can’t get any “specified” rates up to compare my readings to, and I’ve still got two/three weeks untill it’s in the garage with an expert.

IMG_8749.jpeg

IMG_8750.jpeg

IMG_8751.jpeg

IMG_8752.jpeg
 
So
E of you have asked me for data from Vcds but I’m just not skilled enough with it to give the info requested , though I’ve tried a lot of times :(
You are almost there... :thumbsup:

Code:
Perhaps you could make a recording with VCDS of the following data when the underboost condition happens:

IDE00021 Engine RPM
IDE00075 Vehicle speed
IDE00085 Normed load value
IDE00190 Charge air pressure: specified value
IDE00347 Air mass: actual value:
IDE07376 Intake manifold pressure: act. value calculated
IDE07757 Exhaust recirc.valve 1 bank 1: posit.feedback - Actual value
IDE07784 Turbine actuator 1 bank 1: posit.feedback - Specified value
IDE07785 Turbine actuator 1 bank 1: posit.feedback - Actual value
IDE07789 Turbine actuator 1 bank 1: activation
IDE07790 Bypass valve for turboch 1 turbine inlet: activation
IDE07793 Turboc.1 turbin.bypass valve 1 B. 1: pos.feedback - Actual value

1720800280426.png
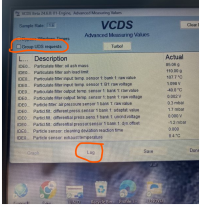
Tick also the following - Group UDS requests by 7, or 8 whichever works.

Please do not forget to START the logging.
Now start the engine -as would like to catch how the turbo "initiates" itself.

Well, since your last post you have updated VCDS to a Beta version - thus the log file will be in folder C:\Ross.Tech\VCDS-Beta\Logs


Have you fixed the leak in the exhaust???
Based on your pictures - if the engine is running - there is a big leak in the exhaust === because particulate air pressure readings are next to none.

took some readings on Vcds and the inlet and outlet temp don’t look right to me.
I let is 107° but outlet temp says -40° ? Which can’t be right.

-40 °C for output of DPF is perfectly normal for Crafter - because there is not such a sensor installed (thus reading -40 °C = open circuit)

See below VCDS snippet about the sensor (from your engine blockmap file)

IDE10225-MAS09654Install. list for temperature sensors bank 1-Exhaust gas temperature sensor downstream of particulate filterNot supported


thanks mmi, I will Go out to the van and try and take the reading as soon as the kids finish tea!
I fitted new seals to the turbo to cat, and cat to dpf, but I reused the clamps do
Maybe it’s that…..
I was going to order new ones online but didn’t know what size they are !

I have got an exhaust leak for sure but I can’t seem to pin point it.
I’ll get it back up in the ramps and take a close look.
I had thought it was leaking out because the cat was stuffed but on seeing exhaust smoke earlier today it must be leaking …. Some xame
From the top temp sensor on the cat as I mustn’t have tightened it enough (I didn’t want to swing off them)
 
i think I've done it mmi, this was the log, i clicked start, then started the vehicle and let it run, then closed the log and saved it to the file attached. should i have just done that or should i take it out for a drive ?
let me know if this is ok please..

OOp's , i dont think that did it looking at the readings ( 0 rpm), ill try again.
 

Attachments

  • Log-CF68JZH-WV1ZZZSYZK9031361-209709km-130307mi - log1.txt
    1.1 KB · Views: 3
Last edited:
try this one , this reads better !
(although i've no idea what it means really.... videos I've watched on utube they somehow get specified measurements up against actual so they can see what is wonky.... i just don't seem to be able to do that ? i also cant work out how to make a live data log so i can start off on a short journey and record it doing its fault in a live data log??? would it be like I've just done ? how do you get it to take a snap shot at the point the fault occurs ?)
 

Attachments

  • Log-CF68JZH-WV1ZZZSYZK9031361-209709km-130307mi-log#2.txt
    2.1 KB · Views: 2
Last edited:
how to make a live data log so i can start off on a short journey and record it doing its fault in a live data log??
Well, the logs you posted were just 1 sample, not a continuous log. It seems you pressed only Save - to make a sample.

You should press "Log" to get prepared for logging

1720809396951.png
Then as below - enter a filename (a different name for each session).
Press "Start" - now it's recording whatever you selected.

start.png

Now - start the engine, take your van for a ride...
By pressing "Marker" you'll get, well, a marker into the log. E.g. for anything possibly interesting for analysis.

Finally... stop
Post the logfile.
 
I’ve just set off to try this but the cat is smoking like a chimney as soon as I pulled off the drive.

I’ve just checked its temp with an infrared temp scanner and it was only about 190°.
I’m thinking it may just be burning off any remnants of cleaner ..

Van ticks over nice, revs nice, sounds nice.
I thought it was exhaust leak but now I’m thinking it’s just burning off the remnants of the degreaser.

I’ll leave it ticking over for half an hour.

Engine temp is fine, everything seems fine. It’s just a little alarming
 
I’ve got my son sat in the van with me ready to click the marker button. Do I have to save a file every time he clicks the marker , or will it just take a snap shot each time for the entire session?
 
  • Like
Reactions: mmi
I’ve got my son sat in the van with me ready to click the marker button. Do I have to save a file every time he clicks the marker , or will it just take a snap shot each time for the entire session?
After pressing "Start" VCDS just keeps on recording - no need to stop or save until all driving is done. Especially useful is to let engine idle and keep recording for a minute after a run - gives good, stable reference data.

The marker just puts a "note" into log - for post analysis to easier find points of interest. Just helps to scroll the data if a known spot is there. Pressing the "Marker" doesn't affect recording itself. Anyways, the markers are useful if the recordings are hours but not necessarily for short runs. Just stay safe - just let the VCDS do the recording.

Usually the wonky data is fairly obvious - especially as now. There are three pairs of "commanded" and "actual" values which should stick close together.

IDE00190 Charge air pressure: specified value​
IDE07376 Intake manifold pressure: act. value calculated​
IDE07784 Turbine actuator 1 bank 1: posit.feedback - Specified value​
IDE07785 Turbine actuator 1 bank 1: posit.feedback - Actual value​
IDE07790 Bypass valve for turboch 1 turbine inlet: activation​
IDE07793 Turboc.1 turbin.bypass valve 1 B. 1: pos.feedback - Actual value​
The rest just to help the understand the conditions - engine load, engine RPM, air mass, EGR position, etc.​
 
ok so i just got back from run and read your message above after i stopped :rofl:

the smoking stopped, i think it is just burning off the cleaner, but it was a little alarming.

here is the log, i think the markers were ok up to about 7 or 8, and THEN it threw its flashing coil light up. po299.

take a look, see if anything jumps out.

what i will say is it only faulted once on this test drive. before the test drive i checked a few things over, the hard plastic rigid pipe that comes off the turbo up to the charge air inlet, i removed it and checked the o'ring. there was a little oil residue around the base of the pipe and the o ring looks a littlle slack at best. i cleaned it up, reseated it and refitted the pipe. i will go get a new seal tomorrow as my box of o'rings here just stops a few sizes below this one ( typical).

the noise from the rear dpf seems to have settled (but still there a little, it just sounds wheazy when under load) i also noted under heavy foot load a wheazy noise from somewhere just under the windscreen. thats where the n75 valve and its other look alike vale are located. I've not found any leaks in any of the pipework there. maybe its the charge air thing ...

let me know if that log is of use....


(I don’t think I’ve done that right again have I …..)

I’ll try again in the morning…. Sorry pal, I’m an idiot
 

Attachments

  • Log-CF68JZF-WV1ZZZSYZK9031361-full log.txt
    1.3 KB · Views: 6
Last edited:
ok so i just got back from run and read your message above after i stopped
let me know if that log is of use....
Well, unfortunately the log is only a single sample of data.
But no worries, we'll get there. It will be worth all the exercise. The VCDS is extremely useful tool when you can take advantage of it's full potential.
I’ll try again in the morning….
Looking forward the new log :thumbsup:
 
Hi MMI, I've tried again, this time its saved it as an excel doc, but i think it shows the markers logged correctly now.

i did two logs over a short journey.
i also ran off the list of fault codes, this time added to the usual PO299 underboost, was a PO401 egr insufficient flow. not sure if that happened after the pO299 fault had occurred but i imagine so.

after stopping to save the log and clear the fault codes/ dash lights, the van reset fine as always. i set off and drove very lightly and the fault stayed away untill the van started going up a hill, then the coil light came on again, so underboosting under load.... my suspicion is turbo is working 99% of the time, but this 1% is doing it. i had suspected an exhaust manifold leak (maybe a crack) but i dont know maybe its sticking vNT vanes .... see what you think the number say..

(fingers crossed I've done it right this time)
 

Attachments

  • LOG-01-IDE00021_&11 - final log v1.CSV
    67.4 KB · Views: 4
  • LOG-02-IDE00021_&11 final log v2.CSV
    31.9 KB · Views: 2
  • FAULT CODES LOG V1.txt
    6.3 KB · Views: 2
  • Love
Reactions: mmi
if it helps, the above files are the full unfiltered sheets. but for your ease I've filtered these sheets below to just show the marker readings.

;)
 

Attachments

  • LOG-01-IDE00021_&11 - final log v1.3.xlsx
    72.8 KB · Views: 3
  • LOG-02-IDE00021_&11 final log v2.3.xlsx
    40.2 KB · Views: 1
  • Like
Reactions: mmi
(fingers crossed I've done it right this time)
Yes, looks good - well, the issue can be seen in the data.

Just first sample to show where the issue is and how it looks. Now need to look how the rest of data relates to it... stay tuned...

GREEN is requested charge pressure
RED is the actual charge pressure

Obviously the issue is either loss of pressure (leak?), or insufficient capability (something sticky?) to build up the pressure.
Normally these curves overlap.

1720891953933.png
Markers were found at 487 and 495 seconds.


Anyways - to improve data collection rate there is one more trick in VCDS.
Tick "Group UDS requests" - then opens up a selection box - select 7 or 8 (or whatever value works!).

1720891242722.png

This massively improves data collection rate - now we got a sample every 1.3 seconds. Using the trick we'll improve the throughput almost 10 times - thus allows us to catch very short glitches.

On the plot each dot is a sample - sometimes the events might happen inbetween.


if it helps, the above files are the full unfiltered sheets. but for your ease I've filtered these sheets below to just show the marker readings.

;)
Thank you - a good idea. However, as usually the events spread out quite a bit I prefer the "raw" data to see where an issue might already start to develop. Also as people usually are a bit slow the markers are after the event.
 
Back
Top