You are using an out of date browser. It may not display this or other websites correctly.
You should upgrade or use an alternative browser.
You should upgrade or use an alternative browser.
Fitting the OEM Auxillary Heating Ductwork
- Thread starter DaveyB
- Start date
Do you still have this at all ?
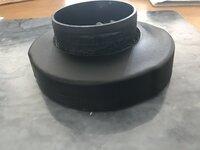
In fact does anyone want it for the price of postage and packing? At the moment its just a door stop in living room.
View attachment 70418
Yep still cluttering up living room with oodles of hard to throw out shite.Do you still have this at all ?
Only just seeing this now as I search up stuff for my own van conversion. This is so good! Well done. Is it still going well these couple of years on? You must be pretty pleased!
Why are more people not using this as the ducting route instead of the rear of driver seat options I see everywhere?!
Rather than the expense of the b pillar and OEM vent ducting that you have gone for, do you think the standard flexy 60mm ducting that supplies heat from the eberspacher woudl fit up the pillar base and allow you to put the circular panel mounted vent provided with the heater through the pillar trim instead?
David
Only just seeing this now as I search up stuff for my own van conversion. This is so good! Well done. Is it still going well these couple of years on? You must be pretty pleased!
Why are more people not using this as the ducting route instead of the rear of driver seat options I see everywhere?!
Rather than the expense of the b pillar and OEM vent ducting that you have gone for, do you think the standard flexy 60mm ducting that supplies heat from the eberspacher woudl fit up the pillar base and allow you to put the circular panel mounted vent provided with the heater through the pillar trim instead?
David
I am pretty sure that would work. But is it really worth the hassle. Whats the price of the extra genuine vw ducting? I think i paid approx 120 euros, 100 quid including delivery to uk.
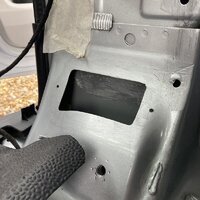
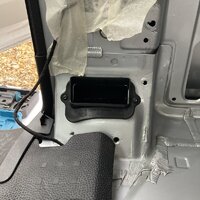
But it is a real bind cutting the hole in the metalwork for the vw duct, cause you have no template, you just have to measure, cut, measure again, trim a bit more metal off. Hopefully you make no mistakes and get a nice snug fit.
Easier with flexible ducting and not to have to be too precise cutting the hole? Maybe easier.
I would go under your van and just try the ducting.
One thing about the vw duct though it branches to two vents. This would have the effect of the air slowing down. So less of a hair dryer effect.
Its your call its your van.
I saved the heater from my old T4 and it had been known, when we had in running in there, to be used as an actual hair drier!I am pretty sure that would work. But is it really worth the hassle. Whats the price of the extra genuine vw ducting? I think i paid approx 120 euros, 100 quid including delivery to uk.
But it is a real bind cutting the hole in the metalwork for the vw duct, cause you have no template, you just have to measure, cut, measure again, trim a bit more metal off. Hopefully you make no mistakes and get a nice snug fit.
Easier with flexible ducting and not to have to be too precise cutting the hole? Maybe easier.
I would go under your van and just try the ducting.
One thing about the vw duct though it branches to two vents. This would have the effect of the air slowing down. So less of a hair dryer effect.
Its your call its your van.
Thanks for your thoughts.
Where did source all the kit you show installed please?I am pretty sure that would work. But is it really worth the hassle. Whats the price of the extra genuine vw ducting? I think i paid approx 120 euros, 100 quid including delivery to uk.
But it is a real bind cutting the hole in the metalwork for the vw duct, cause you have no template, you just have to measure, cut, measure again, trim a bit more metal off. Hopefully you make no mistakes and get a nice snug fit.
Easier with flexible ducting and not to have to be too precise cutting the hole? Maybe easier.
I would go under your van and just try the ducting.
One thing about the vw duct though it branches to two vents. This would have the effect of the air slowing down. So less of a hair dryer effect.
Its your call its your van.
There isn't enough room for anything like that. You will not be able to turn the squashed 60mm duct through 90° to attach it to a vent.Only just seeing this now as I search up stuff for my own van conversion. This is so good! Well done. Is it still going well these couple of years on? You must be pretty pleased!
Why are more people not using this as the ducting route instead of the rear of driver seat options I see everywhere?!
Rather than the expense of the b pillar and OEM vent ducting that you have gone for, do you think the standard flexy 60mm ducting that supplies heat from the eberspacher woudl fit up the pillar base and allow you to put the circular panel mounted vent provided with the heater through the pillar trim instead?
David
Ok, got it. Thanks.There isn't enough room for anything like that. You will not be able to turn the squashed 60mm duct through 90° to attach it to a vent.
Some of the chinese heaters have outlet ends with 4 holes in them, you might be able to squeeze them through a suitably sized hole in the B pillar then take them to different outlets in the van via the b pillar/b pillar cover or breaking out at the bottom and feeding it behind a kitchen unit for example.
Hi folks. I'm currently in the process of gathering parts to install the OEM ducting to my T6 (panel) as detailed in this thread but need to ID the correct part number for the 'B Pillar Trim Cover' if anybody could help?
In @DaveyB 's original post the Trim is listed as '7E0 867 292L 92W' however, when searching this number online, this seems to be a 'plain' grey trim with no openings for the vents or interior sensor button/switch? There is a myriad of options for this part with lots of subtle variations, but it's the version shown post #1 that I definately need, as the colour (light-grey/beige) matches my van interior.
Any help would be much appreciated... Cheers!
is this still available?Hi
Can anybody use this for cost of postage or want to collect it from Grimsby??
View attachment 82487
VW parts department.Where do people buy their parts for this from? I need the smaller 7E0 819 655 A part to complete this job! I've ran into the same problem as a few others and ordered the larger part as part of a "fits all T6's" kit
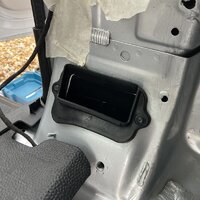
Could you confirm the b-pillar trim cover is, just wondering if the l stands for the left-hand side? ThanksSo, here goes; having received all of the necessary parts from @Pauly, today I have set about cutting the van paneling in order to install this ductwork so that when I go down to Propex Leisure at the end of March, they can connect their LPG heater to the OEM ductwork, rather than using an ugly old vent that comes up through the floor or out of the back of the drivers seat base.
This is going to take some time to write up and install all of the images, so please bear with me.
PARTS
This is a list of my parts, your's may be slightly different because of trim colour/ vehicle derivative etc, so check carefully with Pauly before hand.
View attachment 18304
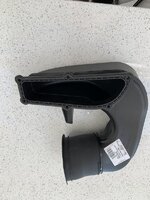
- Intake Duct - Step = 7E0 819 219
- Air Guide Channel = 7E0 819 381C
- Frame Air Guide = 7H0 819 475
- Air Guide B-Pillar = 7H0 819 655A
- B-Pillar Trim Cover = 7E0 867 292L 92W
- Warm Air Vent B-Pillar - Front = 7H0 819 209A
- Warm Air Vent B-Pillar - Rear = 7H0 819 383B
- Screws for front step duct = N90879402 (you'll require 6)
- Screws for B-pillar duct = N90739703 (you'll require 2)
- Cable ties = N0209022 (you'll need 2)
- Front Step with Vent Hole = 7H0 863 735F (No courtesy light) - @Pauly edit, i think this should be 7H0 863 736G 9B9 ?
Having installed it all, I believe I need to find a reducer coupling to drop the fittings down to the 60mm size required by Propex, but that will be an ebay search for an Eberspacher reducer.
- 7E0 867 292L 92W
I shouldn't think so - the heater is mounted on the right in all vehicles and the duct only goes up the right B-pillar. Possibly it is L for light beige or whichever colour it is. ( or maybe lower?)
Thank youI shouldn't think so - the heater is mounted on the right in all vehicles and the duct only goes up the right B-pillar. Possibly it is L for light beige or whichever colour it is. ( or maybe lower?)

Similar threads
- Replies
- 10
- Views
- 5K
- Locked
- Replies
- 5
- Views
- 4K
- Replies
- 27
- Views
- 8K
- Replies
- 51
- Views
- 14K

